Springboot 集成 MybatisPlus
MybatisPlus 使用
MybatisPlus 基于 mybatis开发,主要用于增强mybatis。该文档主要为MybatisPlus 与SpringBoot的集成配置以及一些常用用法,具体的内容请看MybatisPlus与mybatis 官网
一、MybatisPlus 与Springboot集成
1. 引入MybatisPlus 依赖,增加相关配置
1、 pom.xml中增加MybatisPlus依赖;
<!-- https://mvnrepository.com/artifact/com.baomidou/mybatis-plus-boot-starter -->
<dependency>
    <groupId>com.baomidou</groupId>
    <artifactId>mybatis-plus-boot-starter</artifactId>
    <version>3.5.0</version><!--修改为所需的版本号-->
</dependency>
2、 在application.properties中增加配置(此处只增加两个最关键的属性配置,其余属性配置可以查看类MybatisPlusProperties);
#注:配置mybatis xml文件位置 classpath 指代resources 或者java下
# maven 中的classpath :https://www.jianshu.com/p/62a4053ffd34
# https://segmentfault.com/a/1190000015802324
# * 代表通配符,此处与mybatis中的自动配置不相同。mybatis-plus springboot-starter中将自动配置注解的@ConfigurationProperties前缀由mybatis改为了mybatis-plus
# mybatis-plus  配置文件所在位置
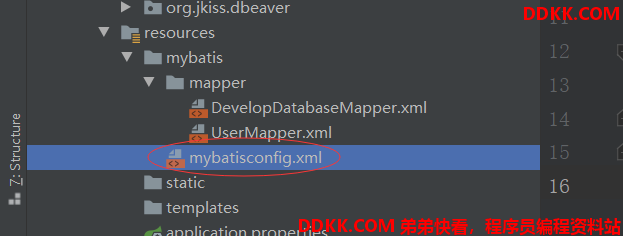
mybatis-plus.config-location=classpath:mybatis/mybatisconfig.xml
# mybatis-plus mapper 文件所在位置
mybatis-plus.mapper-locations=classpath:mybatis/mapper/*.xml
mybatis-plus springboot 自动配置:springboot启动时将会加载 MybatisPlusAutoConfiguration 类,创建类中配置的bean(相当于以前在xml中配置);如果自己想要增加额外配置,可以增加一个MybatisConfig配置类来进行个性化;自动配置和个性化配置并不冲突(不是增加了个性化配置类之后spring自动配置就不加载了,除非自动配置类的bean方法上标注了@ConditionalOnMissingBean,如果在个性化配置创建了该bean那么自动配置中将不在加载)。
在debug时也可以看到,springboot将会先加载个性化配置类(标注了@Configuration的类),再加载自动配置类。
spring中其他的starter自动配置类也是如此
3、 增加自定义配置类MybatisConfig(可选,用于增加新配置);
@Configuration
public class MybatisConfig {
    @Bean //个性化配置
    public ConfigurationCustomizer configurationCustomizer() {
        //return (org.apache.ibatis.session.Configuration configuration) -> configuration.setMapUnderscoreToCamelCase(true);
        return new ConfigurationCustomizer() {
            // 对应mybatisconfig.xml 中的 settings扩展点
            @Override
            public void customize(MybatisConfiguration configuration) {
                //开启驼峰命名
                configuration.setMapUnderscoreToCamelCase(true);
                configuration.setCacheEnabled(true);
            }
        };
    }
}
4、 在resources目录下增加mybatisconfig.xml配置文件(可选,用于后续增加配置);
<?xml version="1.0" encoding="UTF-8" ?>
<!DOCTYPE configuration
        PUBLIC "-//mybatis.org//DTD Config 3.0//EN"
        "http://mybatis.org/dtd/mybatis-3-config.dtd">
<!--mybatis 全局配置文件-->
<configuration>
    <settings>
        <!--开启驼峰命名-->
        <setting name="mapUnderscoreToCamelCase" value="true"/>
    </settings>
    <!--进行别名命名,自定义类型别名 这样就不需要写全限定名-->
    <typeAliases>
        <typeAlias type="com.epoint.restore.restore.dao.entity.User" alias="User"/>
    </typeAliases>
</configuration>
2、增加实体类、Mapper接口、Mapper xml文件
此处以user表为例
1、 增加实体类User与数据库中的user表相对应;
@Data
@TableName("user") //对应数据库中的user表
public class User implements Serializable {
    @TableId("user_id") //主键ID
    private Integer userId;
    @TableField("user_name") //字段注解 与表中字段名相对应
    private String userName;
    @TableField("password")
    private String password;
    @TableField("email")
    private String email;
    @TableField("register_time")
    private String registerTime; //直接将时间序列化为字符串
    @TableField(exist = false)   //表示该字段非数据库字段
    private StringBuilder stringBuilder=new StringBuilder();
}
2、 增加UserMapper接口,继承自BaseMapper接口,并将泛型标注为User类;
@Mapper //标注mapper注解
public interface UserMapper extends BaseMapper<User> {
  //根据ID查询用户 @Param 映射SQL中的字段,如@Param("username") 和{username} 相对应
  //你可以传递多个参数给一个映射器方法。在多个参数的情况下,默认它们将会以 param 加上它们在参数列表中的位置来命名,
  // 比如:#{param1}、#{param2}等。如果你想(在有多个参数时)自定义参数的名称,那么你可以在参数上使用      @Param("paramName") 注解。
  //该注解可自定义传入映射器的参数名称,例如此处@Param("user_id"),那么在mapper.xml中的参数名称则为#{user_id}
  User getUserById(@Param("user_id")Integer id);
}
3、 Springboot启动类上标注@MapperScan注解,标注Mapper接口位置;
@MapperScan("com.ysk.restore.restore.dao.mapper")
4、 在resources目录中增加对应的UserMapper.xml(该目录位置为appaction.properties的mybatis-plus.mapper-locations配置的值)文件;
<?xml version="1.0" encoding="UTF-8" ?>
<!DOCTYPE mapper
        PUBLIC "-//mybatis.org//DTD Mapper 3.0//EN"
        "http://mybatis.org/dtd/mybatis-3-mapper.dtd">
<!--mapper接口类对应的位置-->
<mapper namespace="com.ysk.restore.restore.dao.mapper.UserMapper">
    <!--id 为方法名,parameterType为参数类型,该属性可选。
     resultType 期望从这条语句中返回结果的类全限定名或别名。 注意,如果返回的是集合,那应该设置为集合包含的类型,而不是集合本身的类型。 resultType 和 resultMap 之间只能同时使用一个。 -->
    <!--在这些情况下,MyBatis 会在幕后自动创建一个 ResultMap,再根据属性名来映射列到 JavaBean 的属性上。如果列名和属性名不能匹配上,可以在 SELECT 语句中设置列别名(这是一个基本的 SQL 特性)来完成匹配。-->
    <!--例如:   select
    user_id             as "id",
    user_name           as "userName",
    hashed_password     as "hashedPassword"
  from some_table
  where id ={id} -->
 <select id="getUserById" resultType="User">
select * from user where user_id=#{user_id}
  </select>
 ]
] ]
]