一、前言
由于上文对称密钥涉及到的内容比较多,所以这一节的非对称密钥加密拆开成这一节单独讲解。
所以大家尽量先阅读完上一章的内容后再浏览这一章内容会更好。
二、使用通过JWT和非对称密钥签名的令牌
本节将实现OAuth2身份验证的一个示例,其中授权服务器和资源服务器会使用一个非对称密钥对来对令牌签名和验证令牌。有时只让授权服务器和资源服务器共享一个密钥的做法是不可行的。通常,如果授权服务器和资源服务器不是由同一组织开发的,就会发生这种情况。在这种情况下,就可以认为授权服务器不“信任:资源服务器,因此我们不希望授权服务器与资源服务器共享密钥。而且,使用对称密钥,资源服务器就拥有了过多的功能:不仅可以验证令牌,还可以对它们签名(这种情况示例见下图):
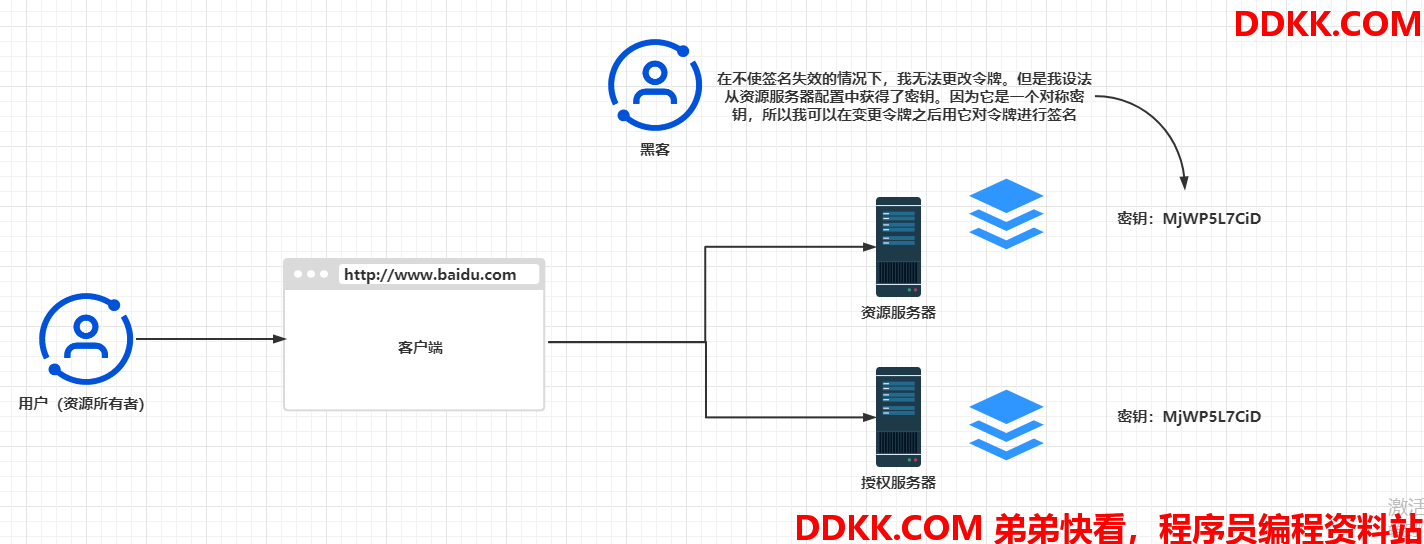
ps:对称密钥是私钥。有该密钥的人可以用它进入系统,所以请永远不要在不安全通道交换对称密钥。如果需要在系统之外共享密钥,它就不应该是对称的!
当我们不能在授权服务器和资源服务器之间认定一种可信的关系时,就要使用非对称密钥对。由于这个原因,我们就需要知道如何实现这样的系统。
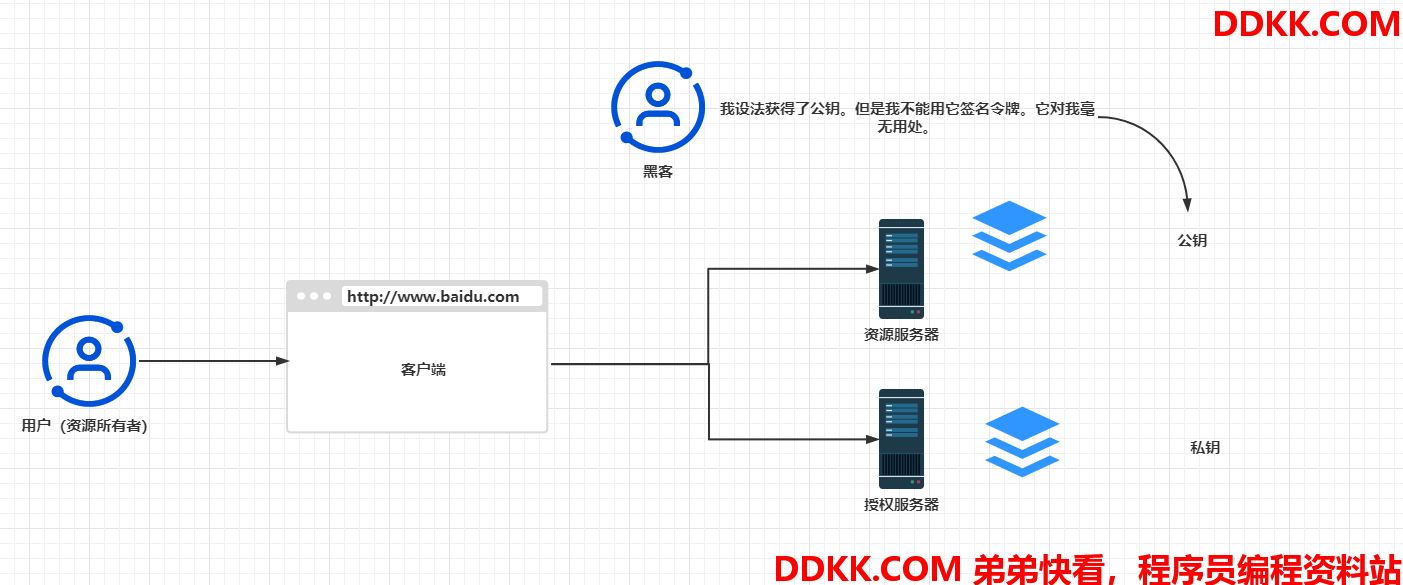
什么是非对称密钥对?它是如何工作的?这个概念很简单。非对称密钥对有两个密钥:一个称为私钥,另一个称为公钥。授权服务器将使用私钥对令牌进行签名,而其他人也只能使用私钥对令牌进行签名。

公钥与私钥是结合在一起的,这就是我们将其称为一对的原因。但是公钥只能用于验证签名。没有人可以使用公钥对令牌进行签名(见下图)
2.1、生成密钥对
本节将讲解如何生成一个非对称密钥对。这里需要一个密钥对用来配置后面实现的授权服务器和资源服务器。这是一个非对称密钥对(这意味着授权服务器使用它的私钥签署令牌,而资源服务器则使用公钥验证签名)。为了生成该密钥对,这里使用了keytool和OpenSSL,它们是两个简单易用的命令行工具。Java的JDK会安装keytool,所以我们的计算机一般都安装了它。而对于OpenSSL.则需要从官网处下载它。如果使用OpenSSL自带的Git Bash,则不需要单独安装它。有了工具之后,需要运行两个命令:
- 生成一个私钥
- 获取之前所生成私钥的公钥
2.1.1、生成一个私钥
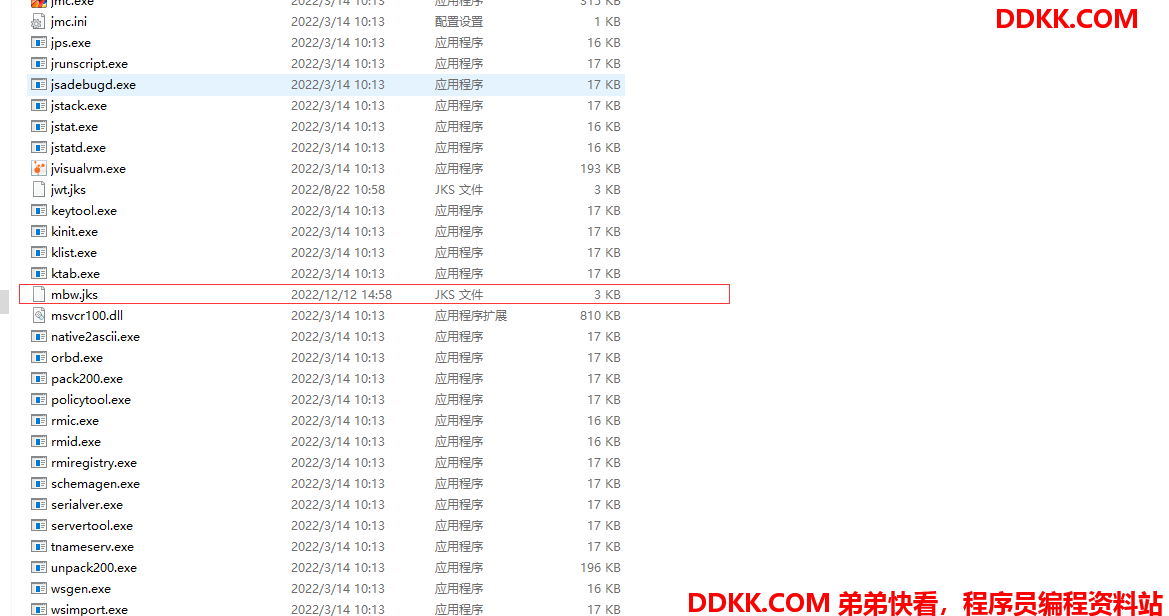
要生成私钥,可以运行下面代码片段中的keytool命令。它将在名为mbw.jks的文件中生成一个私钥。这里还是用了密码”mbw123"保护私钥,并且使用别名"mbw"为密钥指定一个名称。在下面的命令中,可以看到用来生成密钥的算法,即RSA。
keytool -genkeypair -alias mbw -keyalg RSA -keypass mbw123 -keystore mbw.jks -storepass mbw123
运行后,回答相关问题生成你的dn后输入y,在keytool.exe所在文件夹下就生成了mbw.jks文件:
2.1.2、获取公钥
要获取先前所生成私钥的公钥,可以运行这个keytool命令:
keytool -list -rfc --keystore mbw.jks | openssl x509 -inform pem -pubkey
在生成公钥时,系统会提示我们输入密码;这里使用的是mbw123.然后就可以在输出中找到公钥和证书。(对于本示例而言,只有密钥的值是必要的。)这个密钥应该类似于下面的代码片段:
-----BEGIN PUBLIC KEY-----
MIIBIjANBgkqhkiG9w0BAQEFAAOCAQ8AMIIBCgKCAQEAo7HHwNVxcW6iYwyzqbMt
awSkqiARgh6pz5eArBa1KzG3dCH8pupONozjD0G+PCAEu/hCwxEYglLHVLfcuQil
8b8rWuGXVZgA+VHohEEO5KHibKqazGpJGSDQkJG6VNnfuMasZ7DUeQpyyUI6RRkz
CSU7NuQAHHX5J9QEtrEAodv4Mpla1sKTraxMxjb3+BUtTFvW4iSr9fNJWyUsoxDs
6mOhRYEOUUiBl2P8USm7HK7M7rWy90BRG7hOFvKKjXiyM+d2uRN6ASOWVQ168ZcD
0iOdUeBF4sNowZWqWoY4DOiLp0bFRQIDkKuwxGvwrBRNA/K2J+HY0Jz2ULXhdGlU
iQIDAQAB
-----END PUBLIC KEY-----
就是这样!现在我们有了一个用于JWT签名的私钥和一个用于验证签名的公钥。接下来只需要在授权和资源服务器中配置它们即可。
2.1.3、实现使用私钥的授权服务器
本节要将授权服务器配置为使用私钥签名JWT。这里首先我们将之前的mbw.jks复制到应用程序的resources文件夹中。需要将密钥添加到resources文件夹中,因为直接从类路径读取它会更容易。但是,将其放入类路径中的做法并不是强制的。在application.yaml文件中,存储了文件名、密钥的别名,以及用于保护私钥而生成的密码。我们需要这些详细信息用来配置JwtTokenStore.下面代码片段展示了yaml文件中的内容:
password: mbw123
privateKey: mbw.jks
alias: mbw
与之前使用对称密钥相比,唯一更改的是JwtAccessTokenConverter对象的定义。这里仍然使用JwtTokenStore,我们仍将使用JwtAccessTokenConverter对象设置私钥。
import com.mbw.security.service.ClientDetailsServiceImpl;
import com.mbw.security.service.UserDetailsServiceImpl;
import com.mbw.security.token.JsonRedisTokenStore;
import com.mbw.security.token.enhancer.CustomTokenEnhancer;
import org.springframework.beans.factory.annotation.Autowired;
import org.springframework.beans.factory.annotation.Value;
import org.springframework.context.annotation.Bean;
import org.springframework.context.annotation.Configuration;
import org.springframework.core.io.ClassPathResource;
import org.springframework.security.authentication.AuthenticationManager;
import org.springframework.security.oauth2.config.annotation.configurers.ClientDetailsServiceConfigurer;
import org.springframework.security.oauth2.config.annotation.web.configuration.AuthorizationServerConfigurerAdapter;
import org.springframework.security.oauth2.config.annotation.web.configuration.EnableAuthorizationServer;
import org.springframework.security.oauth2.config.annotation.web.configurers.AuthorizationServerEndpointsConfigurer;
import org.springframework.security.oauth2.config.annotation.web.configurers.AuthorizationServerSecurityConfigurer;
import org.springframework.security.oauth2.provider.token.DefaultTokenServices;
import org.springframework.security.oauth2.provider.token.TokenEnhancer;
import org.springframework.security.oauth2.provider.token.TokenEnhancerChain;
import org.springframework.security.oauth2.provider.token.TokenStore;
import org.springframework.security.oauth2.provider.token.store.JwtAccessTokenConverter;
import org.springframework.security.oauth2.provider.token.store.JwtTokenStore;
import org.springframework.security.oauth2.provider.token.store.KeyStoreKeyFactory;
import java.util.ArrayList;
import java.util.List;
@Configuration
@EnableAuthorizationServer
public class AuthServerConfig extends AuthorizationServerConfigurerAdapter {
	@Autowired
	private AuthenticationManager authenticationManager;
	@Autowired
	private ClientDetailsServiceImpl clientDetailsServiceImpl;
	@Autowired
	private UserDetailsServiceImpl userDetailsServiceImpl;
	@Autowired
	private CustomTokenEnhancer customTokenEnhancer;
	@Autowired
	private JsonRedisTokenStore jsonRedisTokenStore;
	@Value("${jwt.key}")
	private String jwtKey;
	@Value("${privateKey}")
	private String privateKey;
	@Value("${password}")
	private String password;
	@Value("${alias}")
	private String alias;
	@Override
	public void configure(AuthorizationServerEndpointsConfigurer endpoints) throws Exception {
		endpoints.authenticationManager(authenticationManager)
				.userDetailsService(userDetailsServiceImpl)
				.tokenEnhancer(tokenEnhancerChain())
				.tokenStore(tokenStore());
		DefaultTokenServices tokenService = getTokenStore(endpoints);
		endpoints.tokenServices(tokenService);
	}
	@Bean
	public TokenEnhancerChain tokenEnhancerChain() {
		TokenEnhancerChain enhancerChain = new TokenEnhancerChain();
		List<TokenEnhancer> enhancers = new ArrayList<>();
		enhancers.add(jwtAccessTokenConverter());
		enhancers.add(customTokenEnhancer);
		enhancerChain.setTokenEnhancers(enhancers);//将自定义Enhancer加入EnhancerChain的delegates数组中
		return enhancerChain;
	}
	//配置TokenService参数
	private DefaultTokenServices getTokenStore(AuthorizationServerEndpointsConfigurer endpoints) {
		DefaultTokenServices tokenService = new DefaultTokenServices();
		tokenService.setTokenStore(endpoints.getTokenStore());
		tokenService.setSupportRefreshToken(true);
		tokenService.setClientDetailsService(endpoints.getClientDetailsService());
		tokenService.setTokenEnhancer(endpoints.getTokenEnhancer());
		//token有效期 1小时
		tokenService.setAccessTokenValiditySeconds(3600);
		//token刷新有效期 15天
		tokenService.setRefreshTokenValiditySeconds(3600 * 12 * 15);
		tokenService.setReuseRefreshToken(false);
		return tokenService;
	}
	@Override
	public void configure(ClientDetailsServiceConfigurer clients) throws Exception {
		clients.withClientDetails(clientDetailsServiceImpl);
	}
	/**
	 * 解决访问/oauth/check_token 403的问题
	 *
	 * @param security
	 * @throws Exception
	 */
	@Override
	public void configure(AuthorizationServerSecurityConfigurer security) throws Exception {
		// 允许表单认证
		security
				.tokenKeyAccess("permitAll()")
				.checkTokenAccess("permitAll()")
				.allowFormAuthenticationForClients();
	}
	@Bean
	public TokenStore tokenStore() {
		return new JwtTokenStore(jwtAccessTokenConverter());
	}
	@Bean
	public JwtAccessTokenConverter jwtAccessTokenConverter() {
		JwtAccessTokenConverter jwtAccessTokenConverter = new JwtAccessTokenConverter();
		KeyStoreKeyFactory keyStoreKeyFactory = new KeyStoreKeyFactory(new ClassPathResource(privateKey), password.toCharArray());
		jwtAccessTokenConverter.setKeyPair(keyStoreKeyFactory.getKeyPair(alias));
		return jwtAccessTokenConverter;
	}
}
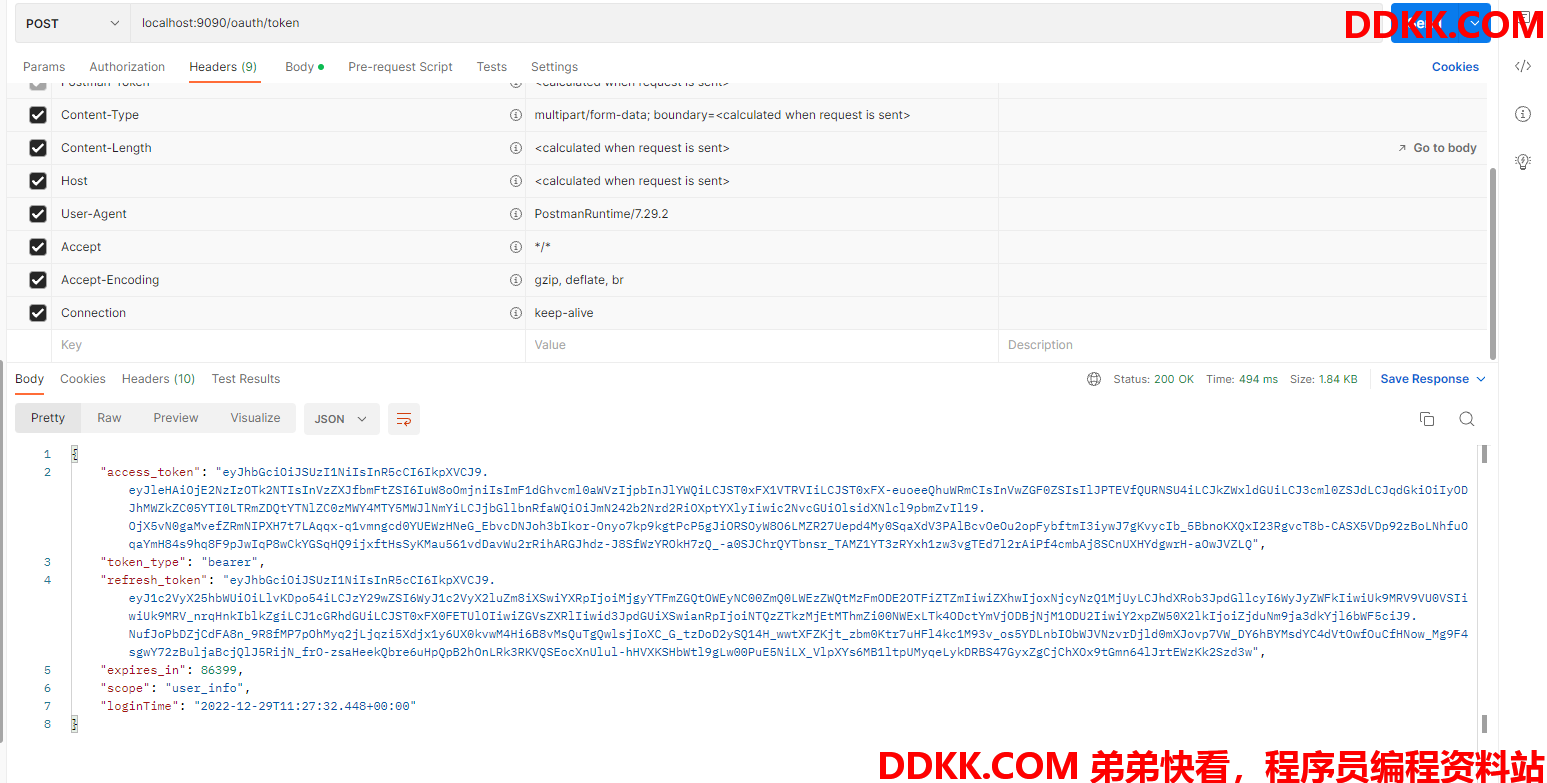
现在可以启动该授权服务器并调用/oauth/token端点来生成一个新的访问令牌。当然,这里只是创建了一个普通的JWT,但是现在的区别是,要验证它的签名,需要使用密钥对中的公钥。
如果遇到启动报错说找不到jks文件的,把idea关了重启就好了,我idea2019.3是这样处理成功的,下面是postman的运行截图:
然后若现在我们使用这个token去请求资源服务器,肯定会失败的:
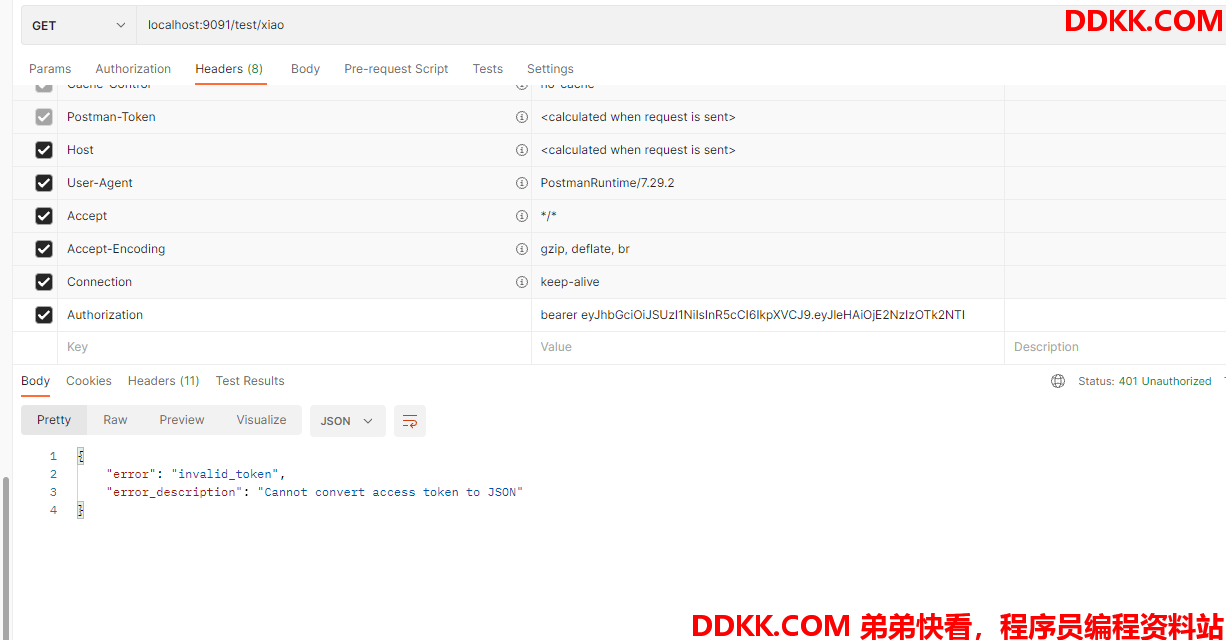
所以我们现在要去资源服务器配置公钥,在配置公钥之前,我们先把授权服务器的这行代码删除
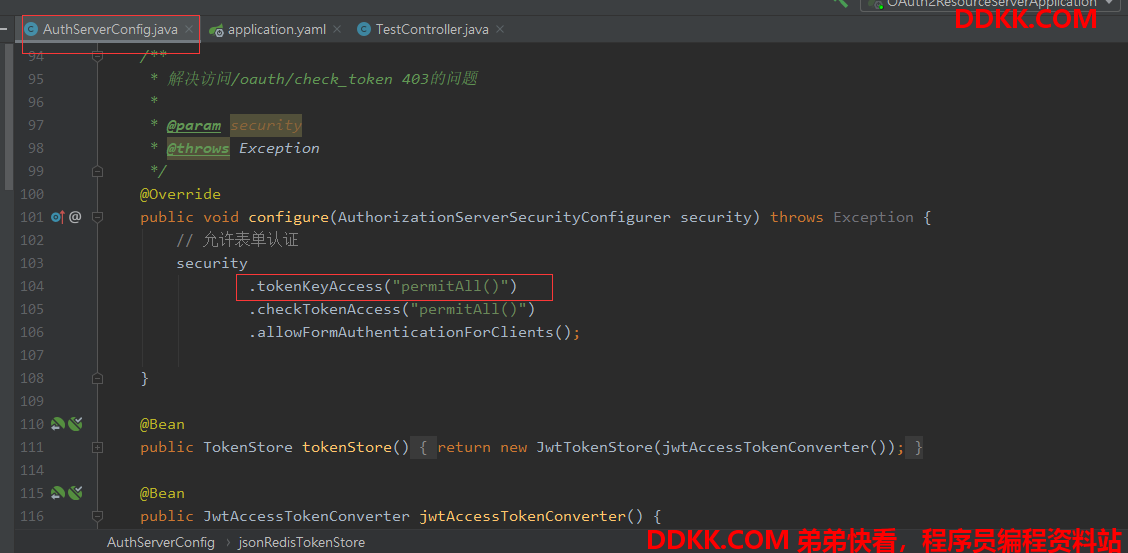
原因之后会讲到。
首先在yaml文件配置公钥:
jwt:
  key: MjWP5L7CiD
  publicKey: -----BEGIN PUBLIC KEY-----MIIBIjANBgkqhkiG9w0BAQEFAAOCAQ8AMIIBCgKCAQEAo7HHwNVxcW6iYwyzqbMtawSkqiARgh6pz5eArBa1KzG3dCH8pupONozjD0G+PCAEu/hCwxEYglLHVLfcuQil8b8rWuGXVZgA+VHohEEO5KHibKqazGpJGSDQkJG6VNnfuMasZ7DUeQpyyUI6RRkzCSU7NuQAHHX5J9QEtrEAodv4Mpla1sKTraxMxjb3+BUtTFvW4iSr9fNJWyUsoxDs6mOhRYEOUUiBl2P8USm7HK7M7rWy90BRG7hOFvKKjXiyM+d2uRN6ASOWVQ168ZcD0iOdUeBF4sNowZWqWoY4DOiLp0bFRQIDkKuwxGvwrBRNA/K2J+HY0Jz2ULXhdGlUiQIDAQAB-----END PUBLIC KEY-----
然后在资源服务器这块儿对公钥进行配置:
import org.springframework.beans.factory.annotation.Value;
import org.springframework.context.annotation.Bean;
import org.springframework.context.annotation.Configuration;
import org.springframework.security.config.annotation.web.builders.HttpSecurity;
import org.springframework.security.oauth2.config.annotation.web.configuration.EnableResourceServer;
import org.springframework.security.oauth2.config.annotation.web.configuration.ResourceServerConfigurerAdapter;
import org.springframework.security.oauth2.config.annotation.web.configurers.ResourceServerSecurityConfigurer;
import org.springframework.security.oauth2.provider.token.TokenStore;
import org.springframework.security.oauth2.provider.token.store.JwtAccessTokenConverter;
import org.springframework.security.oauth2.provider.token.store.JwtTokenStore;
import javax.servlet.http.HttpServletResponse;
@Configuration
@EnableResourceServer
public class ResourceServerConfig extends ResourceServerConfigurerAdapter {
	@Value("${jwt.publicKey}")
	private String publicKey;
	@Override
	public void configure(ResourceServerSecurityConfigurer resources) throws Exception {
		resources.tokenStore(tokenStore());
	}
	@Override
	public void configure(HttpSecurity http) throws Exception {
		http
				.csrf().disable()
				.exceptionHandling()
				.authenticationEntryPoint((request, response, authException) -> response.sendError(HttpServletResponse.SC_UNAUTHORIZED))
				.and()
				.authorizeRequests()
				.antMatchers("/test/**").authenticated()
				.and()
				.httpBasic();
	}
	@Bean
	public TokenStore tokenStore(){
		return new JwtTokenStore(jwtAccessTokenConverter());
	}
	@Bean
	public JwtAccessTokenConverter jwtAccessTokenConverter(){
		JwtAccessTokenConverter jwtAccessTokenConverter = new JwtAccessTokenConverter();
		jwtAccessTokenConverter.setVerifierKey(publicKey);
		return jwtAccessTokenConverter;
	}
}
然后启动资源服务器测试被保护的资源:
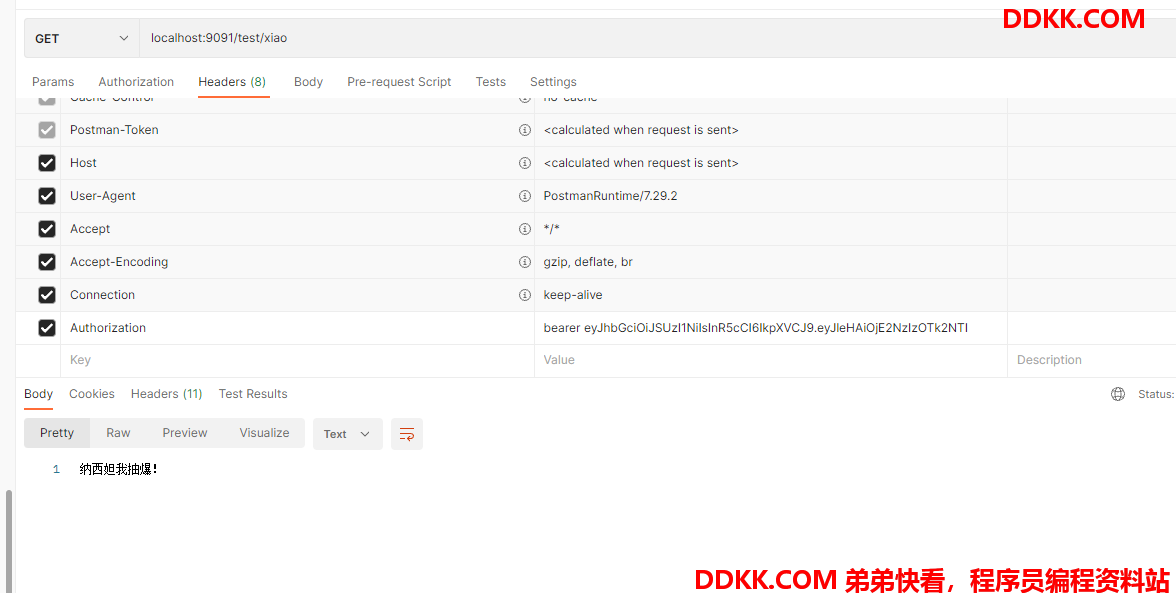
2.2、使用一个暴露公钥的端点
本节将讨论一种让资源服务器获知公钥的方法–用授权服务器暴露公钥。还记得我们上一节将授权服务器删掉的那一行代码吗,这不就来了?在上一节中,我们使用了公私密钥对来对令牌进行签名和验证。其中在资源服务器配置了公钥。资源服务器使用公钥验证JWT。但是,如果想更改密钥时,会发生什么情况呢》最好不要永远保持同一份密钥对,这就是本节要实现的内容。随着时间的推移,应该定期旋转密钥!这将使得系统不容易受到密钥失窃的影响。
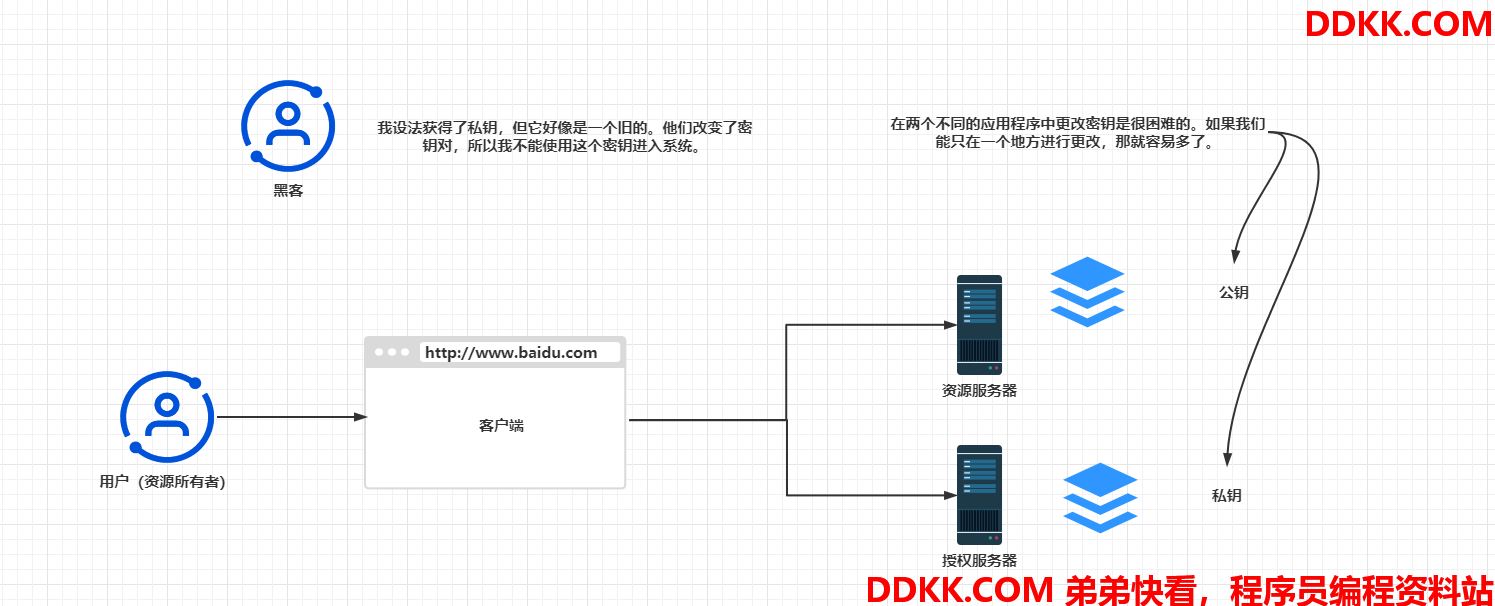
到目前为止,我们已经在授权服务器端配置了私钥,在资源服务器配置了公钥。而将密钥设置在两个地方使得密钥更难管理。不过如果只在一端配置它们,则可以更容易地管理键。解决方案是将整个密钥对迁至授权服务器端,并允许授权服务器使用端点暴露公钥。

那么下面就进入开发
对于授权服务器,我们保持和之前一样的配置即可,只需要能确保能够访问端点即可,也就是暴露公钥。的确,Spring Boot已经配置了这样的端点,但也只是这样而已。默认情况下,对该端点的所有请求都会被拒绝。我们需要重写该端点的配置,并允许任何具有客户端凭据的人访问它。代码如下:
import com.mbw.security.service.ClientDetailsServiceImpl;
import com.mbw.security.service.UserDetailsServiceImpl;
import com.mbw.security.token.JsonRedisTokenStore;
import com.mbw.security.token.enhancer.CustomTokenEnhancer;
import org.springframework.beans.factory.annotation.Autowired;
import org.springframework.beans.factory.annotation.Value;
import org.springframework.context.annotation.Bean;
import org.springframework.context.annotation.Configuration;
import org.springframework.core.io.ClassPathResource;
import org.springframework.security.authentication.AuthenticationManager;
import org.springframework.security.oauth2.config.annotation.configurers.ClientDetailsServiceConfigurer;
import org.springframework.security.oauth2.config.annotation.web.configuration.AuthorizationServerConfigurerAdapter;
import org.springframework.security.oauth2.config.annotation.web.configuration.EnableAuthorizationServer;
import org.springframework.security.oauth2.config.annotation.web.configurers.AuthorizationServerEndpointsConfigurer;
import org.springframework.security.oauth2.config.annotation.web.configurers.AuthorizationServerSecurityConfigurer;
import org.springframework.security.oauth2.provider.token.DefaultTokenServices;
import org.springframework.security.oauth2.provider.token.TokenEnhancer;
import org.springframework.security.oauth2.provider.token.TokenEnhancerChain;
import org.springframework.security.oauth2.provider.token.TokenStore;
import org.springframework.security.oauth2.provider.token.store.JwtAccessTokenConverter;
import org.springframework.security.oauth2.provider.token.store.JwtTokenStore;
import org.springframework.security.oauth2.provider.token.store.KeyStoreKeyFactory;
import java.util.ArrayList;
import java.util.List;
@Configuration
@EnableAuthorizationServer
public class AuthServerConfig extends AuthorizationServerConfigurerAdapter {
	@Autowired
	private AuthenticationManager authenticationManager;
	@Autowired
	private ClientDetailsServiceImpl clientDetailsServiceImpl;
	@Autowired
	private UserDetailsServiceImpl userDetailsServiceImpl;
	@Autowired
	private CustomTokenEnhancer customTokenEnhancer;
	@Autowired
	private JsonRedisTokenStore jsonRedisTokenStore;
	@Value("${jwt.privateKey}")
	private String privateKey;
	@Value("${jwt.password}")
	private String password;
	@Value("${jwt.alias}")
	private String alias;
	@Override
	public void configure(AuthorizationServerEndpointsConfigurer endpoints) throws Exception {
		endpoints.authenticationManager(authenticationManager)
				.userDetailsService(userDetailsServiceImpl)
				.tokenEnhancer(tokenEnhancerChain())
				.tokenStore(tokenStore());
		DefaultTokenServices tokenService = getTokenStore(endpoints);
		endpoints.tokenServices(tokenService);
	}
	@Bean
	public TokenEnhancerChain tokenEnhancerChain() {
		TokenEnhancerChain enhancerChain = new TokenEnhancerChain();
		List<TokenEnhancer> enhancers = new ArrayList<>();
		enhancers.add(jwtAccessTokenConverter());
		enhancers.add(customTokenEnhancer);
		enhancerChain.setTokenEnhancers(enhancers);//将自定义Enhancer加入EnhancerChain的delegates数组中
		return enhancerChain;
	}
	//配置TokenService参数
	private DefaultTokenServices getTokenStore(AuthorizationServerEndpointsConfigurer endpoints) {
		DefaultTokenServices tokenService = new DefaultTokenServices();
		tokenService.setTokenStore(endpoints.getTokenStore());
		tokenService.setSupportRefreshToken(true);
		tokenService.setClientDetailsService(endpoints.getClientDetailsService());
		tokenService.setTokenEnhancer(endpoints.getTokenEnhancer());
		//token有效期 1小时
		tokenService.setAccessTokenValiditySeconds(3600);
		//token刷新有效期 15天
		tokenService.setRefreshTokenValiditySeconds(3600 * 12 * 15);
		tokenService.setReuseRefreshToken(false);
		return tokenService;
	}
	@Override
	public void configure(ClientDetailsServiceConfigurer clients) throws Exception {
		clients.withClientDetails(clientDetailsServiceImpl);
	}
	/**
	 * 解决访问/oauth/check_token 403的问题
	 *
	 * @param security
	 * @throws Exception
	 */
	@Override
	public void configure(AuthorizationServerSecurityConfigurer security) throws Exception {
		// 允许表单认证
		security
				.tokenKeyAccess("isAuthenticated()")
				.checkTokenAccess("permitAll()")
				.allowFormAuthenticationForClients();
	}
	@Bean
	public TokenStore tokenStore() {
		return new JwtTokenStore(jwtAccessTokenConverter());
	}
	@Bean
	public JwtAccessTokenConverter jwtAccessTokenConverter() {
		JwtAccessTokenConverter jwtAccessTokenConverter = new JwtAccessTokenConverter();
		KeyStoreKeyFactory keyStoreKeyFactory = new KeyStoreKeyFactory(new ClassPathResource(privateKey), password.toCharArray());
		jwtAccessTokenConverter.setKeyPair(keyStoreKeyFactory.getKeyPair(alias));
		return jwtAccessTokenConverter;
	}
}
现在可以启动该授权服务器并调用/oauth/token_key端点来确保正确实现了配置。下面postman展示了其调用,我们需要使用Basic Auth输入资源服务器曾经注册的账号进行认证:
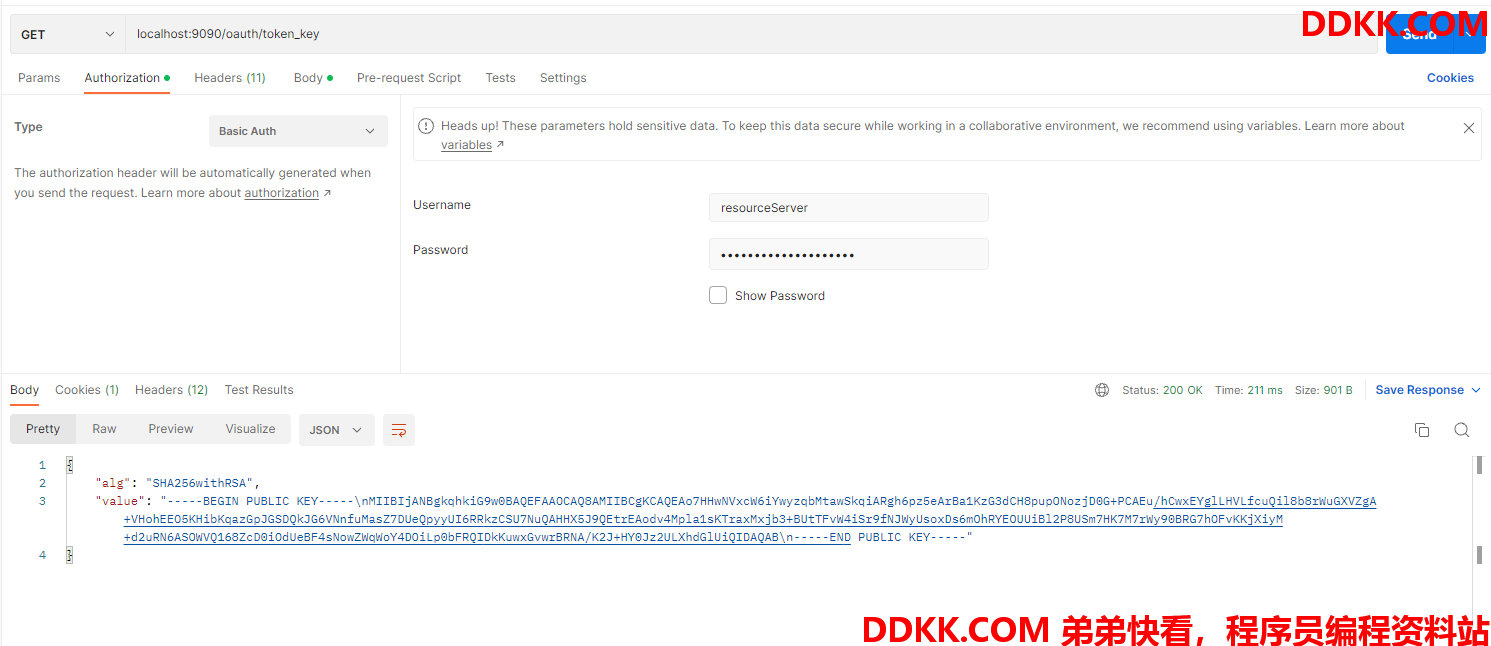
为了让资源服务器可以使用此端点并获得公钥,只需要在其属性文件中配置该端点和凭据即可。下面的配置代码展示了资源服务器的yaml新增配置:
server:
  port: 9091
spring:
  datasource:
    driver-class-name: com.mysql.jdbc.Driver
    username: root
    password: 123456
    url: jdbc:mysql://127.0.0.1:3306/spring_security?useUnicode=true&characterEncoding=UTF-8&useSSL=false&allowPublicKeyRetrieval=true&serverTimezone=Asia/Shanghai&nullCatalogMeansCurrent=true
    initialization-mode: always
  redis配置
  redis:
    host: 127.0.0.1
    password: 123456
    port: 6379
jwt:
  key: MjWP5L7CiD
security:
  oauth2:
    resource:
      jwt:
        key-uri: http://localhost:9090/oauth/token_key
    client:
      client-id: resourceServer
      client-secret: resourceServerSecret
因为资源服务器现在从授权服务器的/oauth/token_key端点获取公钥,所以不需要在资源服务器配置类中配置它。资源服务器只需要配置保护的资源即可,如下面代码片段所示:
import org.springframework.context.annotation.Configuration;
import org.springframework.security.config.annotation.web.builders.HttpSecurity;
import org.springframework.security.oauth2.config.annotation.web.configuration.EnableResourceServer;
import org.springframework.security.oauth2.config.annotation.web.configuration.ResourceServerConfigurerAdapter;
import javax.servlet.http.HttpServletResponse;
@Configuration
@EnableResourceServer
public class ResourceServerConfig extends ResourceServerConfigurerAdapter {
	@Override
	public void configure(HttpSecurity http) throws Exception {
		http
				.csrf().disable()
				.exceptionHandling()
				.authenticationEntryPoint((request, response, authException) -> response.sendError(HttpServletResponse.SC_UNAUTHORIZED))
				.and()
				.authorizeRequests()
				.antMatchers("/test/**").authenticated()
				.and()
				.httpBasic();
	}
}
现在启动资源服务器,带着令牌访问被保护资源:
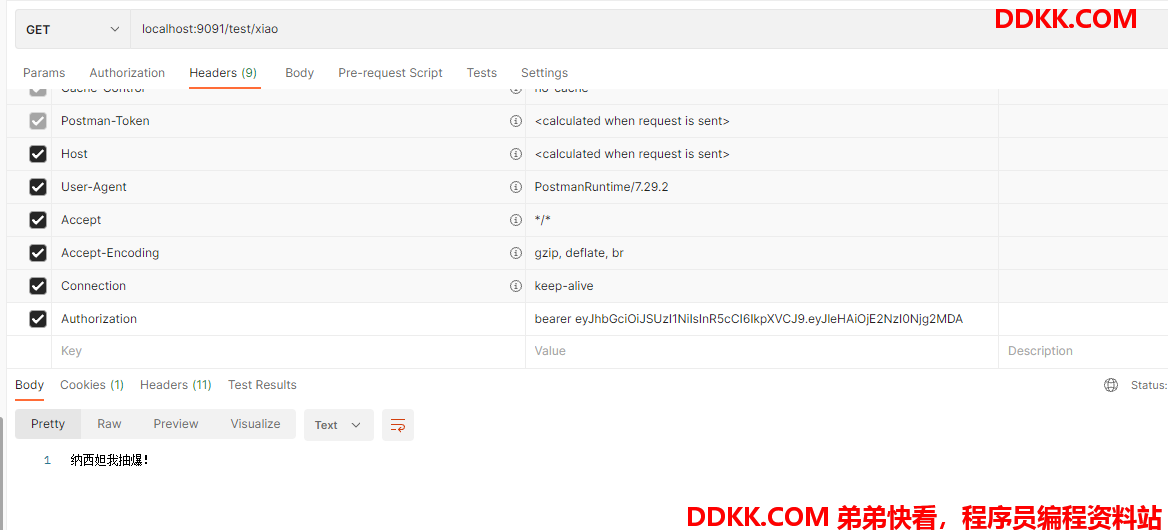
至此,Spring Security的主要学习内容就告一段落,非常感谢大家支持!
如果有感兴趣的小伙伴想要项目,可以参考我的gitee中的OAuth2的项目,也是我自己学习一路开发过来的,我也希望大家能够指出我文章中的错误或是解决我文章中的提出的疑问,因为笔者自己本身仍然很菜,后面会慢慢深层学习。最后,再次表示感谢,希望大家能够继续支持我后面的elasticSearch。