1.安装 MySQL
- 传送门
- 已安装
主库:192.168.70.148
从库:192.168.70.149
2.Master[主库]配置
2.1 修改 Master 配置文件
- 路径:/etc/my.cnf
- 命令:vim /etc/my.cnf
2.2 server_id
- 本环境中 server_id 是 1
- MySQL 服务唯一标识
- 配置要求:
server_id 任意配置,只要是数字即可
server_id Master 唯一标识数字必须小于 Slave 唯一标识数字.
2.3 log_bin
- 本环境中 log_bin 值 : master_log
- 开启日志功能以及日志文件命名,log_bin=master_log
- 变量的值就是日志文件名称.是日志文件名称的主体.
- MySQL 数据库自动增加文件名后缀和文件类型.
2.4 重启 MySQL
- service mysqld restart
2.5 配置 Master
2.5.1 访问 MySQL
- mysql -uusername -ppassword
2.5.2 创建用户
- 在 MySQL 数据库中,为不存在的用户授权,就是同步创建用户并授权
- 此用户是从库访问主库使用的用户
- ip 地址不能写为%. 因为主从备份中,当前创建的用户,是给从库 Slave 访问主库 Master 使用的.用户必须有指定的访问地址.不能是通用地址.
grant all privileges on *.* to ‘username’@’ip’ identified by ‘password’ with grant option;
flush privileges;
grant all privileges on *.* to 'myslave'@'192.168.70.149' identified by 'myslave' with grant option;
flush privileges;
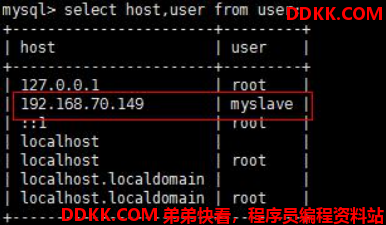
2.5.3 查看用户
- use mysql;
- select host, name from user;

2.5.4 查看 Master 信息
- show master status;

2.5.5 关闭防火墙或在防火墙中开放 3306 端口
- 1.永久性生效,重du启后不会复原zhi
开启:dao chkconfig iptables on
关闭: chkconfig iptables off - 2.即时生效,重启后复原
开启: service iptables start
关闭: service iptables stop - 需要说明的是对于Linux下的其它服务都可以用以上命令执行开启和关闭操作。
在当开启了防火墙时,做如下设置,开启相关端口,
修改/etc/sysconfig/iptables 文件,添加以下内容:
-A RH-Firewall-1-INPUT -m state --state NEW -m tcp -p tcp --dport 80 -j ACCEPT
-A RH-Firewall-1-INPUT -m state --state NEW -m tcp -p tcp --dport 22 -j ACCEPT
3.Slave[从库]配置
3.1 修改 Slave 配置文件
- /etc/my.cnf
3.2 server_id
- 唯一标识, 本环境中配置为 : 2
3.3 重启 MySQL 服务
service mysqld restart
3.4 配置 Slave
3.4.1 访问 mysql
- mysql -uusername -ppassword
3.4.2 停止 Slave 功能
- stop slave
3.4.3 配置主库信息
- 需要修改的数据是依据 Master 信息修改的. ip 是 Master 所在物理机 IP. 用户名和密码是 Master 提供的 Slave 访问用户名和密码. 日志文件是在 Master 中查看的主库信息提供的.在 Master 中使用命令 show master status 查看日志文件名称.
change master to master_host=’ip’, master_user=’username’, master_password=’password’, master_log_file=’log_file_name’;
change master to master_host='192.168.70.148',master_user='myslave',master_password='myslave',master_log_file='master_log.000001';
3.4.4 启动 Slave 功能
- start slave;
3.4.5 查看 Slave 配置
- show slave status \G;
mysql> show slave status \G;
*************************** 1. row ***************************
Slave_IO_State: Waiting for master to send event
Master_Host: 192.168.70.148
Master_User: myslave
Master_Port: 3306
Connect_Retry: 60
Master_Log_File: master-log.000001
Read_Master_Log_Pos: 427
Relay_Log_File: mysqld-relay-bin.000002
Relay_Log_Pos: 591
Relay_Master_Log_File: master-log.000001
Slave_IO_Running: Yes
Slave_SQL_Running: Yes
Replicate_Do_DB:
Replicate_Ignore_DB:
Replicate_Do_Table:
Replicate_Ignore_Table:
Replicate_Wild_Do_Table:
Replicate_Wild_Ignore_Table:
Last_Errno: 0
Last_Error:
Skip_Counter: 0
Exec_Master_Log_Pos: 427
Relay_Log_Space: 765
Until_Condition: None
Until_Log_File:
Until_Log_Pos: 0
Master_SSL_Allowed: No
Master_SSL_CA_File:
Master_SSL_CA_Path:
Master_SSL_Cert:
Master_SSL_Cipher:
Master_SSL_Key:
Seconds_Behind_Master: 0
Master_SSL_Verify_Server_Cert: No
Last_IO_Errno: 0 最后一次错误的 IO 请求编号
Last_IO_Error:
Last_SQL_Errno: 0 最后一次错误的执行 SQL 命令编号.
Last_SQL_Error:
Replicate_Ignore_Server_Ids:
Master_Server_Id: 1
Master_UUID: 9ee988ac-8751-11e7-8a95-000c2953ac06
Master_Info_File: /var/lib/mysql/master.info
SQL_Delay: 0
SQL_Remaining_Delay: NULL
Slave_SQL_Running_State: Slave has read all relay log; waiting for the slave I/O thread to update it
Master_Retry_Count: 86400
Master_Bind:
Last_IO_Error_Timestamp:
Last_SQL_Error_Timestamp:
Master_SSL_Crl:
Master_SSL_Crlpath:
Retrieved_Gtid_Set:
Executed_Gtid_Set:
Auto_Position: 0
1 row in set (0.00 sec)
4.测试主从
- 新建库
create database demo1 default character set utf8;
- 新建表
CREATE TABLE t_users (
id int(11) NOT NULL,
name varchar(30) DEFAULT NULL,
PRIMARY KEY (id)
) ENGINE=InnoDB DEFAULT CHARSET=utf8;
-
添加数据
insert into users values(1,‘admin’)