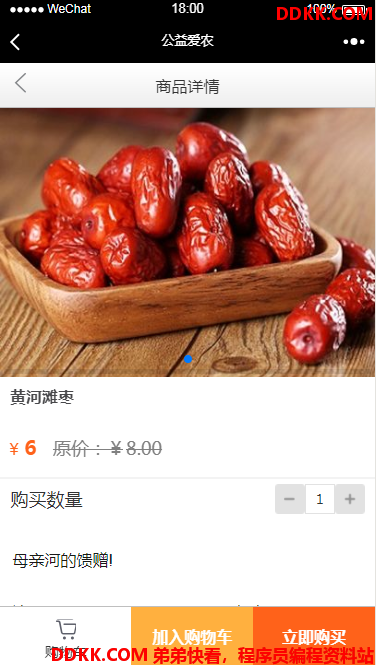
当用户在商品列表页中点击时,就会跳转到该页面。
步骤如下:
1. 新增路由
向src/router/index.js中增加:
import GoodsDetails from '@/views/shops/goods_details'
Vue.use(Router)
export default new Router({
  routes: [
    {
      path: '/shops/goods_details',
      name: 'GoodsDetails',
      component: GoodsDetails
    },
  ]
})
2. 新增vue页面
向src/views/shops/goods_details 中增加:
<template>
  <div class="background">
    <div class="goods_detail" style="height: 100%;">
      <header class="top_bar">
        <a onclick="window.history.go(-1)" class="icon_back"></a>
        <h3 class="cartname">商品详情</h3>
      </header>
      <div class="tast_list_bd" style="padding-top: 44px;">
        <main class="detail_box">
        <!-- 轮播图 -->
        <div class="home_ban">
          <div class="m_banner clearfix" id="my_banner">
            <ul class="banner_box" >
              <div v-for="image in good_images">
                <li><img :src="image" alt="" style="height: 300px"/></li>
              </div>
            </ul>
            <ul class="point_box" >
              <li></li>
            </ul>
          </div>
        </div>
        <section class="product_info clearfix">
          <div class="product_left">
            <p class="p_name">{{good.name}}</p>
            <div class="product_pric">
              <span>¥</span>
              <span class="rel_price">{{good.price}}</span>
              <span></span>
              <span style='color: grey;
              text-decoration: line-through;
              font-size: 18px;
              margin-left: 14px;'>
                原价: ¥{{good.original_price}}
              </span>
            </div>
            <!--
            <div class="product_right">
              降价通知
            </div>
            -->
          </div>
        </section>
        <span class="divider" style="height: 2px;"></span>
        <div id="choose_number" style= "height: 40px; background-color: #fff;">
          <label style="font-size: 18px; float: left; margin-left: 10.5px; margin-top: 7.5px;">购买数量</label>
          <div style= "padding-top: 5px;">
            <img src="../../assets/add@2x.png" style="margin-right: 10px; display: inline;float:right;width:30px;" class="plus" @click="plus"/>
            <input pattern="[0-9]*" v-model="buy_count" type="text" name="counts" style="width:30px;display: inline;float:right;border: 0.5px solid #e2e2e2;line-height:28px;text-align:center;"/>
            <img src="../../assets/minus@2x.png" style="display: inline;float:right;width:30px;" class="minus" @click="minus"/>
          </div>
        </div>
        <section class="product_intro">
          <div class="pro_det" v-html="good.description" style='padding: 0 6.5px;'>
          </div>
        </section>
        </main>
      </div>
    <footer class="cart_d_footer">
      <div class="m">
        <ul class="m_box">
          <li class="m_item">
            <a @click="toCart" class="m_item_link">
              <em class="m_item_pic three"></em>
              <span class="m_item_name">购物车</span>
            </a>
          </li>
        </ul>
        <div class="btn_box clearfix" >
          <a @click="addToCart" class="buy_now">加入购物车</a>
          <a @click="zhifu" class="buybuy">立即购买</a>
        </div>
      </div>
    </footer>
    </div>
  </div>
</template>
<script>
import { go } from '../../libs/router'
//import { swiper, swiperSlide } from 'vue-awesome-swiper'
import {scrollPic} from '../../libs/index.js'
   export default{
        data(){
            return {
                good_images: [],
                good: "",
                buy_count: 1,
                good_id: this.$route.query.good_id,
            }
        },
        watch:{
        },
        mounted(){
          scrollPic();   //轮播图
          this.$http.get(this.$configs.api + 'goods/goods_details?good_id=' + this.good_id).then((response)=>{
            console.info(this.good_id)
            console.info(response.body)
            this.good = response.body.good
            this.good_images = response.body.good_images
          },(error) => {
            console.error(error)
          });
        },
        methods:{
          addToCart () {
            alert("商品已经加入到了购物车")
            let goods = {
              id: this.good_id,
              title: this.good.name,
              quantity: this.buy_count,
              price: this.good.price,
              image: this.good_images[0]
            }
            this.$store.dispatch('addToCart', goods)
          },
          toCart () {
            go("/cart", this.$router)
          },
          plus () {
            this.buy_count = this.buy_count + 1
          },
          minus () {
            if(this.buy_count > 1) {
              this.buy_count = this.buy_count - 1
            }
          },
          zhifu () {
            go("/shops/dingdanzhifu?good_id=" + this.good_id + "&buy_count=" + this.buy_count, this.$router)
          },
        },
        components: {
        },
                computed: {
                }
    }
</script>
在上面的代码中,
1、 实现了加入购物车的方法;
2、 实现了对于支付页面的跳转;
3、 实现了从远程接口读取数据;
3. 添加物品到购物车
下面的代码是把某个商品添加到购物车中:
addToCart () {
    console.info('加入购物车')
    alert("商品已经加入到了购物车")
    let goods = {
        id: this.good_id,
        title: this.good.name,
        quantity: this.buy_count,
        price: this.good.price,
        image: this.good_images[0]
    }
    this.$store.dispatch('addToCart', goods)
},
同时,在 src/vuex/actions.js中,添加如下代码:
export const addToCart = ({ commit }, product) => {
    commit(types.ADD_TO_CART, {
      id: parseInt(product.id),
      image: product.image,
      title: product.title,
      quantity: product.quantity,
      price: product.price
    })
}
看效果

总结
- 购物车使用了Vuex来保存数据。 下一节会详述。
- 进入到支付页面,在后面会详述。 这个页面我们只加上一个链接就好了
- 本页面使用了后台提供的接口,会返回必要的数据。 接口结构略。
版权声明:「DDKK.COM 弟弟快看,程序员编程资料站」本站文章,版权归原作者所有