一、概述
前面一篇文章,我们已经总结了Shiro相关的一些概念以及架构知识,相信小伙伴们对Shiro安全框架都有了一定的认识。本篇文章我们将通过示例详细说明在日常工作中常见的-----用户身份认证功能。
什么是身份认证呢,简单理解,就是在应用中谁能证明他就是他本人。一般提供如他们的身份 ID 一些标识信息来表明他就是他本人,如提供身份证,用户名 / 密码来证明。
在shiro 中,用户需要提供 principals (身份)和 credentials(证明)给 shiro,从而应用能验证用户身份:
1、 principals:身份,即主体的标识属性,可以是任何东西,如用户名、邮箱等,唯一即可。一个主体可以有多个 principals,但只有一个 Primary principals,一般是用户名 / 密码 / 手机号。
2、 credentials:证明 / 凭证,即只有主体知道的安全值,如密码 / 数字证书等。
最常见的 principals 和 credentials 组合就是用户名 / 密码。
接下来,我们以SpringBoot为基础,通过整合Shiro来实现用户身份认证功能。
二、身份认证流程
在Spring Boot中集成Shiro进行用户的认证过程主要有以下三点:
1、 定义一个ShiroConfig,然后配置SecurityManager,SecurityManager是Shiro的安全管理器,管理着所有Subject;
2、 在ShiroConfig中配置ShiroFilterFactoryBean,其为Shiro过滤器工厂类,依赖于SecurityManager;
3、 自定义Realm实现;
接下来,我们创建一个SpringBoot项目:【springboot-shiro】,整体项目结构如下图所示:

前提:我们先创建一个 数据库shiro,然后创建一张用户表user并初始化一条用户信息,表sql如下:
CREATE TABLE user (
  id varchar(32) COLLATE utf8_bin NOT NULL COMMENT '用户id',
  username varchar(64) COLLATE utf8_bin NOT NULL COMMENT '用户名',
  password varchar(32) COLLATE utf8_bin NOT NULL COMMENT '用户密码',
  status char(1) COLLATE utf8_bin DEFAULT '1' COMMENT '用户状态',
  PRIMARY KEY (id) USING BTREE
) ENGINE=InnoDB DEFAULT CHARSET=utf8 COLLATE=utf8_bin ROW_FORMAT=COMPACT
并初始化一条用户信息:
INSERT INTO user VALUES ('1', 'admin', '123456', '1');
【a】引入一些相关的依赖:mysql、mybatis、thymeleaf、shiro等。具体pom.xml如下:
<?xml version="1.0" encoding="UTF-8"?>
<project xmlns="http://maven.apache.org/POM/4.0.0" xmlns:xsi="http://www.w3.org/2001/XMLSchema-instance"
         xsi:schemaLocation="http://maven.apache.org/POM/4.0.0 https://maven.apache.org/xsd/maven-4.0.0.xsd">
    <modelVersion>4.0.0</modelVersion>
    <parent>
        <groupId>org.springframework.boot</groupId>
        <artifactId>spring-boot-starter-parent</artifactId>
        <version>2.2.10.RELEASE</version>
        <relativePath/> <!-- lookup parent from repository -->
    </parent>
    <groupId>com.wsh.springboot</groupId>
    <artifactId>springboot-shiro</artifactId>
    <version>0.0.1-SNAPSHOT</version>
    <name>springboot-shiro</name>
    <description>Demo project for Spring Boot</description>
    <properties>
        <java.version>1.8</java.version>
    </properties>
    <dependencies>
        <dependency>
            <groupId>org.springframework.boot</groupId>
            <artifactId>spring-boot-starter-web</artifactId>
        </dependency>
        <dependency>
            <groupId>org.apache.shiro</groupId>
            <artifactId>shiro-spring-boot-web-starter</artifactId>
            <version>1.4.0</version>
        </dependency>
        <dependency>
            <groupId>org.springframework.boot</groupId>
            <artifactId>spring-boot-starter-thymeleaf</artifactId>
        </dependency>
        <dependency>
            <groupId>org.mybatis.spring.boot</groupId>
            <artifactId>mybatis-spring-boot-starter</artifactId>
            <version>1.3.3</version>
        </dependency>
        <dependency>
            <groupId>mysql</groupId>
            <artifactId>mysql-connector-java</artifactId>
            <scope>runtime</scope>
        </dependency>
        <dependency>
            <groupId>org.springframework.boot</groupId>
            <artifactId>spring-boot-starter-test</artifactId>
            <scope>test</scope>
            <exclusions>
                <exclusion>
                    <groupId>org.junit.vintage</groupId>
                    <artifactId>junit-vintage-engine</artifactId>
                </exclusion>
            </exclusions>
        </dependency>
    </dependencies>
    <build>
        <plugins>
            <plugin>
                <groupId>org.springframework.boot</groupId>
                <artifactId>spring-boot-maven-plugin</artifactId>
            </plugin>
        </plugins>
    </build>
</project>
【b】定义User实体类,接口UserMapper外加上UserMapper.xml配置实现
public class User {
    private String id;
    private String username;
    private String password;
    private String status;
    public String getId() {
        return id;
    }
    public void setId(String id) {
        this.id = id;
    }
    public String getUsername() {
        return username;
    }
    public void setUsername(String username) {
        this.username = username;
    }
    public String getPassword() {
        return password;
    }
    public void setPassword(String password) {
        this.password = password;
    }
    public String getStatus() {
        return status;
    }
    public void setStatus(String status) {
        this.status = status;
    }
}
UserMapper.java:
@Mapper
public interface UserMapper {
    /**
     * 根据用户名查找用户信息
     *
     * @param name 用户名
     * @return
     */
    User findUserByName(@Param("name") String name);
}
UserMapper.xml:
<?xml version="1.0" encoding="utf-8"?>
<!DOCTYPE mapper
        PUBLIC "-//mybatis.org//DTD Mapper 3.0//EN"
        "http://mybatis.org/dtd/mybatis-3-mapper.dtd">
<mapper namespace="com.wsh.springboot.springbootshiro.mapper.UserMapper">
    <resultMap type="com.wsh.springboot.springbootshiro.entity.User" id="baseUser">
    <id column="id" property="id" javaType="java.lang.String" jdbcType="VARCHAR"/>
    <id column="username" property="username" javaType="java.lang.String" jdbcType="VARCHAR"/>
    <id column="password" property="password" javaType="java.lang.String" jdbcType="VARCHAR"/>
    <id column="status" property="status" javaType="java.lang.String" jdbcType="VARCHAR"/>
  </resultMap>
  <select id="findUserByName" resultMap="baseUser" parameterType="String">
    SELECT * FROM USER t
    where t.username ={name}
  </select>
</mapper>
【c】配置文件 application.yml,配置数据源信息、mybatis扫描的包等
server:
  port: 8080
spring:
  datasource:
    driver-class-name: com.mysql.jdbc.Driver
    username: root
    password: root
    url: jdbc:mysql://localhost:3306/shiro?serverTimezone=UTC&useUnicode=true&characterEncoding=utf-8
mybatis:
  mapper-locations: classpath:mapper/*Mapper.xml
  type-aliases-package: com.wsh.springboot.springbootshiro.entity
  configuration:
    log-impl: org.apache.ibatis.logging.stdout.StdOutImpl
【d】自定义Realm,通过继承AuthenticatingRealm 实现
需要重写doGetAuthenticationInfo方法。
package com.wsh.springboot.springbootshiro.realm;
import com.wsh.springboot.springbootshiro.entity.User;
import com.wsh.springboot.springbootshiro.mapper.UserMapper;
import org.apache.shiro.authc.*;
import org.apache.shiro.realm.AuthenticatingRealm;
import org.slf4j.Logger;
import org.slf4j.LoggerFactory;
import org.springframework.beans.factory.annotation.Autowired;
public class MyShiroRealm extends AuthenticatingRealm {
    private static final Logger logger = LoggerFactory.getLogger(MyShiroRealm.class);
    @Autowired
    private UserMapper userMapper;
    /**
     * 认证相关方法
     */
    @Override
    protected AuthenticationInfo doGetAuthenticationInfo(AuthenticationToken authenticationToken) throws AuthenticationException {
        UsernamePasswordToken usernamePasswordToken = (UsernamePasswordToken) authenticationToken;
        //1.判断用户名, token中的用户信息是登录时候传进来的
        String username = usernamePasswordToken.getUsername();
        char[] password = usernamePasswordToken.getPassword();
        logger.info("username:" + username);
        logger.info("password:" + new String(password));
        //通过账号查找用户信息
        User user = userMapper.findUserByName(username);
        if (null == user) {
            logger.error("用户不存在..");
            throw new UnknownAccountException("用户不存在!");
        }
        if ("0".equals(user.getStatus())) {
            throw new LockedAccountException("账号已被锁定,请联系管理员!");
        }
        //数据库中查询的用户名
        Object principal = user.getUsername();
        //数据库中查询的密码
        Object credentials = user.getPassword();
        String realmName = getName();
        //2.判断密码
        return new SimpleAuthenticationInfo(principal, credentials, null, realmName);
    }
}
【e】创建Shiro的全局配置类
import com.wsh.springboot.springbootshiro.realm.MyShiroRealm;
import org.apache.shiro.spring.web.ShiroFilterFactoryBean;
import org.apache.shiro.web.mgt.DefaultWebSecurityManager;
import org.springframework.beans.factory.annotation.Qualifier;
import org.springframework.boot.web.servlet.FilterRegistrationBean;
import org.springframework.context.annotation.Bean;
import org.springframework.context.annotation.Configuration;
import org.springframework.web.filter.DelegatingFilterProxy;
import java.util.LinkedHashMap;
import java.util.Map;
/**
 * @Description: Shiro全局配置类
 * @author DDKK.COM 弟弟快看,程序员编程资料站
 * @Date: 2022/11/3 09:23
 * <p>
 * 三大组件:
 * 1. Subject: 用户主体(把操作交给SecurityManager)
 * 2. SecurityManager:安全管理器(关联Realm)
 * 3. Realm:Shiro连接数据的桥梁
 */
@Configuration
public class ShiroConfiguration {
    /**
     * 将Realm注册到securityManager中
     *
     * @return
     */
    @Bean("securityManager")
    public DefaultWebSecurityManager securityManager() {
        return new DefaultWebSecurityManager(myShiroRealm());
    }
    /**
     * 配置自定义的Realm
     */
    @Bean
    public MyShiroRealm myShiroRealm() {
        return new MyShiroRealm();
    }
    /**
     * 如果没有此name,将会找不到shiroFilter的Bean
     * <p>
     * Shiro内置过滤器,可以实现权限相关的拦截器
     * 常用的过滤器:
     * anon: 无需认证(登录)可以访问
     * authc: 必须认证才可以访问
     * user: 如果使用rememberMe的功能可以直接访问
     * perms: 该资源必须得到资源权限才可以访问
     * role: 该资源必须得到角色权限才可以访问
     */
    @Bean
    public ShiroFilterFactoryBean shiroFilter(@Qualifier("securityManager") DefaultWebSecurityManager securityManager) {
        ShiroFilterFactoryBean shiroFilterFactoryBean = new ShiroFilterFactoryBean();
        shiroFilterFactoryBean.setSecurityManager(securityManager);
        //表示指定登录页面
        shiroFilterFactoryBean.setLoginUrl("/userLogin");
        //登录成功后要跳转的链接
        shiroFilterFactoryBean.setSuccessUrl("/success");
        //未授权页面
        shiroFilterFactoryBean.setUnauthorizedUrl("/unauthorized");
        //拦截器, 配置不会被拦截的链接 顺序判断
        Map<String, String> filterChainDefinitionMap = new LinkedHashMap<>();
        //所有匿名用户均可访问到Controller层的该方法下
        filterChainDefinitionMap.put("/index", "anon");
        filterChainDefinitionMap.put("/userLogin", "anon");
        //authc:所有url都必须认证通过才可以访问; anon:所有url都都可以匿名访问
        filterChainDefinitionMap.put("/**", "authc");
        shiroFilterFactoryBean.setFilterChainDefinitionMap(filterChainDefinitionMap);
        return shiroFilterFactoryBean;
    }
    /**
     * SpringShiroFilter首先注册到spring容器
     * 然后被包装成FilterRegistrationBean
     * 最后通过FilterRegistrationBean注册到servlet容器
     *
     * @return
     */
    @Bean
    public FilterRegistrationBean delegatingFilterProxy() {
        FilterRegistrationBean filterRegistrationBean = new FilterRegistrationBean();
        DelegatingFilterProxy proxy = new DelegatingFilterProxy();
        proxy.setTargetFilterLifecycle(true);
        proxy.setTargetBeanName("shiroFilter");
        filterRegistrationBean.setFilter(proxy);
        return filterRegistrationBean;
    }
}
【f】在resource/templates文件夹下创建几个html文件:
index.html:
<!doctype html>
<!--注意:引入thymeleaf的名称空间-->
<html lang="en" xmlns:th="http://www.thymeleaf.org">
<head>
    <meta charset="UTF-8">
    <meta name="viewport"
          content="width=device-width, user-scalable=no, initial-scale=1.0, maximum-scale=1.0, minimum-scale=1.0">
    <meta http-equiv="X-UA-Compatible" content="ie=edge">
    <title>Document</title>
</head>
<body>
<h3 style="color: red" th:text="${msg}"></h3><br/>
<form method="post" action="/userLogin">
    用户名: <input type="text" name="username"><br/>
    密码: <input type="password" name="password"><br/>
    <input type="submit" name="submit"><br/>
</form>
</body>
</html>
success.html:
<!doctype html>
<!--注意:引入thymeleaf的名称空间-->
<html lang="en">
<head>
    <meta charset="UTF-8">
    <meta name="viewport"
          content="width=device-width, user-scalable=no, initial-scale=1.0, maximum-scale=1.0, minimum-scale=1.0">
    <meta http-equiv="X-UA-Compatible" content="ie=edge">
    <title>Document</title>
</head>
<body>
你好,这是登录成功的页面<br/>
</div>
</body>
</html>
unauthorized.html:
<!doctype html>
<!--注意:引入thymeleaf的名称空间-->
<html lang="en" xmlns:th="http://www.thymeleaf.org">
<head>
    <meta charset="UTF-8">
    <meta name="viewport"
          content="width=device-width, user-scalable=no, initial-scale=1.0, maximum-scale=1.0, minimum-scale=1.0">
    <meta http-equiv="X-UA-Compatible" content="ie=edge">
    <title>Document</title>
</head>
<body>
抱歉,你暂未授权访问此页面
</body>
</html>
【g】编写UserController
package com.wsh.springboot.springbootshiro.controller;
import org.apache.shiro.SecurityUtils;
import org.apache.shiro.authc.IncorrectCredentialsException;
import org.apache.shiro.authc.LockedAccountException;
import org.apache.shiro.authc.UnknownAccountException;
import org.apache.shiro.authc.UsernamePasswordToken;
import org.apache.shiro.subject.Subject;
import org.slf4j.Logger;
import org.slf4j.LoggerFactory;
import org.springframework.stereotype.Controller;
import org.springframework.ui.Model;
import org.springframework.web.bind.annotation.GetMapping;
import org.springframework.web.bind.annotation.RequestMapping;
import org.springframework.web.bind.annotation.RequestMethod;
@Controller
public class UserController {
    private static final Logger logger = LoggerFactory.getLogger(UserController.class);
    @GetMapping("/index")
    public String index() {
        //返回index.html
        return "index";
    }
    @GetMapping("/success")
    public String success() {
        return "success";
    }
    @RequestMapping(value = "/userLogin", method = RequestMethod.POST)
    public String toLogin(String username, String password, Model model) {
        //1.获取Subject
        Subject subject = SecurityUtils.getSubject();
        //2.封装用户数据
        UsernamePasswordToken token = new UsernamePasswordToken(username, password);
        try {
            //3.执行登录方法
            subject.login(token);
            //4.登录成功,然后跳转到success.html
            return "redirect:/success";
        } catch (UnknownAccountException e) {
            logger.error("msg:该账号不存在");
            model.addAttribute("msg", "该账号不存在");
            return "index";
        } catch (IncorrectCredentialsException e) {
            logger.error("msg: 密码错误,请重试");
            model.addAttribute("msg", "密码错误,请重试");
            return "index";
        } catch (LockedAccountException e) {
            logger.error("msg:该账户已被锁定,请联系管理员");
            model.addAttribute("msg", "该账户已被锁定,请联系管理员");
            return "index";
        } catch (Exception e) {
            model.addAttribute("msg", "登录失败");
            logger.error("msg: 登录失败");
            return "index";
        }
    }
    @RequestMapping("/unauthorized")
    public String unauthorized() {
        return "unauthorized";
    }
}
【h】主启动类
@SpringBootApplication
@MapperScan("com.wsh.springboot.springbootshiro.mapper")
public class SpringbootShiroApplication {
    public static void main(String[] args) {
        SpringApplication.run(SpringbootShiroApplication.class, args);
    }
}
【i】启动项目,进行测试
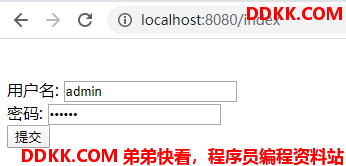
浏览器访问:http://localhost:8080/index,输入admin/123456:

可以看到,因为此时用户名和密码跟数据库中是一致的,所以登录成功,并跳转到success.html中。

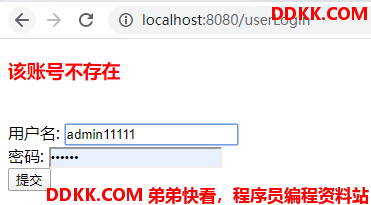
重新访问http://localhost:8080/index,输入admin11111/123456,如下图:

可以看到,由于用户表中不存在此用户,所以提示账号不存在。
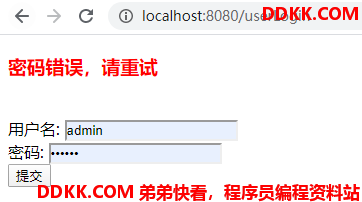
重新访问http://localhost:8080/index,输入admin/111111,如下图:

可见,当输入错误的密码时,shiro提示密码错误。
三、总结
以上就是关于Shiro提供了用户身份认证功能,总结一下大体步骤:
- 自定义Realm,继承AuthenticatingRealm ,重写方法doGetAuthenticationInfo(AuthenticationToken authenticationToken),通过subject.login方法传入的token,去数据库中查询用户数据,将用户密码传入shiro进行比对;
- 自定义Shiro配置,注入SecurityManager安全管理器、ShiroFilterFactoryBean过滤器工厂等对象;
存在问题:在实际工作中,密码不可能明文传输,为了演示方便,上面的示例使用的明文密码比对,实际上Shiro也提供了加密功能,下一篇文章我们将优化成密文比对。