一、概述
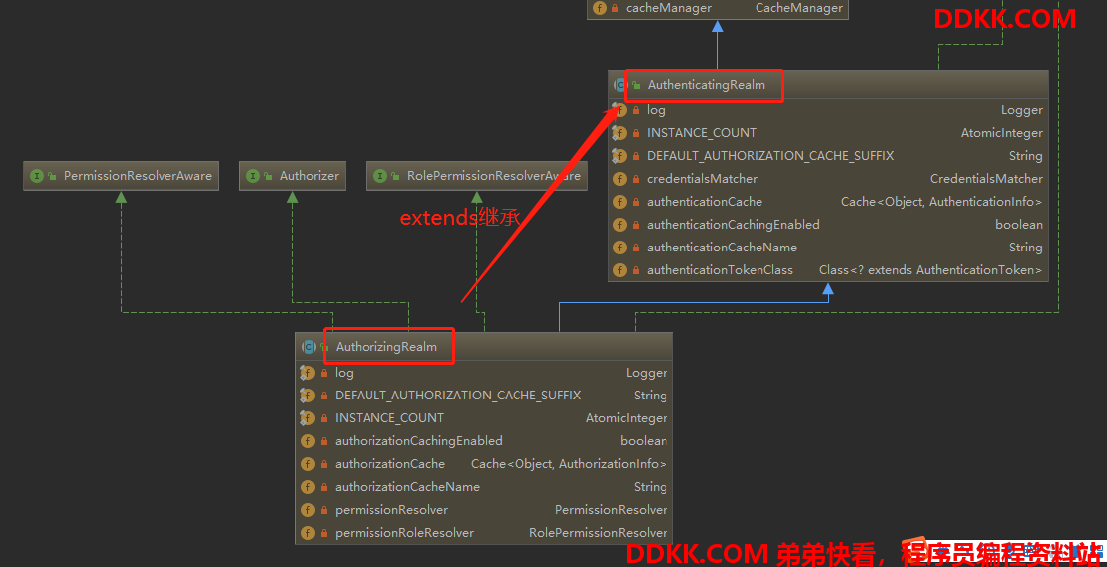
在前面一篇文章:SpringBoot + Shiro实现用户身份认证功能中,我们的自定义Realm继承了AuthenticatingRealm,并实现了doGetAuthenticationInfo()方法完成了用户认证操作,但是AuthenticatingRealm仅仅只是提供了用户认证的功能,在实际工作中,一般不使用AuthenticatingRealm抽象类,通常我们都使用AuthorizingRealm抽象类,它提供了认证功能,同时也提供了授权功能。
public abstract class AuthorizingRealm extends AuthenticatingRealm implements Authorizer, Initializable, PermissionResolverAware, RolePermissionResolverAware {
    //.............
}

可以看到,AuthorizingRealm类继承自AuthenticatingRealm,所以里面肯定就有两个认证以及授权的方法:
1、 用户认证方法:protectedAuthenticationInfodoGetAuthenticationInfo(AuthenticationTokenauthenticationToken)throwsAuthenticationException;
2、 用户授权方法:protectedAuthorizationInfodoGetAuthorizationInfo(PrincipalCollectionprincipalCollection);
接下来,我们就可以通过实现doGetAuthorizationInfo()方法完成Shiro的权限控制功能。
二、权限控制数据库模型搭建
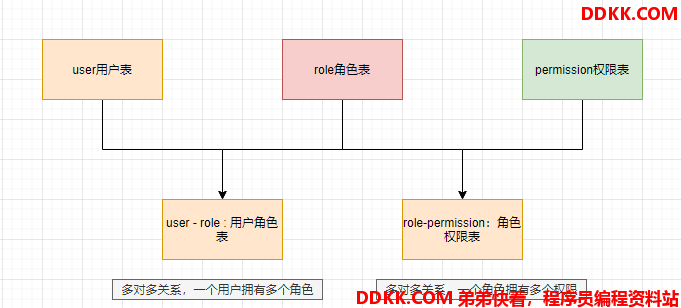
授权,也叫访问控制,即在应用中控制谁能访问哪些资源(如访问页面/编辑数据/页面操作等)。即根据不同用户的权限判断其是否有访问相应资源的权限。在Shiro中,权限控制有三个核心的元素:用户、角色、权限。
根据用户权限控制模型,我们创建了五张表:
1、 用户表USER;
2、 角色表ROLE;
3、 用户角色关联表USER_ROLE;
4、 权限表PERMISSION;
5、 权限角色关联表ROLE_PERMISSION;
大体的关系如下图所示:

这里假定:用户admin角色为admin,用户test角色为test。admin角色拥有用户的所有权限(user:user,user:add,user:delete),而test角色只拥有用户的查看权限(user:user)。密码都是123456,没经过Shiro提供的MD5加密。
下面是具体的建表语句:
因为用户表user在前面的文章中已经创建过了,这里就不贴出来了。
CREATE TABLE role  (
  id INT(11) NOT NULL COMMENT '主键id',
  name VARCHAR(32) CHARACTER SET utf8 COLLATE utf8_bin NULL DEFAULT NULL COMMENT '角色名称',
  PRIMARY KEY (id) USING BTREE
) ENGINE = INNODB CHARACTER SET = utf8 COLLATE = utf8_bin ROW_FORMAT = COMPACT;
CREATE TABLE user_role  (
  user_id INT(10) NULL DEFAULT NULL COMMENT '用户id',
  role_id INT(10) NULL DEFAULT NULL COMMENT '角色id'
) ENGINE = INNODB CHARACTER SET = utf8 COLLATE = utf8_bin ROW_FORMAT = COMPACT;
CREATE TABLE permission  (
  id INT(11) NOT NULL COMMENT '主键id',
  url VARCHAR(255) CHARACTER SET utf8 COLLATE utf8_bin NULL DEFAULT NULL COMMENT '权限路径',
  name VARCHAR(64) CHARACTER SET utf8 COLLATE utf8_bin NULL DEFAULT NULL COMMENT '权限名称',
  PRIMARY KEY (id) USING BTREE
) ENGINE = INNODB CHARACTER SET = utf8 COLLATE = utf8_bin ROW_FORMAT = COMPACT;
CREATE TABLE role_permission  (
  roleid INT(10) NULL DEFAULT NULL COMMENT '角色id',
  pid INT(10) NULL DEFAULT NULL COMMENT '权限id'
) ENGINE = INNODB CHARACTER SET = utf8 COLLATE = utf8_bin ROW_FORMAT = COMPACT;
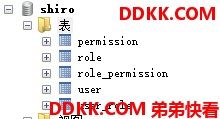
创建完成后,如下图所示:

接着我们初始化一些用户角色、权限数据,用户用户授权的测试:
insert into user (id, username, password) values('1','admin','038bdaf98f2037b31f1e75b5b4c9b26e');
insert into user (id, username, password) values('2','user','098d2c478e9c11555ce2823231e02ec1');
insert into role (id, name) values('1','admin');
insert into role (id, name) values('2','user');
insert into user_role (user_id, role_id) values('1','1');
insert into user_role (user_id, role_id) values('2','2');
insert into permission (id, url, name) values('1','/admin','admin:list');
insert into permission (id, url, name) values('2','/user','user:list');
insert into role_permission (roleid, pid) values('1','1');
insert into role_permission (roleid, pid) values('1','2');
insert into role_permission (roleid, pid) values('2','2');
三、用户授权具体实现
【a】创建角色Role实体类、权限Permission类
/**
 * Role角色类
 */
public class Role implements Serializable {
    private Integer id;
    private String name;
    public Role() {
    }
    public Integer getId() {
        return id;
    }
    public void setId(Integer id) {
        this.id = id;
    }
    public String getName() {
        return name;
    }
    public void setName(String name) {
        this.name = name;
    }
}
/**
 * 权限类
 */
public class Permission implements Serializable {
    private String id;
    private String url;
    private String name;
    public Permission() {
    }
    public String getId() {
        return id;
    }
    public void setId(String id) {
        this.id = id;
    }
    public String getUrl() {
        return url;
    }
    public void setUrl(String url) {
        this.url = url;
    }
    public String getName() {
        return name;
    }
    public void setName(String name) {
        this.name = name;
    }
}
【b】创建RoleMapper角色接口和XML,提供一个接口根据用户名查询所有的角色信息
@Mapper
public interface RoleMapper {
    /**
     * 根据用户名查询所有的角色信息
     *
     * @param username
     * @return
     */
    List<Role> getAllRoleListByUsername(@Param("username") String username);
}
<?xml version="1.0" encoding="utf-8"?>
<!DOCTYPE mapper
        PUBLIC "-//mybatis.org//DTD Mapper 3.0//EN"
        "http://mybatis.org/dtd/mybatis-3-mapper.dtd">
<mapper namespace="com.wsh.springboot.springbootshiro.mapper.RoleMapper">
    <select id="getAllRoleListByUsername" resultType="com.wsh.springboot.springbootshiro.entity.Role">
        SELECT t1.* FROM role t1
            LEFT JOIN user_role t2
            ON t1.id = t2.role_id
            LEFT JOIN USER t3
            ON t2.user_id = t3.id
            WHERE t3.username ={username}
    </select>
</mapper>
【c】创建PermissionMapper角色接口和XML,提供一个接口根据用户名查询所有的权限信息
@Mapper
public interface PermissionMapper {
    /**
     * 根据用户名查询所有的权限信息
     *
     * @param username
     * @return
     */
    List<Permission> getAllPermissionListByUsername(@Param("username") String username);
}
<?xml version="1.0" encoding="utf-8"?>
<!DOCTYPE mapper
        PUBLIC "-//mybatis.org//DTD Mapper 3.0//EN"
        "http://mybatis.org/dtd/mybatis-3-mapper.dtd">
<mapper namespace="com.wsh.springboot.springbootshiro.mapper.PermissionMapper">
    <select id="getAllPermissionListByUsername" resultType="com.wsh.springboot.springbootshiro.entity.Permission">
        SELECT t1.* FROM permission t1
            LEFT JOIN role_permission t2
            ON t1.id = t2.pid
            LEFT JOIN role t3
            ON t2.roleid = t3.id
            LEFT JOIN user_role t4
            ON t3.id = t4.role_id
            LEFT JOIN USER t5
            ON t5.id = t4.user_id
            WHERE t5.username ={username}
    </select>
</mapper>
【d】修改我们的自定义Realm,实现前面说到的授权相关方法doGetAuthorizationInfo(PrincipalCollection principalCollection)
/**
 * 授权相关方法
 *
 * @param principalCollection
 * @return
 */
@Override
protected AuthorizationInfo doGetAuthorizationInfo(PrincipalCollection principalCollection) {
    //1.获取用户名
    String username = (String) principalCollection.getPrimaryPrincipal();
    logger.info("username:" + username);
    //返回AuthorizationInfo授权类的子类
    SimpleAuthorizationInfo simpleAuthorizationInfo = new SimpleAuthorizationInfo();
    //2.根据用户名查询用户所有的角色信息
    List<Role> allRoleList = roleMapper.getAllRoleListByUsername(username);
    Set<String> rolesSet = new HashSet<>();
    for (Role r : allRoleList) {
        String roleName = r.getName();
        rolesSet.add(roleName);
    }
    logger.info("用户:{} 拥有的角色有:{}", username, rolesSet);
    //设置用户角色信息
    simpleAuthorizationInfo.setRoles(rolesSet);
    //3.根据用户名查询用户所有的权限信息
    List<Permission> allPermissionList = permissionMapper.getAllPermissionListByUsername(username);
    Set<String> permissionSet = new HashSet<>();
    for (Permission permission : allPermissionList) {
        String permissionName = permission.getName();
        permissionSet.add(permissionName);
    }
    simpleAuthorizationInfo.setStringPermissions(permissionSet);
    logger.info("用户:{} 拥有的权限有:{}", username, permissionSet);
    return simpleAuthorizationInfo;
}
在上述代码中,我们通过方法获取了当前登录用户的角色和权限集,然后保存到SimpleAuthorizationInfo对象中,并返回给Shiro,这样Shiro中就存储了当前用户的角色和权限信息了。
【e】Controller中加入如下方法,并且添加admin.html和user.html
@GetMapping("/admin")
public String admin() {
    //返回admin.html
    return "admin";
}
@GetMapping("/user")
public String user() {
    return "user";
}
<!doctype html>
<!--注意:引入thymeleaf的名称空间-->
<html lang="en" xmlns:th="http://www.thymeleaf.org">
<head>
    <meta charset="UTF-8">
    <meta name="viewport"
          content="width=device-width, user-scalable=no, initial-scale=1.0, maximum-scale=1.0, minimum-scale=1.0">
    <meta http-equiv="X-UA-Compatible" content="ie=edge">
    <title>Document</title>
</head>
<body>
admin page
</body>
</html>
<!doctype html>
<!--注意:引入thymeleaf的名称空间-->
<html lang="en" xmlns:th="http://www.thymeleaf.org">
<head>
    <meta charset="UTF-8">
    <meta name="viewport"
          content="width=device-width, user-scalable=no, initial-scale=1.0, maximum-scale=1.0, minimum-scale=1.0">
    <meta http-equiv="X-UA-Compatible" content="ie=edge">
    <title>Document</title>
</head>
<body>
user page
</body>
</html>
success.html中加入两个超链接:
<!doctype html>
<!--注意:引入thymeleaf的名称空间-->
<html lang="en">
<head>
    <meta charset="UTF-8">
    <meta name="viewport"
          content="width=device-width, user-scalable=no, initial-scale=1.0, maximum-scale=1.0, minimum-scale=1.0">
    <meta http-equiv="X-UA-Compatible" content="ie=edge">
    <title>Document</title>
</head>
<body>
你好,这是登录成功的页面<br/>
<div>跳转到admin.html: <a href="/admin">admin.html</a><br></div>
<div>跳转到user.html: <a href="/user">user.html</a><br></div>
<div>跳转到remember.html: <a href="/remember">remember.html</a><br>
</div>
</body>
</html>
【e】配置授权 - 使用filterChain配置
Shiro提供了几种配置授权的方式,这里我们选择内置过滤器perms[xxx],其中xxx表示权限名称。
下面我们修改一下Shiro全局配置类,加入如下配置:
filterChainDefinitionMap.put("/admin", "roles[admin]");
filterChainDefinitionMap.put("/user", "roles[user]");
以上配置表示:
- 访问/admin时,需要用户的角色是admin才能访问;
- 访问/user时,需要用户的角色是user才能访问p;
启动项目,使用admin/123456登录,因为admin仅仅是admin角色,所以他只能访问admin.html,如下图:

当访问user.html时,会报未授权:

然后我们使用user/123456登录,因为user仅仅是user角色,所以他只能访问user.html页面,如下图:

当我们访问admin.html时,会报未授权:

同理,我们也可以配置允许哪些权限时才能访问,如下所示:
filterChainDefinitionMap.put("/admin", "perms[admin:list]");
filterChainDefinitionMap.put("/user", "perms[user:list]");
以上配置表示:
- 访问/admin时,需要用户拥有权限【admin:list】才能访问;
- 访问/user时,需要用户拥有权限【user:list】才能访问;
具体测试这里就不过多阐述了,跟角色的大体类似,以上是关于用filterChain方式进行配置授权,Shiro还有很多种配置方式,接下来我们总结一下如何使用注解方式配置。
四、配置授权 - 使用注解配置
Shiro为我们提供了一些和权限相关的注解,如下所示:
- @RequiresAuthentication :表示当前Subject已经通过login进行了身份验证;即Subject.isAuthenticated()返回true。
- @RequiresUser :表示当前Subject已经身份验证或者通过记住我登录的。
- @RequiresGuest :表示当前Subject没有身份验证或通过记住我登录过,即是游客身份。
- @RequiresRoles(value={"admin", "user"}, logical= Logical.AND) :表示当前Subject需要角色admin和user。
- @RequiresPermissions (value={"user:a", "user:b"}, logical= Logical.OR):表示当前Subject需要权限user:a或user:b。
【a】修改Shiro全局配置类,开启shiro认证注解
/**
 * 开启Shiro注解配置
 * @param securityManager
 * @return
 */
@Bean
public AuthorizationAttributeSourceAdvisor authorizationAttributeSourceAdvisor(@Qualifier("securityManager") DefaultWebSecurityManager securityManager) {
    AuthorizationAttributeSourceAdvisor authorizationAttributeSourceAdvisor = new AuthorizationAttributeSourceAdvisor();
    authorizationAttributeSourceAdvisor.setSecurityManager(securityManager);
    return authorizationAttributeSourceAdvisor;
}
【b】修改UserController,添加一个权限注解用于测试
/**
 * 使用shiro权限注解标明,只能拥有这个admin:list权限的用户访问
 */
@RequiresPermissions(value = "admin:list")
@RequestMapping("/adminList")
public String adminList(){
    return "list";
}
以上配置表示只有当前登录用户拥有【admin:list】权限时,才能访问此接口。
【c】新增一个list.html
<!doctype html>
<!--注意:引入thymeleaf的名称空间-->
<html lang="en" xmlns:th="http://www.thymeleaf.org">
<head>
    <meta charset="UTF-8">
    <meta name="viewport"
          content="width=device-width, user-scalable=no, initial-scale=1.0, maximum-scale=1.0, minimum-scale=1.0">
    <meta http-equiv="X-UA-Compatible" content="ie=edge">
    <title>Document</title>
</head>
<body>
admin list page
</body>
</html>
success.html中加入一个超链接:
<div>跳转到admin.html: <a href="/adminList">list.html</a><br></div>
【d】测试
启动项目,使用admin/123456进行登录,因为admin拥有权限【admin:list】,所以正常访问admin.html,如下图所示:

然后我们切换成user/123456进行登录,由于user并不拥有权限【admin:list】,所以不能访问admin.html,如下图所示:

可以看到,提示当前登录用户主体并不拥有【admin:list】权限。
细心的小伙伴可能会发现,我们在Shiro全局配置类中配置了未授权页面的地址:
//未授权页面
shiroFilterFactoryBean.setUnauthorizedUrl("/unauthorized");
但是前面我们使用user用户访问未授权页面list.html时,并没有跳转到/unauthorized接口指定的unauthorized.html页面去。后来通过查阅资料发现,该设置只对filterChain起作用,比如filterChain中加入如下配置:
filterChainDefinitionMap.put("/admin", "roles[admin]");
如果用户不是admin角色的话,那么当其访问/admin的时候,页面会被重定向到/unauthorized接口指定的页面。
针对上述问题,我们可以采用如下的解决方法,有两种解决方法:
【第一种方法】:定义一个全局异常处理进行处理
import org.apache.shiro.authz.AuthorizationException;
import org.springframework.core.Ordered;
import org.springframework.core.annotation.Order;
import org.springframework.web.bind.annotation.ControllerAdvice;
import org.springframework.web.bind.annotation.ExceptionHandler;
/**
 * 全局异常处理器
 */
@ControllerAdvice
@Order(value = Ordered.HIGHEST_PRECEDENCE)
public class CustomGlobalExceptionHandler {
    //处理AuthorizationException认证相关异常
    @ExceptionHandler(value = AuthorizationException.class)
    public String authorizationException() {
        return "unauthorized";
    }
}
启动项目,依然使用user/123456去访问list.html:

可以看到,此时,浏览器直接重定向到我们指定的未授权页面去了,并没有报如下的错误:
Subject does not have permission [admin:list]
说明我们配置全局异常处理器是有效的。
【第二种方法】:配置异常解析器
import org.springframework.context.annotation.Bean;
import org.springframework.context.annotation.Configuration;
import org.springframework.web.servlet.handler.SimpleMappingExceptionResolver;
import java.util.Properties;
/**
 * 配置异常解析器
 */
@Configuration
public class CustomExceptionResolver {
    private static final String AUTHORIZATION_EXCEPTION = "AuthorizationException";
    @Bean("simpleMappingExceptionResolver")
    public SimpleMappingExceptionResolver simpleMappingExceptionResolver() {
        SimpleMappingExceptionResolver resolver = new SimpleMappingExceptionResolver();
        Properties properties = new Properties();
        //拦截到AuthorizationException就跳转到resources资源下的unauthorized.html未授权页面
        //如果带文件夹需要加上文件夹: /xxx/unauthorized.html
        properties.setProperty(AUTHORIZATION_EXCEPTION, "/unauthorized");
        resolver.setExceptionMappings(properties);
        return resolver;
    }
}
启动项目,并且注释掉第一种方式的全局异常处理器,同样使用user/123456去访问list.html:

可以看到,此时,浏览器直接重定向到我们指定的未授权页面去了,也没有报如下的错误:
Subject does not have permission [admin:list]
说明我们配置异常解析器方法也是有效的。
五、总结
本篇文章主要总结了Shiro的用户授权功能,并介绍了如何通过Shiro注解实现用户权限控制功能,在实际工作中,根据具体的权限控制需求选择最合适的方式进行用户权限的控制。