一、概述
前面的文章总结了Shiro如何实现用户授权功能,并且当用户访问未授权的资源时,会跳转到未授权页面,在实际项目中,一般如果当前用户登录后,针对某个资源,如果没有授权,那么这些资源压根就不应该展示出来,所以Shiro提供了标签用于控制这些资源的显示隐藏。
实际上Thymeleaf官方并没有提供Shiro的标签,我们需要引入第三方实现thymeleaf-extras-shiro。接下来就通过案例说明Thymeleaf整合Shiro标签实现资源的控制。
二、Shiro标签的使用
【a】引入thymeleaf-extras-shiro第三方依赖
<dependency>
    <groupId>com.github.theborakompanioni</groupId>
    <artifactId>thymeleaf-extras-shiro</artifactId>
    <version>2.0.0</version>
</dependency>
【b】Shiro全局配置类注入ShiroDialect
/**
 * 为了在thymeleaf中使用shiro的自定义tag
 */
@Bean
public ShiroDialect shiroDialect() {
    return new ShiroDialect();
}
【c】修改success.html,引入Shiro标签库
<!doctype html>
<!--注意:引入thymeleaf的名称空间-->
<html lang="en" xmlns:th="http://www.thymeleaf.org"
      xmlns:shiro="http://www.w3.org/1999/xhtml">
<head>
    <meta charset="UTF-8">
    <meta name="viewport"
          content="width=device-width, user-scalable=no, initial-scale=1.0, maximum-scale=1.0, minimum-scale=1.0">
    <meta http-equiv="X-UA-Compatible" content="ie=edge">
    <title>Document</title>
</head>
<body>
你好,这是登录成功的页面<br/>
<!--shiro:hasRole: 判断当前登录用户是否拥有某种角色-->
<div shiro:hasRole="admin">跳转到admin.html: <a href="/admin">admin.html</a><br></div>
<div shiro:hasRole="user">跳转到user.html: <a href="/user">user.html</a><br></div>
<div>跳转到remember.html: <a href="/remember">remember.html</a><br></div>
<!--shiro:hasPermission: 判断当前登录用户是否拥有某个权限-->
<div shiro:hasPermission="admin:list">跳转到admin.html: <a href="/adminList">list.html</a><br></div>
<div>跳转到userList.html: <a href="/userList">userList.html</a><br></div>
</body>
</html>
【d】启动项目
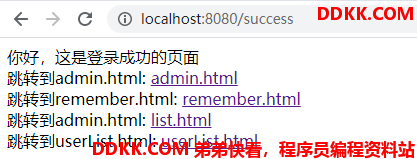
(1)、使用admin/123456进行登录,假设admin用户是【admin】角色,admin用户拥有【admin:list、user:list】权限

因为admin不是user角色,所以admin登录之后看不到【跳转到user.html】这一个超链接,因为admin拥有【admin:list】权限,所以能看到【跳转到admin.html】超链接。
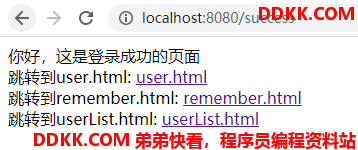
(2)、使用user/123456进行登录,假设user用户是【user】角色,user用户拥有【user:list】权限

因为user不是admin角色,所以登录之后看不到【跳转到admin.html】这一个超链接,因为user没有【admin:list】权限,所以不能看到【跳转到admin.html】超链接。
由此,我们就实现了只对用户授权了的资源才显示。
说明:在生产环境中,如果是前后端项目分离的话,一般都是将当前登录用户的权限、资源等缓存起来,然后在前端自己做过滤,只展示出拥有权限的那些菜单、按钮等等。
三、扩展知识
Shiro官网对JSP / GSP Tag Library的文档资料:http://shiro.apache.org/web.html#Web-JSP%252FGSPTagLibrary
<!--guest仅当当前电流Subject被视为“客人”时,标签才会显示其包装内容-->
<p shiro:guest="">
   <a href="login.html">Login</a>
</p>
<!--user仅当当前Subject被视为“用户”时,标签才会显示其包装内容。-->
<p shiro:user="">
  Welcome back John! Not John? Click <a href="login.html">here<a> to login.
</p>
<!--仅当当前用户在当前会话期间已成功通过身份验证时,才显示正文内容-->
<a shiro:authenticated="" href="updateAccount.html">Update your contact information</a>
<!--notAuthenticated标签是的逻辑相反的authenticated标签-->
<p shiro:notAuthenticated="">
  Please <a href="login.html">login</a> in order to update your credit card information.
</p>
<!--principal标签将输出Subject的principal(识别属性),或主要的属性。
没有任何标签属性,标签将呈现toString()主体的值。-->
<p>Hello, <span shiro:principal=""></span></p>
<p>Hello, <shiro:principal/></p>
<!--hasRole仅当为当前Subject角色分配了指定角色时,标签才会显示其包装内容-->
<p shiro:hasRole="admin" >
    <a href="admin.jsp">Administer the system</a>
</p>
<!--lacksRole标签将显示它的包裹内容仅供如果当前Subject 没有分配指定的角色-->
<p shiro:lacksRole="admin">
  Sorry, you are not allowed to administer the system.
</p>
<!--必须拥有所有角色才显示-->
<p shiro:hasAllRoles="developer, project manager, administrator">
</p>
<!--该hasAnyRole如果当前标签会显示它的包裹内容Subject被分配任何指定的角色从一个逗号分隔的角色名称列-->
<p shiro:hasAnyRoles="admin,test">
  You are either a developer, project manager, or administrator.
</p>
<!--hasPermission仅当当前的Subject“具有”(隐含)指定的权限时,标记才会显示其包装内容-->
<shiro:hasPermission name="user:create">
    <a href="createUser.jsp">Create a new User</a>
</shiro:hasPermission>
<!--lacksPermission仅当当前Subject 不(暗示)指定的权限时,标签才会显示其包装内容-->
<shiro:lacksPermission name="user:delete">
    Sorry, you are not allowed to delete user accounts.
</shiro:lacksPermission>
<!--验证当前用户是否拥有所有权限才会出现-->
<p shiro:hasAllPermissions="user:add, user:user">
  xxx
</p>
<!--验证当前用户是否拥有以下任意一个权限才会出现-->
<p shiro:hasAnyPermissions="user:add, user:user">
  xxxx
</p>
四、总结
本篇文章主要总结关于如何使用Shiro标签整合Thymeleaf标签实现权限资源的控制,只针对用户可访问的资源进行展示等,在实际工作中结合具体项目的需求选择是否使用Shiro标签进行控制。