1、什么是Pod生命周期
Pod可以包含多个容器,同时 Pod 也可以有一个或多个先于应用容器启动的 Init 容器。Init 容器和普通容器区别不大,主要是init优先运行,init成功运行完成后,才会启动主容器,所以Init 容器不支持 Readiness。如果 Pod 的 Init 容器启动失败,Kubernetes 会不断地重启该 Pod,直到 Init 容器成功为止。
如下图描述

Init 容器的优势:
1、 想用某些工具,又不想放在主容器中,就把这些工具放在初始镜像init使用,运行完,初始镜像结束,再用主容器;
2、 Init容器可以安全地运行这些工具,减少风险;
3、 应用镜像的创建者和部署者可以各自独立工作;
2、Pod生命周期实现
(1)init容器
编写init.yaml文件
[root@server2 pod]# cat init.yaml
apiVersion: v1
kind: Pod
metadata:
  name: myapp-pod
  labels:
    app: myapp
spec:
  containers:
  - name: myapp-container
    image: busyboxplus
    command: ['sh', '-c', 'echo The app is running! && sleep 3600']
  initContainers:		%优先运行init容器
  - name: init-myservice
    image: busyboxplus
    command: ['sh', '-c', "until nslookup myservice.default.svc.cluster.local; do echo waiting for myservice; sleep 2; done"]
  - name: init-mydb
    image: busyboxplus
    command: ['sh', '-c', "until nslookup mydb.default.svc.cluster.local; do echo waiting for mydb; sleep 2; done"]

拉起pod,可以看到初始化无法完成,那么主容器也就无法运行
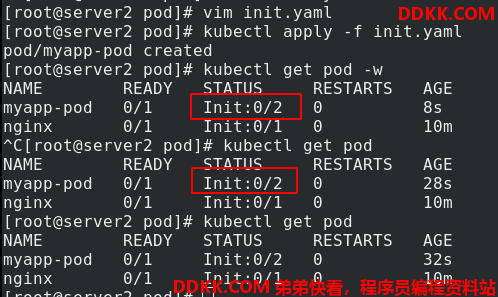
修改init.yaml文件,添加init要满足的服务
[root@server2 pod]# cat init.yaml
apiVersion: v1
kind: Pod
metadata:
name: myapp-pod
labels:
app: myapp
spec:
containers:
- name: myapp-container
image: busyboxplus
command: ['sh', '-c', 'echo The app is running! && sleep 3600']
initContainers:
- name: init-myservice
image: busyboxplus
command: ['sh', '-c', "until nslookup myservice.default.svc.cluster.local; do echo waiting for myservice; sleep 2; done"]
- name: init-mydb
image: busyboxplus
command: ['sh', '-c', "until nslookup mydb.default.svc.cluster.local; do echo waiting for mydb; sleep 2; done"]
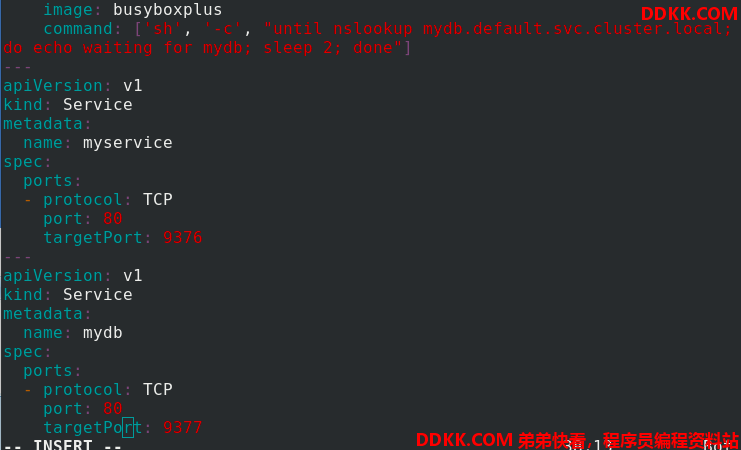
---
apiVersion: v1
kind: Service
metadata:
name: myservice
spec:
ports:
- protocol: TCP
port: 80
targetPort: 9376
---
apiVersion: v1
kind: Service
metadata:
name: mydb
spec:
ports:
- protocol: TCP
port: 80
targetPort: 9377
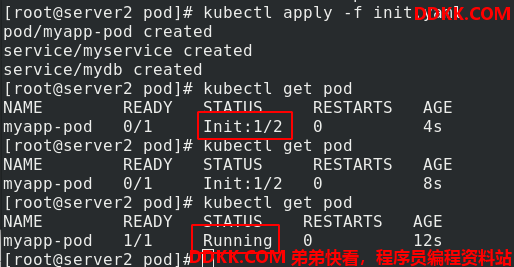
再次拉起pod,可以看到成功running
(2)存活探针livenessProbe
表示容器是否正在运行(running)
注意:当存活和就绪探针同时存在,但只有存活探针通过时,容器会运行,但只能内部运行,无法对外访问。只有两个探针都运行成功,才可以对外访问。
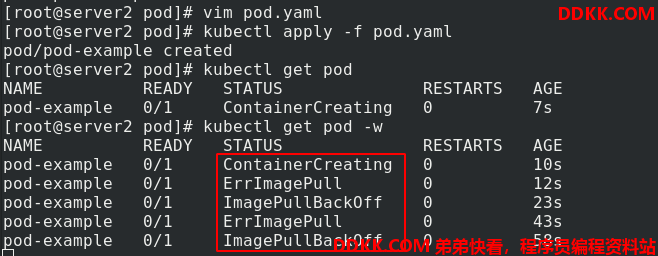
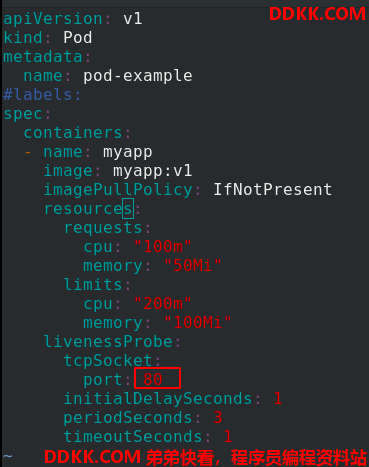
编辑pod.yaml ,加入存活探针
[root@server2 pod]# cat pod.yaml
apiVersion: v1
kind: Pod
metadata:
  name: pod-example
spec:
  nodeName: server4				%使用server4作为后端
  containers:
  - name: myapp					%myapp的端口是80
    image: myapp:v1
    imagePullPolicy: IfNotPresent
    resources:
      requests:			%对cpu和mem的最低要求
        cpu: "100m"
        memory: "50Mi"
      limits:			%对cpu和mem的最高限制
        cpu: "200m"
        memory: "100Mi"
    livenessProbe:			%存活探针,通过监测8080端口判断是否存活
      tcpSocket:
        port: 8080
      initialDelaySeconds: 1
      periodSeconds: 3
      timeoutSeconds: 1
因为我改变了端口,肯定监测不到,所以容器一直无法启动。
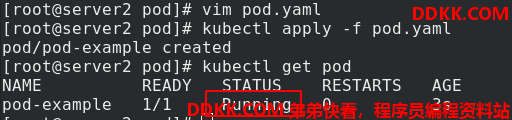
一旦恢复了80端口
容器就可以正常启动
(3)就绪探针readinessProbe
表示容器是否准备好服务请求(ready)
就绪探针就绪后,才能用这个后端,否则svc不会暴露端口
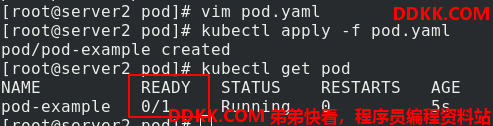
编辑pod.yaml 文件,添加就绪探针
[root@server2 pod]# cat pod.yaml
apiVersion: v1
kind: Pod
metadata:
  name: pod-example
spec:
  nodeName: server4				%使用server4作为后端
  containers:
  - name: myapp
    image: myapp:v1
    imagePullPolicy: IfNotPresent
    resources:
      requests:			%对cpu和mem的最低要求
        cpu: "100m"
        memory: "50Mi"
      limits:			%对cpu和mem的最高限制
        cpu: "200m"
        memory: "100Mi"
    livenessProbe:			%存活探针,通过监测80端口判断是否存活
      tcpSocket:
        port: 80
      initialDelaySeconds: 1
      periodSeconds: 3
      timeoutSeconds: 1
    readinessProbe:			%就绪探针, 通过监测/test.html这个文件判断是否就绪
      httpGet:
        path: /test.html
        port: 80
      initialDelaySeconds: 1
      periodSeconds: 3
      timeoutSeconds: 1
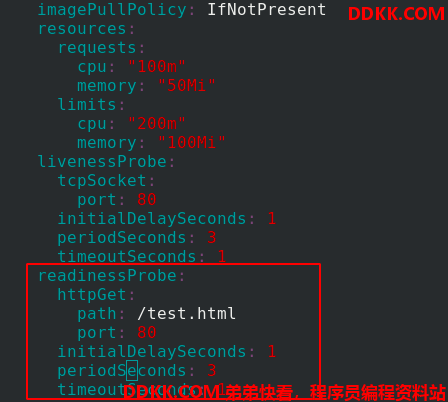
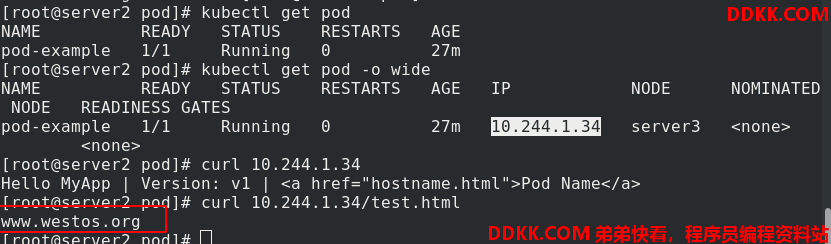
由于test.html这个文件没有,所以无法就绪。
进入pod-example,添加test.html这个文件,就可以ready了

测试,成功访问到添加的发布信息