前言
在之前,我们了解到Seata 会对数据源进行代理,执行SQL时,会进入到Seata 的代理数据源中,接下来我们分析下是如何进行代理的?
数据源代理
1. 自动代理配置类
在seata-spring-boot-starter模块的SeataDataSourceAutoConfiguration配置类中,开启了seata数据源的自动代理,该准备主要是注入了SeataDataSourceBeanPostProcessor和SeataAutoDataSourceProxyCreator。
@ConditionalOnBean(DataSource.class)
@ConditionalOnExpression("${seata.enable:true} && ${seata.enableAutoDataSourceProxy:true} && ${seata.enable-auto-data-source-proxy:true}")
public class SeataDataSourceAutoConfiguration {
    /**
     * The bean seataDataSourceBeanPostProcessor.
     */
    @Bean(BEAN_NAME_SEATA_DATA_SOURCE_BEAN_POST_PROCESSOR)
    @ConditionalOnMissingBean(SeataDataSourceBeanPostProcessor.class)
    public SeataDataSourceBeanPostProcessor seataDataSourceBeanPostProcessor(SeataProperties seataProperties) {
		//
        return new SeataDataSourceBeanPostProcessor(seataProperties.getExcludesForAutoProxying(), seataProperties.getDataSourceProxyMode());
    }
    /**
     * The bean seataAutoDataSourceProxyCreator.
     */
    @Bean(BEAN_NAME_SEATA_AUTO_DATA_SOURCE_PROXY_CREATOR)
    @ConditionalOnMissingBean(SeataAutoDataSourceProxyCreator.class)
    public SeataAutoDataSourceProxyCreator seataAutoDataSourceProxyCreator(SeataProperties seataProperties) {
        return new SeataAutoDataSourceProxyCreator(seataProperties.isUseJdkProxy(),
            seataProperties.getExcludesForAutoProxying(), seataProperties.getDataSourceProxyMode());
    }
}
2. 数据源后置处理器
SeataDataSourceBeanPostProcessor 实现了BeanPostProcessor接口,BeanPostProcessor是Spring 中的后置处理器,作用是在Bean对象在实例化和依赖注入完毕后,调用初始化方法时在其前后添加我们自己的逻辑。
主要是重写了其postProcessAfterInitialization方法,在Bean 初始化完成后会调用该方法,会进行数据源的代理。
    @Override
    public Object postProcessAfterInitialization(Object bean, String beanName) throws BeansException {
        if (bean instanceof DataSource) {
            //When not in the excludes, put and init proxy.
            // 配置中没有忽略DataSource类的代理,则进行代理
            if (!excludes.contains(bean.getClass().getName())) {
                //Only put and init proxy, not return proxy.
                // 初始化代理
                DataSourceProxyHolder.get().putDataSource((DataSource) bean, dataSourceProxyMode);
            }
            //If is SeataDataSourceProxy, return the original data source.
            // 如果Bean 已经是SeataDataSourceProxy,返回原来的数据源
            if (bean instanceof SeataDataSourceProxy) {
                LOGGER.info("Unwrap the bean of the data source," +
                    " and return the original data source to replace the data source proxy.");
                return ((SeataDataSourceProxy) bean).getTargetDataSource();
            }
        }
        return bean;
    }
在上面的putDataSource方法中,会进行数据源代理类的创建:
    /**
     * Put dataSource
     *
     * @param dataSource          数据源
     * @param dataSourceProxyMode 代理模式,AT模式
     * @return dataSourceProxy
     */
    public SeataDataSourceProxy putDataSource(DataSource dataSource, BranchType dataSourceProxyMode) {
        DataSource originalDataSource;
        // 1. 如果数据源是SeataDataSourceProxy,则直接返回
        if (dataSource instanceof SeataDataSourceProxy) {
            SeataDataSourceProxy dataSourceProxy = (SeataDataSourceProxy) dataSource;
            //If it's an right proxy, return it directly.
            // 如果是正确的代理,请直接返回。
            if (dataSourceProxyMode == dataSourceProxy.getBranchType()) {
                return (SeataDataSourceProxy) dataSource;
            }
            //Get the original data source.
            // 获取原始数据源。
            originalDataSource = dataSourceProxy.getTargetDataSource();
        } else {
            originalDataSource = dataSource;
        }
		// 2. 从存放代理的集合中获取该数据源的代理数据源
        SeataDataSourceProxy dsProxy = dataSourceProxyMap.get(originalDataSource);
        if (dsProxy == null) {
        // 3.如果没有则创建代理并放入集合中
            synchronized (dataSourceProxyMap) {
                dsProxy = dataSourceProxyMap.get(originalDataSource);
                if (dsProxy == null) {
                    dsProxy = createDsProxyByMode(dataSourceProxyMode, originalDataSource);
                    dataSourceProxyMap.put(originalDataSource, dsProxy);
                }
            }
        }
        //4. 返回
        return dsProxy;
    }
createDsProxyByMode方法用于创建数据源代理,如果是XA 模式,创建DataSourceProxyXA,其他模式(AT模式)创建DataSourceProxy:
    private SeataDataSourceProxy createDsProxyByMode(BranchType mode, DataSource originDs) {
        return (SeataDataSourceProxy)(BranchType.XA == mode ? new DataSourceProxyXA(originDs) : new DataSourceProxy(originDs));
    }
DataSourceProxy就是代理数据源类,直接通过New 创建数据源代理:
    public DataSourceProxy(DataSource targetDataSource, String resourceGroupId) {
        if (targetDataSource instanceof SeataDataSourceProxy) {
            LOGGER.info("Unwrap the target data source, because the type is: {}", targetDataSource.getClass().getName());
            targetDataSource = ((SeataDataSourceProxy) targetDataSource).getTargetDataSource();
        }
        this.targetDataSource = targetDataSource;
        init(targetDataSource, resourceGroupId);
    }
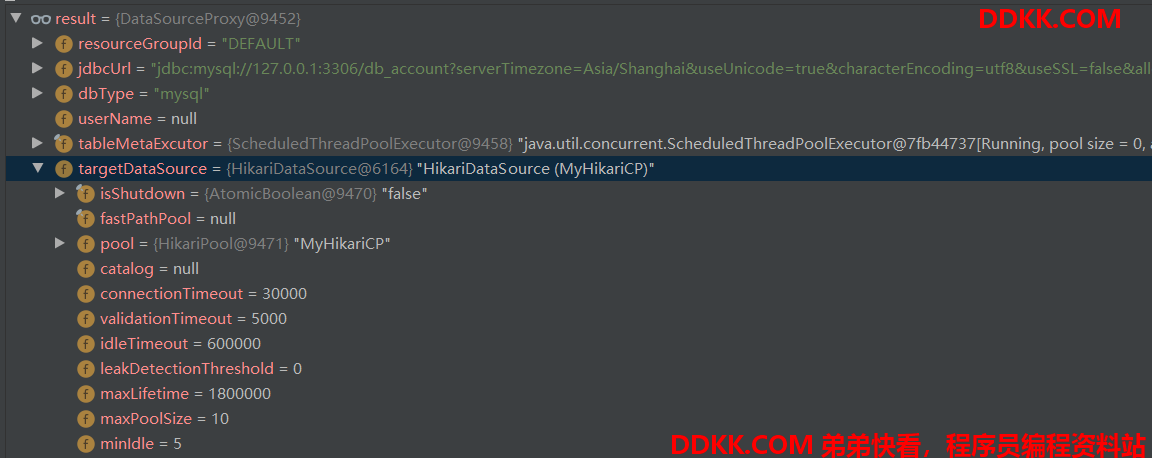
在数据源代理的构造方法中,会调用init 初始化方法,获取原来数据源的属性信息,设置到当前代理类中,并开启一个定时任务,每分钟查询一次数据源的表结构信息并缓存,在需要查询数据库结构时会用到,不然每次去数据库查询结构效率会很低。
    private void init(DataSource dataSource, String resourceGroupId) {
        this.resourceGroupId = resourceGroupId;
        try (Connection connection = dataSource.getConnection()) {
        	// 数据库连接
            jdbcUrl = connection.getMetaData().getURL();
            // 数据库类型,MySql
            dbType = JdbcUtils.getDbType(jdbcUrl);
            if (JdbcConstants.ORACLE.equals(dbType)) {
                userName = connection.getMetaData().getUserName();
            }
        } catch (SQLException e) {
            throw new IllegalStateException("can not init dataSource", e);
        }
        // 资源管理器管理注册本类
        DefaultResourceManager.get().registerResource(this);
        // 判断是否启动定时任务,定时任务的作用是缓存数据库表结构,表结构在RM保存数据快照的时候使用。如果内存中没有缓存,会实时查询数据库。
        //默认1分钟运行一次。
        if (ENABLE_TABLE_META_CHECKER_ENABLE) {
            tableMetaExcutor.scheduleAtFixedRate(() -> {
                try (Connection connection = dataSource.getConnection()) {
                    TableMetaCacheFactory.getTableMetaCache(DataSourceProxy.this.getDbType())
                        .refresh(connection, DataSourceProxy.this.getResourceId());
                } catch (Exception ignore) {
                }
            }, 0, TABLE_META_CHECKER_INTERVAL, TimeUnit.MILLISECONDS);
        }
        //Set the default branch type to 'AT' in the RootContext.
        RootContext.setDefaultBranchType(this.getBranchType());
    }
最终生成的代理数据源如下图所示:

3. 添加AOP
在上面的类中,生成了数据源的代理对象,那么执行数据增删改查时,是如何切换到代理数据源的呢?
SeataAutoDataSourceProxyCreator继承了AbstractAutoProxyCreator抽象类,Spring 通过 AbstractAutoProxyCreator来创建 AOP 代理,其实现了BeanPostProcessor 接口,用于在 bean 初始化完成之后创建它的代理。在Seata 中,该类目的是为数据源添加Advisor,当数据源执行操作时,会进入其SeataAutoDataSourceProxyAdvice类中处理。
public class SeataAutoDataSourceProxyCreator extends AbstractAutoProxyCreator {
    private static final Logger LOGGER = LoggerFactory.getLogger(SeataAutoDataSourceProxyCreator.class);
    private final List<String> excludes;
    private final Advisor advisor;
    public SeataAutoDataSourceProxyCreator(boolean useJdkProxy, String[] excludes, String dataSourceProxyMode) {
        this.excludes = Arrays.asList(excludes);
        this.advisor = new DefaultIntroductionAdvisor(new SeataAutoDataSourceProxyAdvice(dataSourceProxyMode));
        setProxyTargetClass(!useJdkProxy);
    }
	// 为数据源Bean 添加 Advisor
    @Override
    protected Object[] getAdvicesAndAdvisorsForBean(Class<?> beanClass, String beanName, TargetSource customTargetSource) throws BeansException {
        if (LOGGER.isInfoEnabled()) {
            LOGGER.info("Auto proxy of [{}]", beanName);
        }
        return new Object[]{
     advisor};
    }
	// 不是DataSource 则跳过
    @Override
    protected boolean shouldSkip(Class<?> beanClass, String beanName) {
        return !DataSource.class.isAssignableFrom(beanClass) ||
            SeataProxy.class.isAssignableFrom(beanClass) ||
            excludes.contains(beanClass.getName());
    }
}
当数据源执行操作时,由于添加了AOP代理,最终会进入到SeataAutoDataSourceProxyAdvice的invoke方法中:
    @Override
    public Object invoke(MethodInvocation invocation) throws Throwable {
        if (!RootContext.requireGlobalLock() && dataSourceProxyMode != RootContext.getBranchType()) {
            return invocation.proceed();
        }
		// 数据源执行的方法,比如获取连接的 getConnection()
        Method method = invocation.getMethod();
        Object[] args = invocation.getArguments();
        // 查询代理数据源对应的方法 DataSourceProxy.getConnection()
        Method m = BeanUtils.findDeclaredMethod(dataSourceProxyClazz, method.getName(), method.getParameterTypes());
        if (m != null && DataSource.class.isAssignableFrom(method.getDeclaringClass())) {
            SeataDataSourceProxy dataSourceProxy = DataSourceProxyHolder.get().putDataSource((DataSource) invocation.getThis(), dataSourceProxyMode);
            // 执行代理数据源的方法
            return m.invoke(dataSourceProxy, args);
        } else {
            return invocation.proceed();
        }
    }