动画:图像
原理:能够识别的最小的时间间隔是18帧,一般情况下电影院里放映的电影24帧
匀速运动
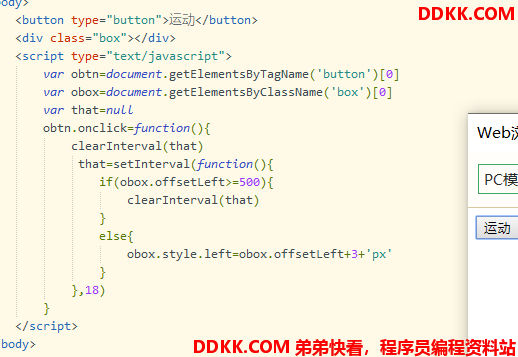
简单匀速运动:从左到右
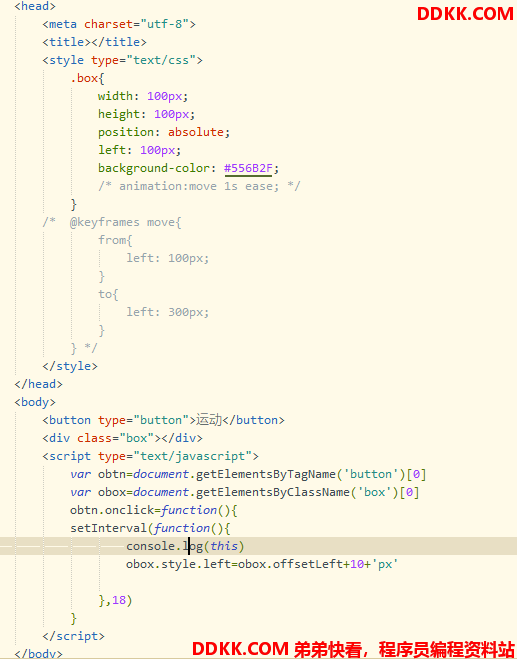
再上图,当我们利用setInterval进行简单的匀速时,有以下问题需要解决的。
1、 停不下来;
解决:clearIntervel
注:每个定时器最好对应一个变量存储,多个定时器要实现多个变量存储。后续有讲到。
clearInterval(that)
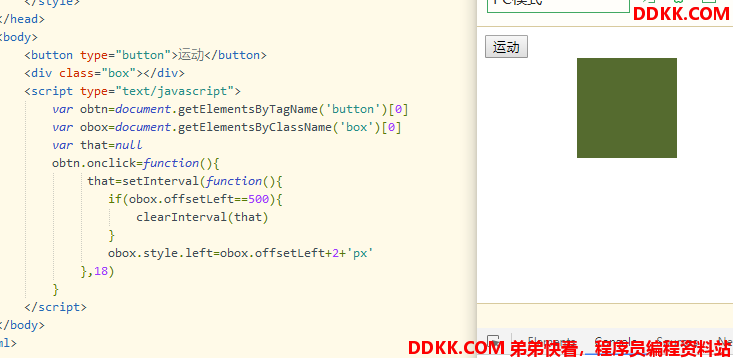
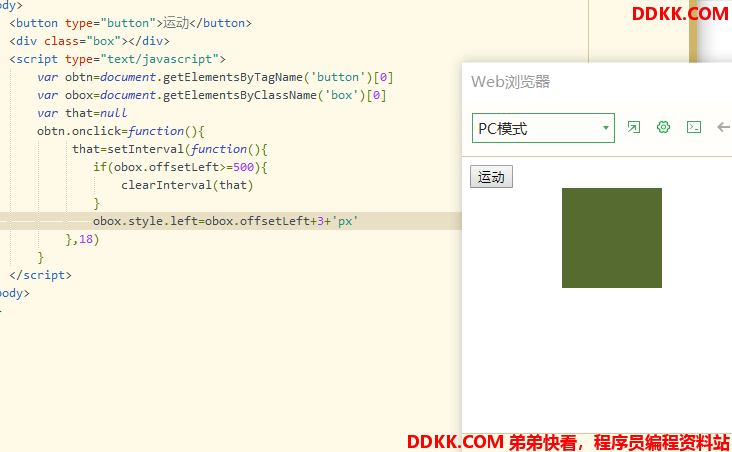
2、 当速度取某些值时,不满足界限时停不下来;
解决:>=
if(obox.offsetLeft>=500)
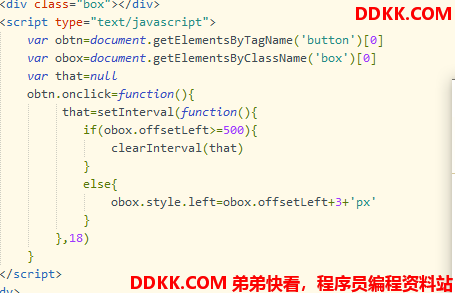
3、 到达目的值以后点击还会继续往前运动;
解决:if…else
if(obox.offsetLeft>=500){
    clearInterval(that)
}
else{
    obox.style.left=obox.offsetLeft+10+'px'
}
4、 重复点击会加速,重复点击会产生多个定时器;
解决:保证只有一个定时器,关闭上次的定时器
运动框架:编写运动代码固定的套路
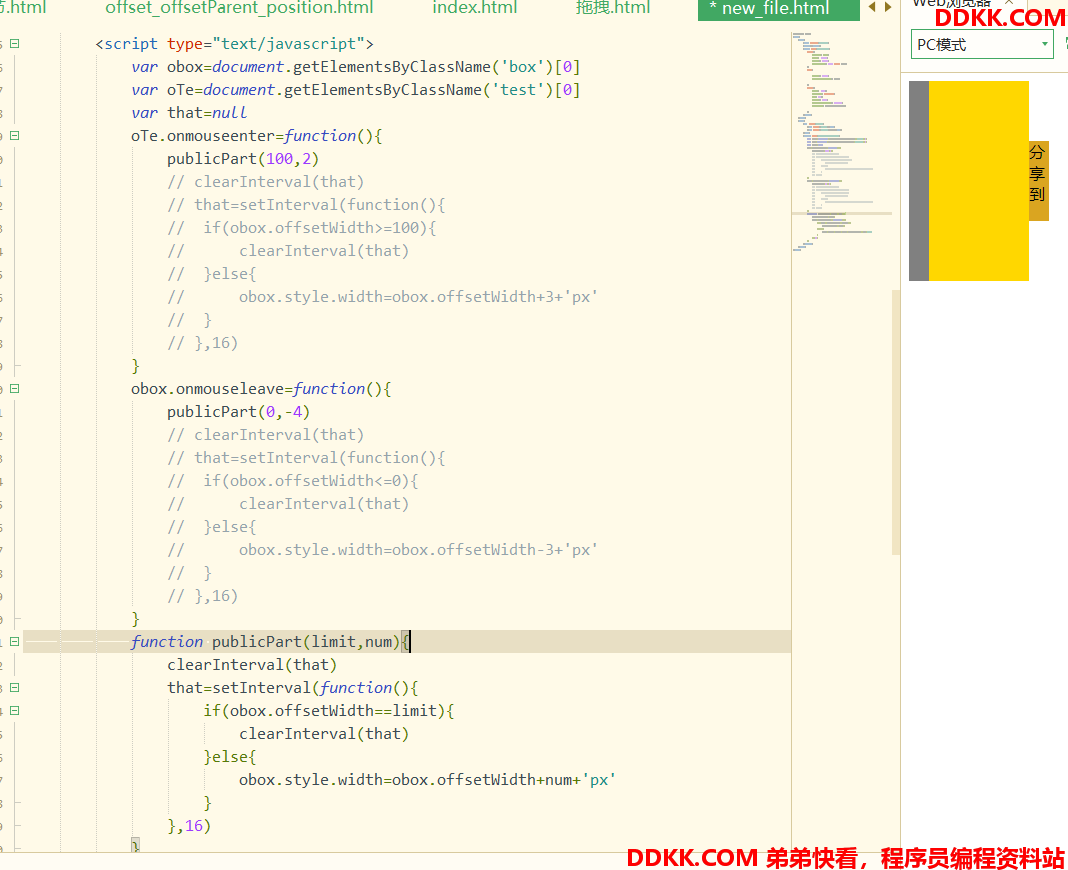
1、 每次启动定时器之前,先将上一次定时器关闭;
2、 if…else将运动和停止分开;
案例:
分享菜单 鼠标移入划出,鼠标移出划入
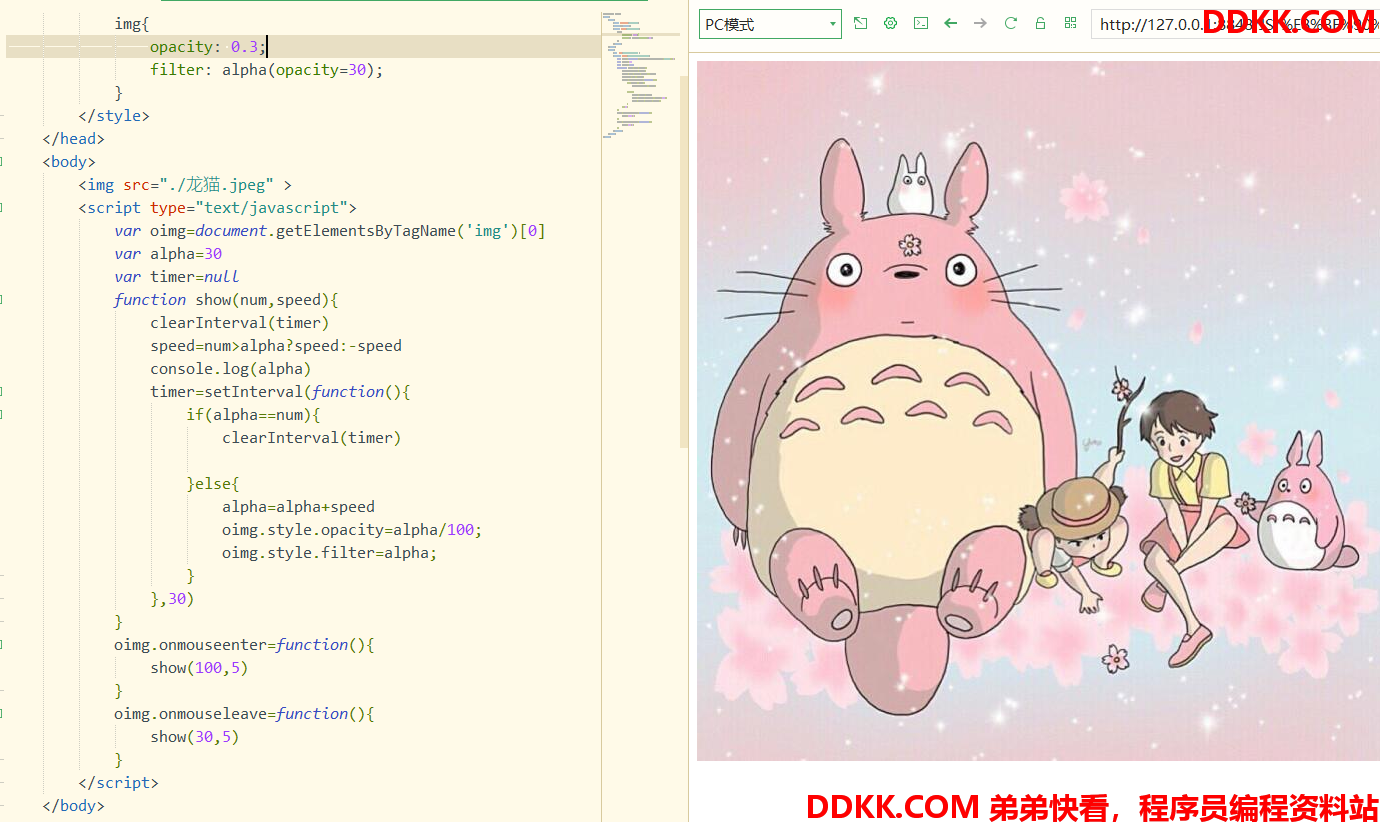
淡入淡出 鼠标移入透明度变大 鼠标移出透明度变小
缓冲运动

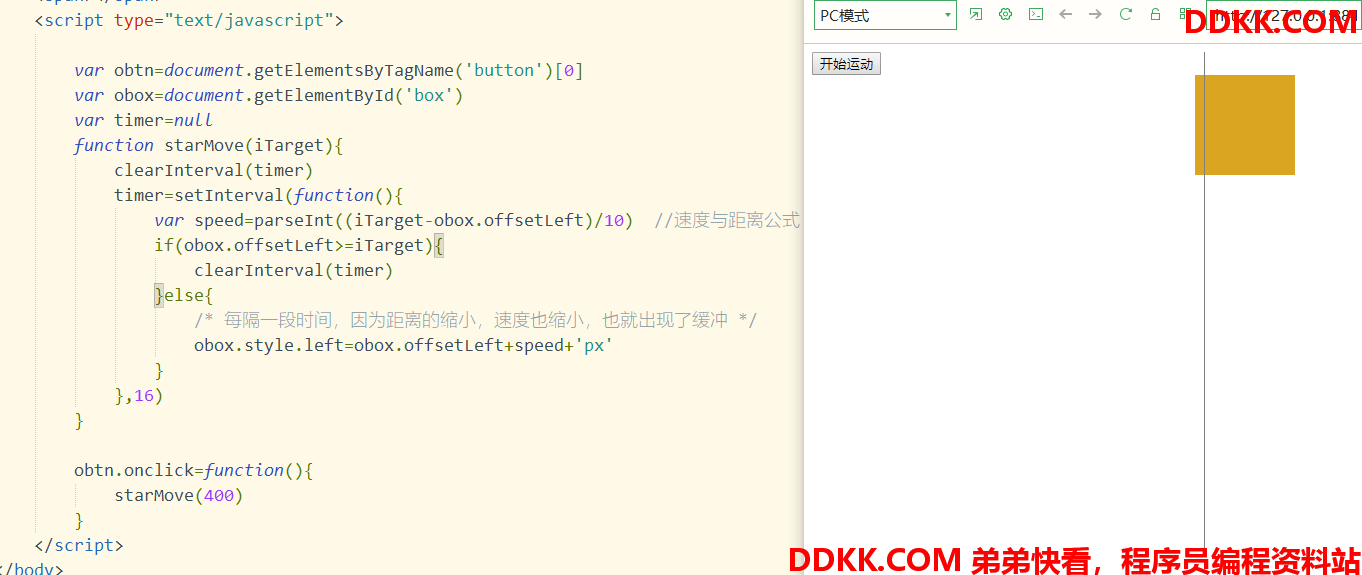
大胆猜想:不是物理规律的特点:速度与距离成正比
var speed='距离'
var speed=iTarget(目标位置)-iCur(当前物体的位置)
但是如果直接取iTarget(目标位置)-iCur(当前物体的位置),物体就会直接到达终点,因此,我们要将速度缩小,根据测试,
var speed=(iTarget(目标位置)-iCur(当前物体的位置))/8最合适
初步构思:
bug:物体没有完全抵达预计的距离
原因:计算机最小能识别的像素是1像素,当你的像素值小于1时,就会出现bug,可能不一定在哪一个小于1的值,就当作0处理,所以物体没有达到预估的位置,就是在最后的时候speed一直是0
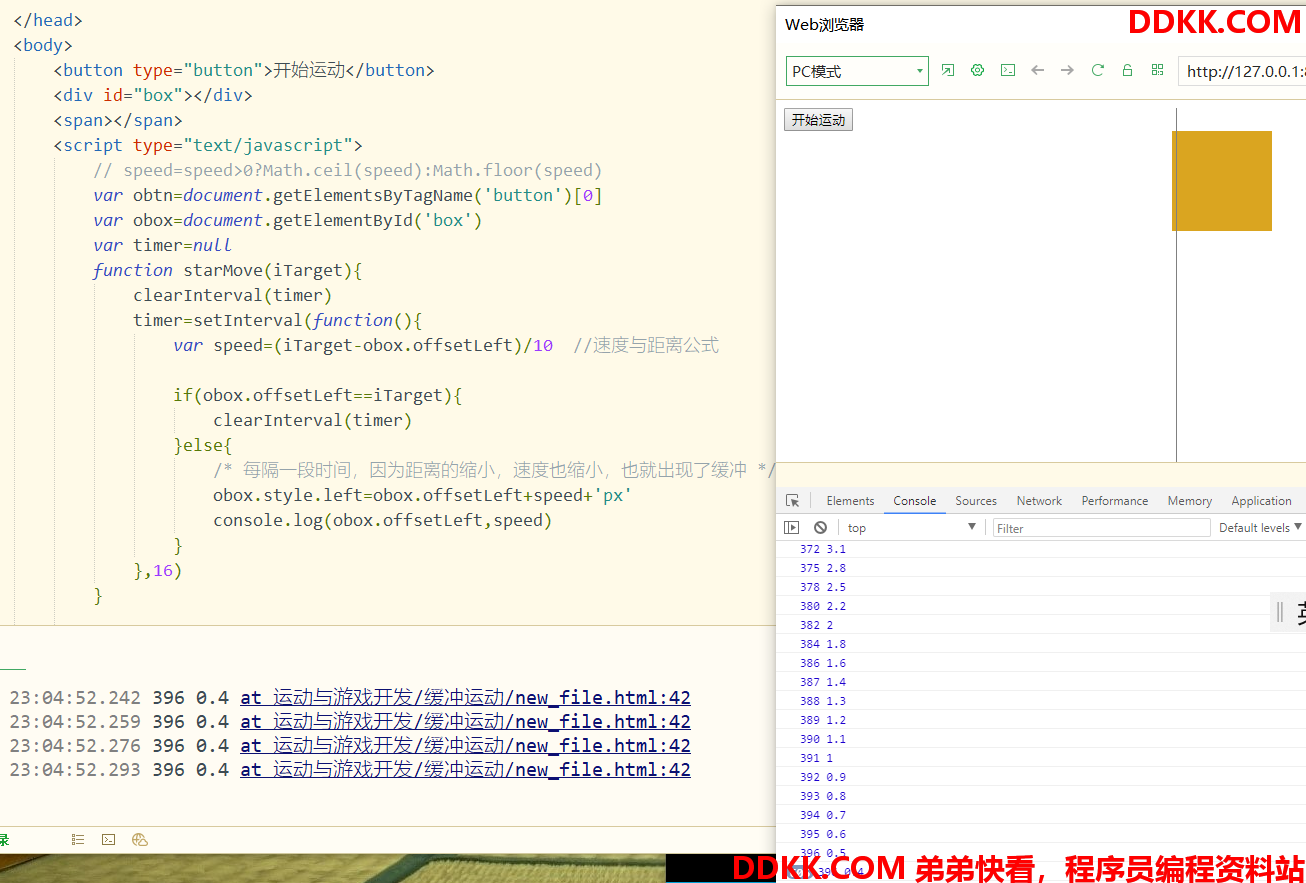
改正:将速度向上取整,这样即使小于1的部分也会当作1计算
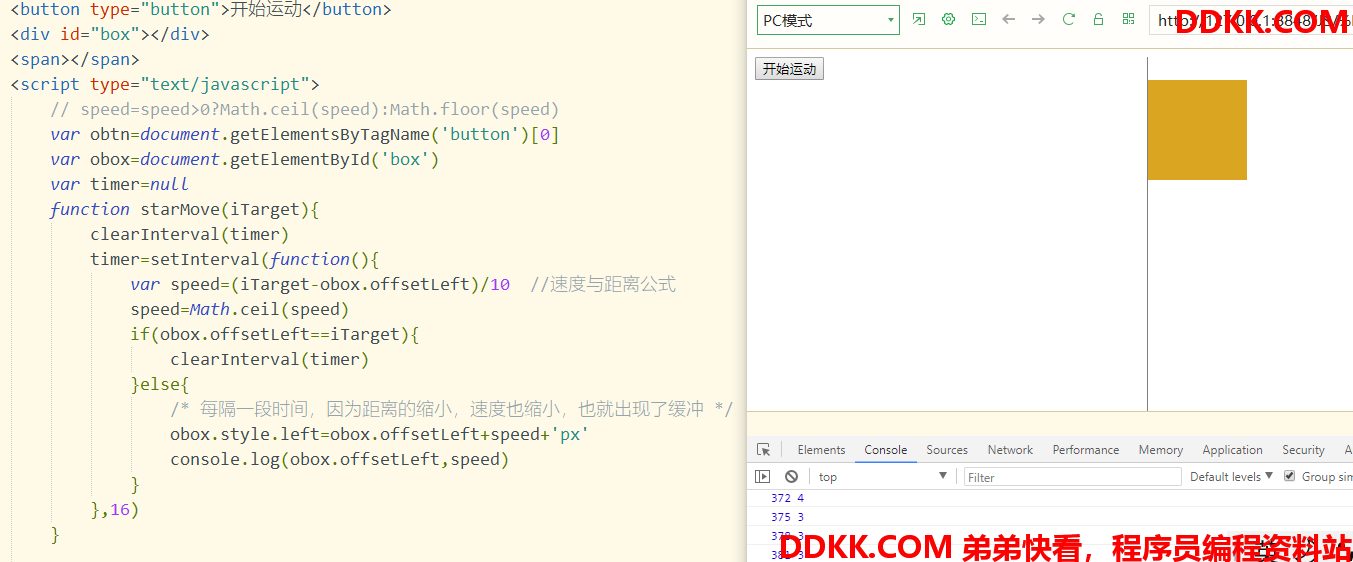
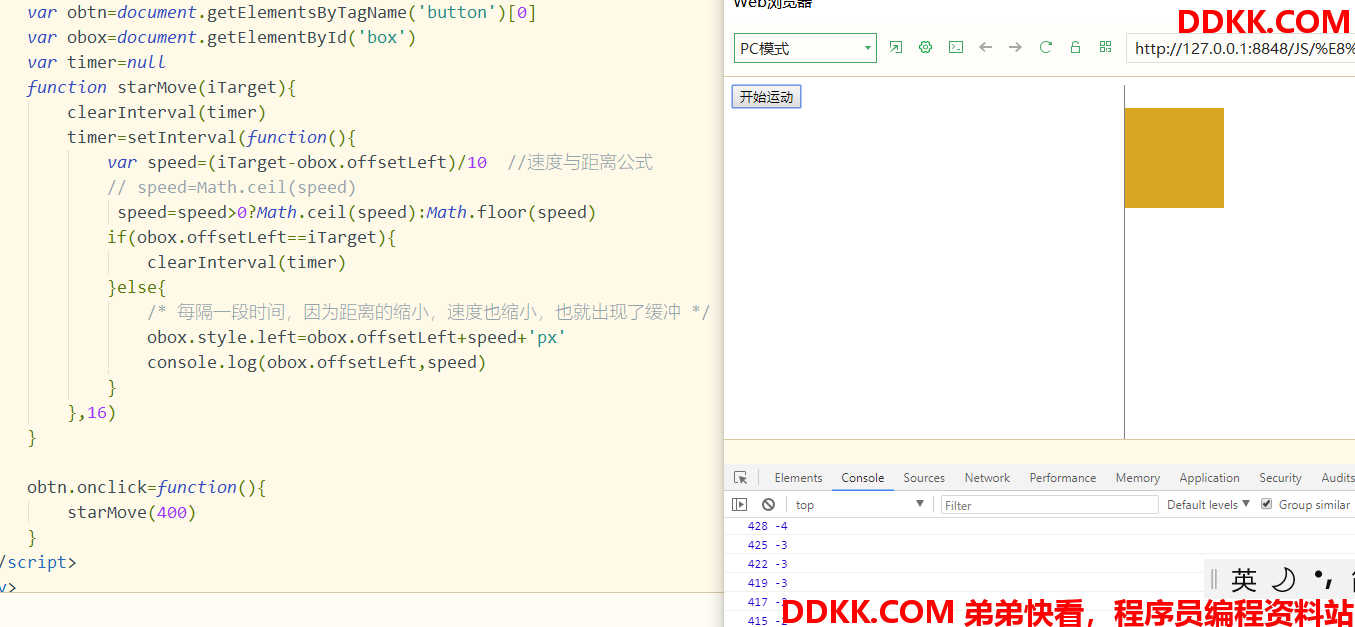
bug2:当反向运动时,就会出现同样的问题,当大于-1不识别
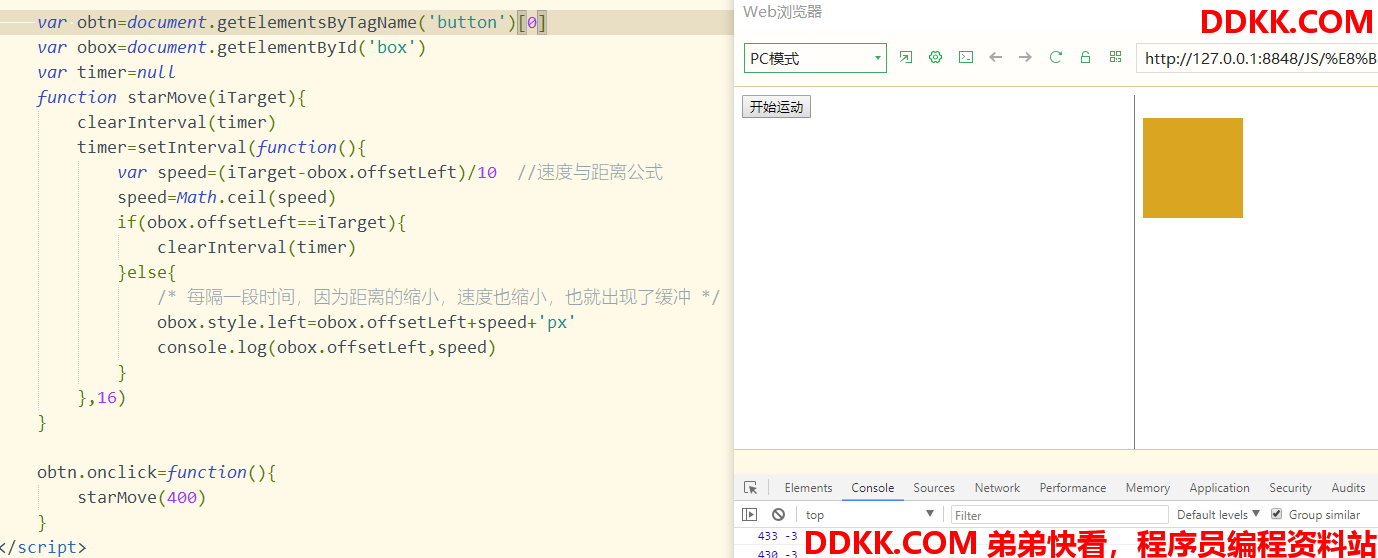
改正:判断速度正负值时:大于0向上取整,小于0向下取整
案例:缓冲菜单 难点:空间分析,距离测量
功能:滑块随滚动条的滚动位置保持不变
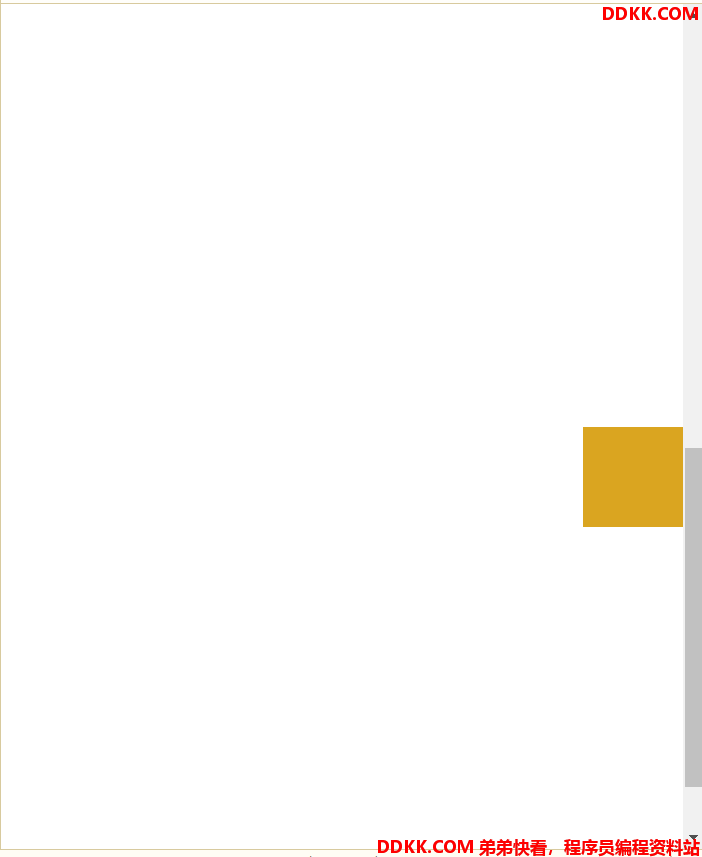
<!DOCTYPE html>
<html>
	<head>
		<meta charset="utf-8">
		<title></title>
		<style type="text/css">
			*{
				margin: 0;
				padding: 0;
			}
			body{
				height: 2000px;
				width: 100%;
			}
			.box{
				width: 100px;
				height: 100px;
				background-color:DAA520;
				position: absolute;
				right: 0;
			}
		</style>
	</head>
	<body>
		<div class="box"></div>
		<script type="text/javascript">
			var obox=document.getElementsByClassName('box')[0]
			/*获取滚动条距离浏览器窗口相对高度  */
			var scrolltop=document.documentElement.scrollTop||document.body.scrollTop;
			/*获取浏览器窗口高度  */
			var height=document.documentElement.clientHeight||document.body.clientHeight;
			var timer=null
			var relativeTop=scrolltop+height/2
			startmove(relativeTop)
			function startmove(relative){
				clearInterval(timer)
				timer=setInterval(function(){
					if(obox.offsetTop==relative){
						clearInterval(timer)
					}else{
						/* 速度会定时减小,形成缓冲效果。
						减小原理:依据物体距离窗口中部之间的距离变小 */
						var speed=(relative-obox.offsetTop)/8;
						speed=speed>0?Math.ceil(speed):Math.floor(speed)
						obox.style.top=obox.offsetTop+speed+'px';
					}
				},16)
			}
			window.onscroll=function(){
				/*获取当前滚动条距离文档窗口相对高度  */
				var scrolltop=document.documentElement.scrollTop||document.body.scrollTop;
				var height=document.documentElement.clientHeight||document.body.clientHeight;
				/* 获取当前窗口的中间距离文档顶部的距离 */
				var relativeTop=scrolltop+height/2
				startmove(relativeTop)
			}
			window.onresize=function(){
				console.log(1)
				/*获取当前滚动条距离文档窗口相对高度  */
				var scrolltop=document.documentElement.scrollTop||document.body.scrollTop;
				var height=document.documentElement.clientHeight||document.body.clientHeight;
				/* 获取当前窗口的中间距离文档顶部的距离 */
				var relativeTop=scrolltop+height/2
				startmove(relativeTop)
			}
		</script>
	</body>
</html>
多物体运动
注:多物体运动,会涉及到this指向问题,记得使用call\bind\apply或者属性,或者变量存储。
注:不能共用定时器,不能共享数据
bug:共用定时器会干扰到别的物体的运动
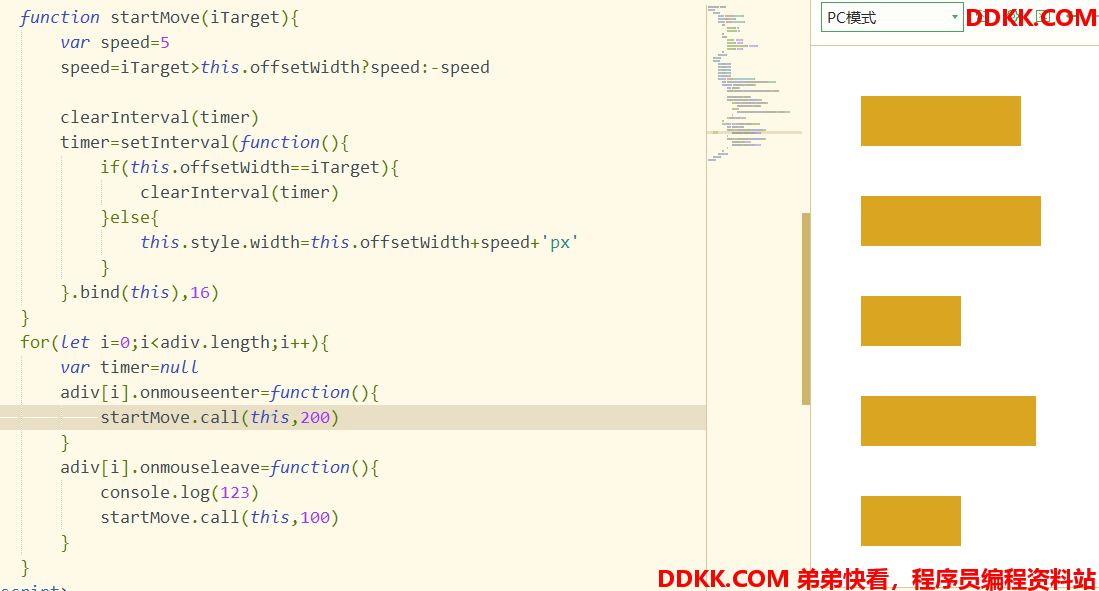
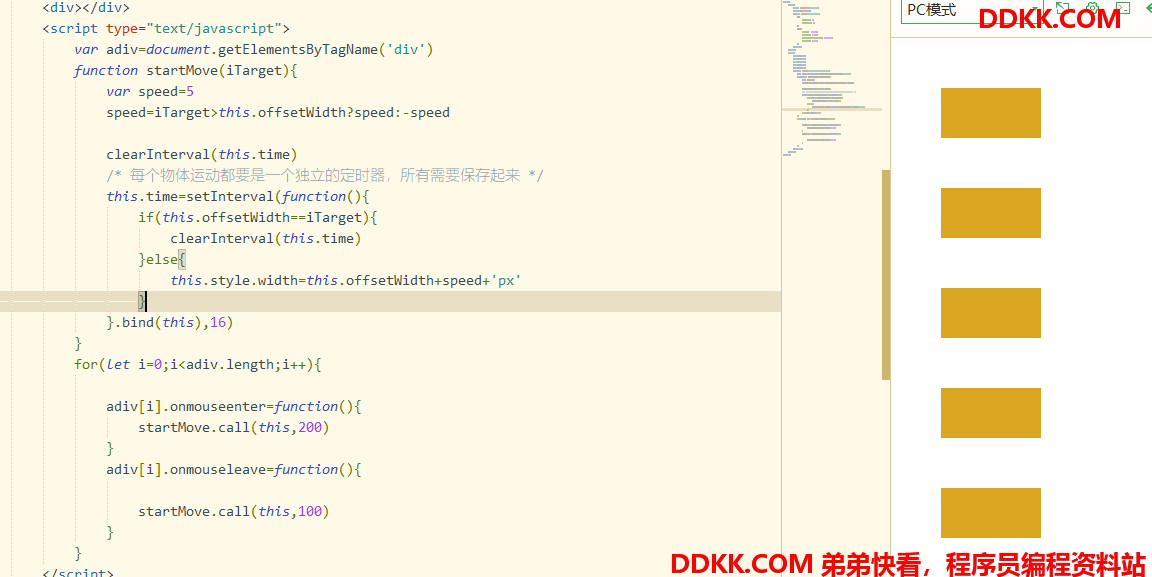
解决:给每个物体设置独立的定时器,可以使用元素属性存起来
this.time=setInterval(...)
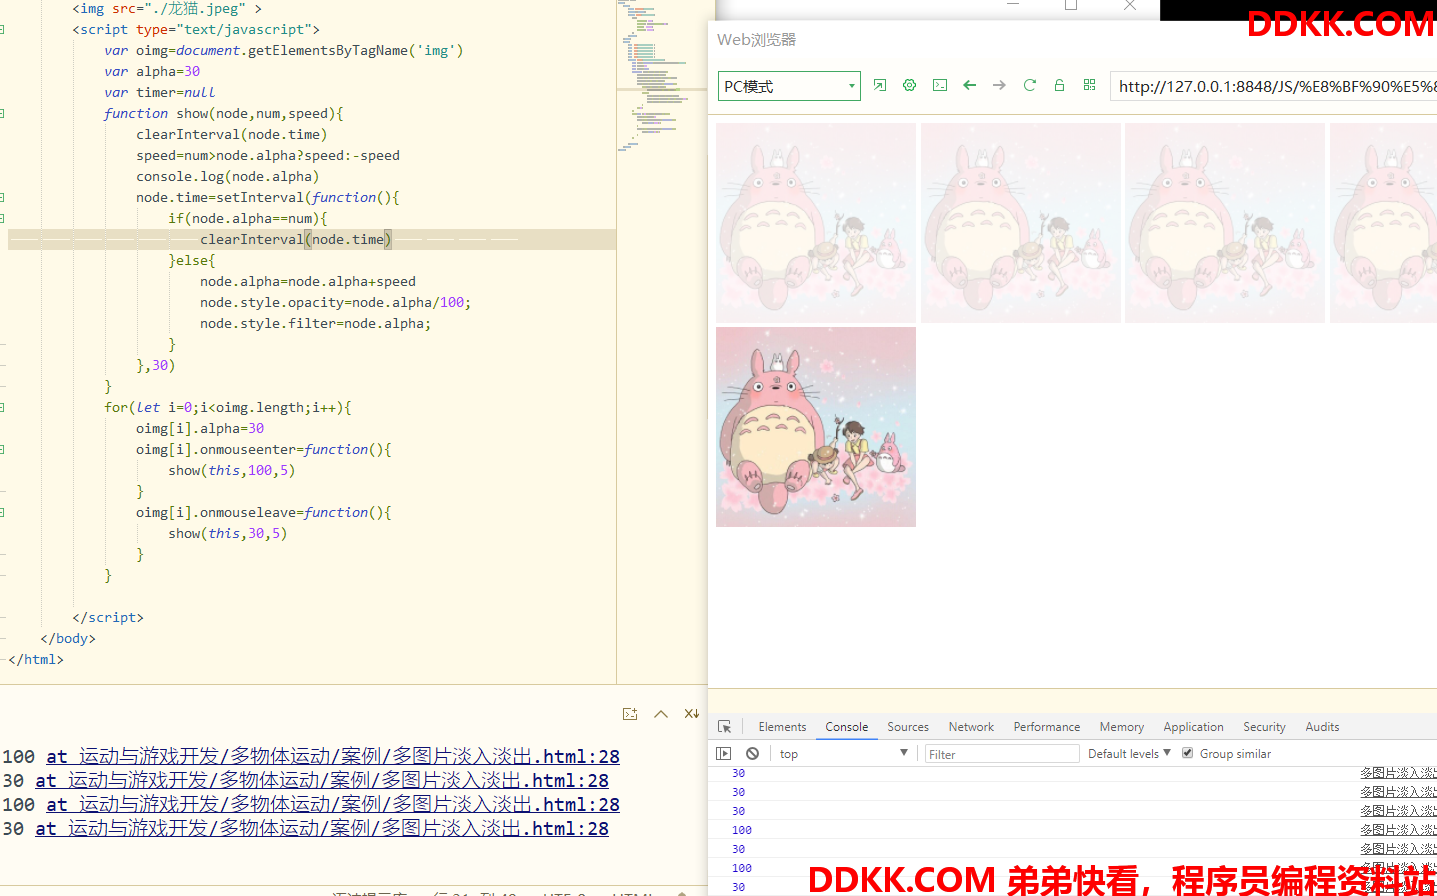
案例:多图片淡入淡出
bug:任何数据不能共用
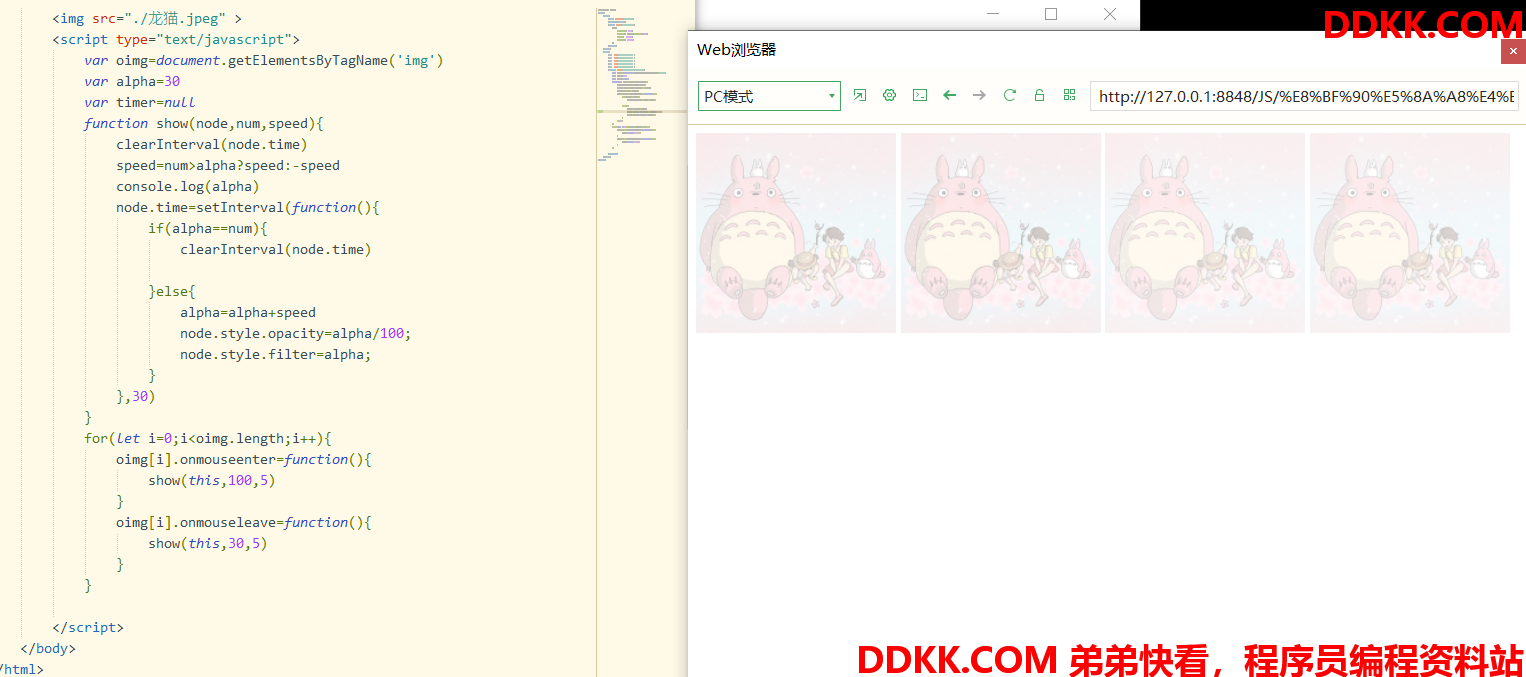
解决:也是设置元素属性存储起来。
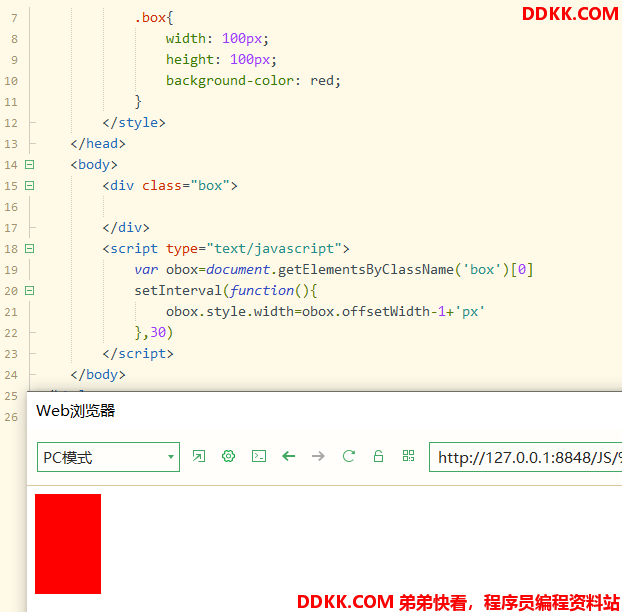
offset系类问题
正常情况:
加上border时候,不减反增。并且border越大,增加的越快
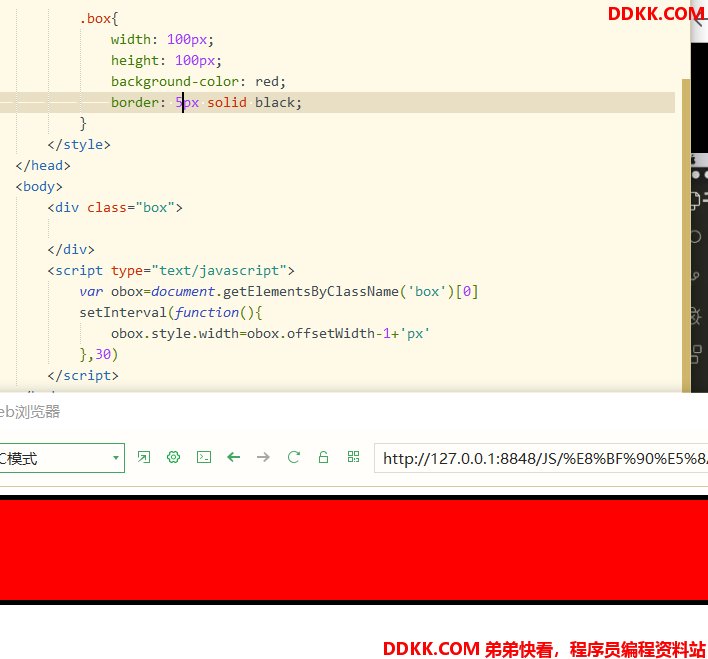
原理:offsetWidth获取的宽度包括width+padding+border宽度,而style设置的width就是纯内容宽度也就是content部分宽度。在开始时offsetWidth是102的,而width是100,即使offsetWidth-1那么还是101,此时width只会在原基础上+1而不是减1也就出现了,只增不简的情况。
利用元素属性获取外部样式( 单纯的width): 元素节点.currentStyle[‘属性’]或者getComputedStyle(元素节点)[‘属性’] (知识点:获取当前有效样式)
node.currentStyle[style](IE兼容)
getComputedStyle(node)[style](火狐和谷歌兼容)。
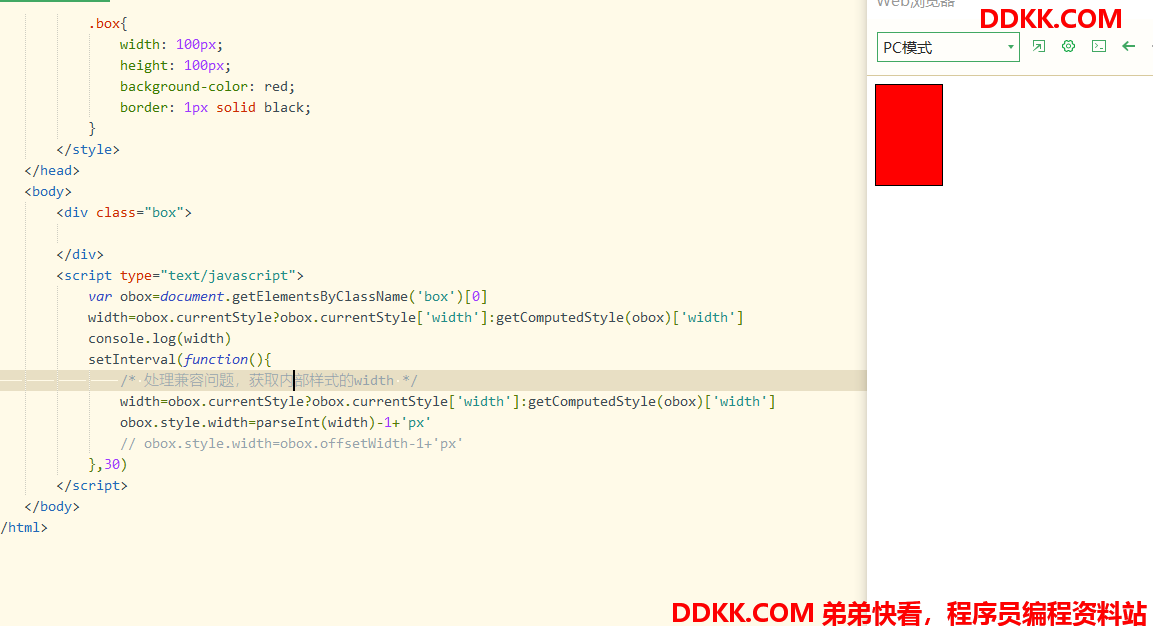
因此:在实现运动的函数里面,尽量使用node.ocurrentStyle[‘属性’]或者getComputedStyle(node)[‘属性’] 获取当前有效样式。
多物体多样式运动
多物体多样式运动:用一个函数实现不同样式的改变。
带px样式多物体的运动#
//封装多物体多样式运动
			function startMove(node,attr,iTarget){
				/* 停止上一次运动 */
				clearInterval(node.time)
				/* 每个物体独立的定时器 */
				node.time=setInterval(function(){
					/* 获取当前有效样式 */
					var newattr=node.currentStyle?node.currentStyle[attr]:getComputedStyle(node)[attr]
					newattr=parseInt(newattr)
					// 缓冲运动
					var speed=(iTarget-newattr)/8
					speed=speed>0?Math.ceil(speed):Math.floor(speed)
					if(newattr==iTarget){
						clearInterval(node.time)
					}else{
						/* 设置当前有效样式 */
						node.style[attr]=newattr+speed+'px'
						// node.setAttribute('style',attr+':'+(newattr+speed)+'px')
					}
				},16)
			}
针对不带px的样式运动
//封装多物体多样式运动
			function startMove(node,attr,iTarget){
				/* 停止上一次运动 */
				clearInterval(node.time)
				/* 每个物体独立的定时器 */
				node.time=setInterval(function(){
					/* 获取当前有效样式 */
					var newattr=node.currentStyle?node.currentStyle[attr]:getComputedStyle(node)[attr]
					//判断是否是透明度样式
					if(attr=='opacity'){
						newattr=parseFloat(newattr)
					}else{
						newattr=parseInt(newattr)
					}
					// 缓冲运动
					var speed=(iTarget-newattr)/8
					speed=speed>0?Math.ceil(speed):Math.floor(speed)
					if(newattr==iTarget){
						clearInterval(node.time)
					}else{
						/* 设置当前有效样式 */
						if(attr=='opacity'){
							node.style.opacity=newattr+speed/100
							node.style.filter='alpha(opcity='+ (newattr+speed)+');'
						}else{
							node.style[attr]=newattr+speed+'px'
							// node.setAttribute('style',attr+':'+(newattr+speed)+'px')
						}
					}
				},16)
			}
链式运动
一个运动的结束意味着另一个运动开始。
注:关键点,找到第一个动画结束的时候
回调函数:我们把函数当作参数传入,并且在合适的时候调用的方式叫做回调函数,在别的编程语言(c语言,c++)叫做函数指针。
原理:在多运动多样式的封装基础上,增添多一个形参。这个形参代表的是传入的回调函数,每次运动结束时,执行这个回调函数。回调函数里面的再去执行我们的下一次运动,这样的链式运动就完成啦。
function getStyle(node,attr){
				return node.currentStyle?node.currentStyle[attr]:getComputedStyle(node)[attr]
			}
			function startMove(node,attr,iTarget,complete){
				clearInterval(node.time)
				node.time=setInterval(function(){
					if(attr=='opacity'){
						var nowstyle=getStyle(node,attr)
						nowstyle=nowstyle*100
					}else{
						var nowstyle=getStyle(node,attr)
						nowstyle=parseInt(nowstyle)
					}
					if(nowstyle==iTarget){
						clearInterval(node.time)
						/*
							startMove(node,'opacity',30) 这种是不合适的,
							因为我随时要更换运动属性,所以不能固定在这里
							注:封装函数,形参,根据函数不确定的值决定的
							可以将一段代码编写的权力交给别人
							声明一个形参,这个形参是用来从外面封装的函数
						 */
						/* 只有当complete存在才执行 */
						if(complete){
							complete.call(node)
						}
					}else{
						var speed=(iTarget-nowstyle)/8
						speed=speed>0?Math.ceil(speed):Math.floor(speed)
						if(attr=='opacity'){
							node.style.opacity=(nowstyle+speed)/100
							node.style.filter='alpha(opacity'+nowstyle+speed/+')'
						}else{
							node.style[attr]=nowstyle+speed+'px'
						}
					}
				},16)
			}
使用:
使用:
obox.onmouseenter=function(){
				// function list(){
				// 	startMove(this,'height',200)
				// }
				// startMove(this,'width',300,list)
				startMove(this,'width',300,function(){
					startMove(this,'height',300,function(){
						startMove(this,'opacity',30)
					})
				})
			}
回调函数案例:
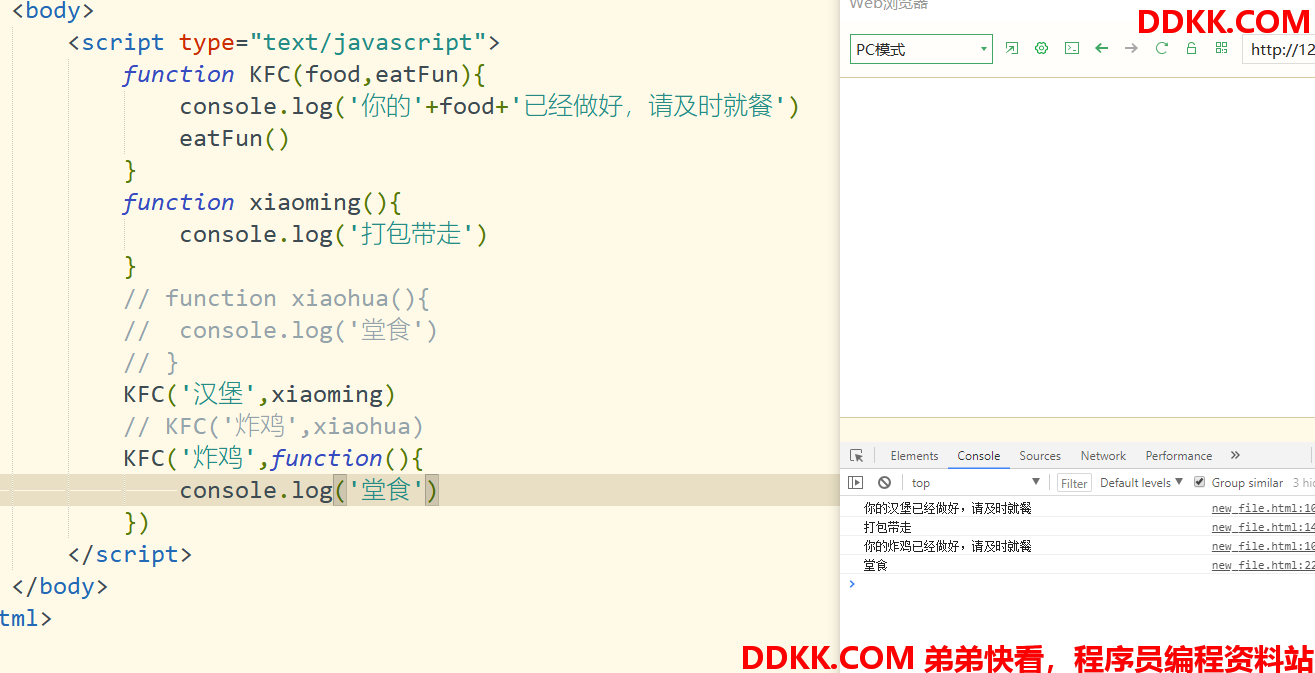
案例:
打砖块:
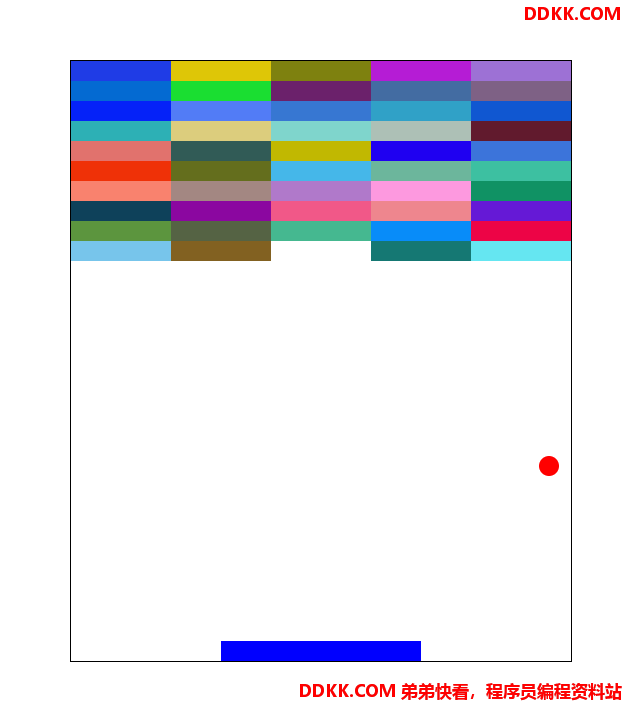
<!DOCTYPE html>
<html>
	<head>
		<meta charset="utf-8">
		<title></title>
		<style type="text/css">
			* {
				margin: 0;
				padding: 0;
			}
			li {
				list-style: none;
			}
			#main {
				width: 500px;
				height: 600px;
				border: 1px solid black;
				margin: 100px auto;
				position: relative;
			}
			ul {
				position: relative;
			}
			ul li {
				position: absolute;
			}
			#block {
				width: 200px;
				height: 20px;
				background-color: blue;
				position: absolute;
				bottom: 0;
				left: 50%;
				transform: translateX(-50%);
			}
			#ball {
				z-index: 2;
				width: 20px;
				height: 20px;
				border-radius: 10px;
				background-color: red;
				position: absolute;
				bottom: 20px;
				left: 50%;
				transform: translateX(-50%);
			}
		</style>
	</head>
	<body>
		<div id="main">
			<div id="ball"></div>
			<div id="block"></div>
		</div>
		<script type="text/javascript">
			var oMain = document.getElementById('main')
			var oBlock = document.getElementById('block')
			var oBall = document.getElementById('ball')
			/* 优化性能 生成一个ul将li放入,在一次性放入到容器中,减少对bom的操作 */
			var oul = document.createElement('ul')
			/* 计算消失的方块数,验证游戏成功 */
			var count=0
			/* 生成随机颜色 */
			function randColor() {
				return 'rgb(' + parseInt(Math.random() * 256) + ',' + parseInt(Math.random() * 256) + ',' + parseInt(Math
					.random() * 256) + ')'
			}
			/* 创建颜色方块以及布局 */
			var top_count = 0
			var left_count = 0
			for (let i = 0; i < 50; i++) {
				var newNode = document.createElement('li')
				newNode.style.backgroundColor = randColor()
				newNode.style.height = '20px'
				newNode.style.width = '100px'
				newNode.style.left = 100 * left_count + 'px'
				newNode.style.top = 20 * top_count + 'px'
				if (++left_count == 5) {
					left_count = 0
					top_count++
				}
				oul.appendChild(newNode)
			}
			/* 将颜色方块插入到容器中 */
			oMain.appendChild(oul)
			/* 小球球运动 */
			function startMove(node, attr, iTarget, complete) {
				var speedX = parseInt(Math.random() * 10)
				clearInterval(node.time)
				node.time = setInterval(function() {
					var iCur = parseInt(getStyle(node, attr))
					node.style.left = oBall.offsetLeft + speedX + 'px'
					/* 球的左右临界 */
					var width = parseInt(getStyle(oMain, 'width'))
					if (node.offsetLeft + node.offsetWidth >= width || node.offsetLeft <= 0) {
						speedX = -speedX
						node.style.left = node.offsetLeft + speedX + 'px'
					}
					var speed = 5
					speed = (iTarget - iCur) > 0 ? speed : -speed
					// var speed=(iTarget-iCur)/8
					// speed=speed>0?Math.ceil(speed):Math.floor(speed)
					if (iCur == iTarget) {
						clearInterval(node.time)
						/* 小球运动掉地 提示失败 */
						if (iCur == 0) {
							alert("GAME OVER")
							window.location.reload()
						} else {
							if (complete) {
								complete()
							}
						}
					} else {
						node.style[attr] = iCur + speed + 'px'
						/* 球与滑块碰撞瞬间 */
						var bottom = parseInt(getStyle(oBall, 'bottom'))
						if (oBall.offsetLeft >= oBlock.offsetLeft - oBlock.offsetWidth/2 && oBall.offsetLeft <= oBlock.offsetLeft +  oBlock.offsetWidth/2 &&
							bottom <= oBlock.offsetHeight && bottom >= oBlock.offsetHeight-5) {
							start()
						}
						/* 球与上层方块碰撞 */
						for (let i = 0; i < oul.children.length; i++) {
							var bottom = oul.children[i].offsetTop + oul.children[i].offsetHeight
							var top = oBall.offsetTop
							/* 底部碰撞和两侧碰撞都算 */
							if ((node.offsetLeft >= oul.children[i].offsetLeft &&
									node.offsetLeft <= oul.children[i].offsetLeft + 100 &&
									bottom == top) || (node.offsetLeft == oul.children[i].offsetLeft + oul.children[i]
									.offsetWidth && bottom == top) ||
								(node.offsetLeft + node.offsetWidth / 2 == oul.children[i].offsetLeft && bottom == top)
								) {
								oul.children[i].style.display = 'none'
								count++;
								if(count>=oul.children.length){
									clearInterval(node.time)
									alert('恭喜你!!!!!通关成功')
									end=''
								}
								end()
								break;
							}
						}
					}
				}, 16)
			}
			/* 初始小球运动一次 */
			function start() {
				startMove(oBall, 'bottom', 580, function() {
					startMove(oBall, 'bottom', 0)
				})
			}
			function end() {
				startMove(oBall, 'bottom', 0, function() {
					startMove(oBall, 'bottom', 580)
				})
			}
			start()
			/* 滑块拖拽 */
			/* 获取当前有效样式 */
			function getStyle(node, attr) {
				/* 浏览器兼容性处理 currentStyle(IE支持)getComputedStyle(火狐谷歌支持)*/
				return node.currentStyle ? node.currentStyle[attr] : getComputedStyle(node)[attr]
			}
			oBlock.onmousedown = function(ev) {
				/* 浏览器兼容性处理  IE8以下用window.event获取事件对象*/
				var e = ev || window.event
				var left = e.clientX - oMain.offsetLeft - oBlock.offsetLeft
				oMain.onmousemove = function(ev) {
					var e = ev || window.event
					oBlock.style.left = e.clientX - oMain.offsetLeft - left + 'px'
					console.log(oBlock.offsetLeft)
					//越界处理
					critical_values(oBlock)
				}
			}
			oMain.onmouseup = function() {
				oMain.onmousemove = ''
			}
			/* 临界范围 */
			function critical_values(node) {
				/* 获取容器宽度 */
				var width = parseInt(getStyle(oMain, 'width'))
				var point = node.offsetLeft + node.offsetWidth / 2
				if (point >= width) {
					node.style.left = width - node.offsetWidth / 2 + 'px'
				}
				if (node.offsetLeft - node.offsetWidth/2 <= 0) {
					node.style.left =node.offsetWidth/2+'px'
				}
			}
		</script>
	</body>
</html>
圆周运动:
1、 确定圆心2.确定半径3.旋转;
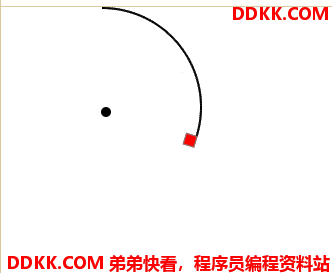
<!DOCTYPE html>
<html>
	<head>
		<meta charset="utf-8">
		<title></title>
		<style type="text/css">
			* {
				margin: 0;
				padding: 0;
			}
			li{
				list-style: none;
			}
			#box {
				width: 10px;
				height: 10px;
				border: 1px solid808080;
				background-color:FF0000;
				position: absolute;
				transform-origin: 0px 100px;
				left: 101px;
				z-index: 2;
			}
			#point {
				width: 10px;
				height: 10px;
				position: absolute;
				left: 100px;
				top: 100px;
				background-color: black;
				border-radius: 5px;
			}
			ul li{
				left: 101px;
				position: absolute;
				transform-origin: 0px 100px;
				width: 2px;
				height: 2px;
				background-color:000000;
			}
		</style>
	</head>
	<body>
		<div id="box"></div>
		<div id="point"></div>
		<script type="text/javascript">
			var obox = document.getElementById('box')
			var X = 100;
			var Y = 100;
			var i = 1;
			var newnode=document.createElement('ul')
			var timer=null
			timer=setInterval(function() {
				if(i==360){
					clearInterval(timer)
				}
				obox.style.transform = 'rotate(' +i + 'deg)'
					var newLi=document.createElement('li')
					newLi.style.transform = 'rotate(' +(i-1)+ 'deg)'
					newnode.appendChild(newLi)
				i++;
			}, 16)
			document.body.appendChild(newnode)
		</script>
	</body>
</html>
完美运动框架:
当我们链式运动的函数时,想利用一个函数在同一时刻执行多个运动时会出现覆盖
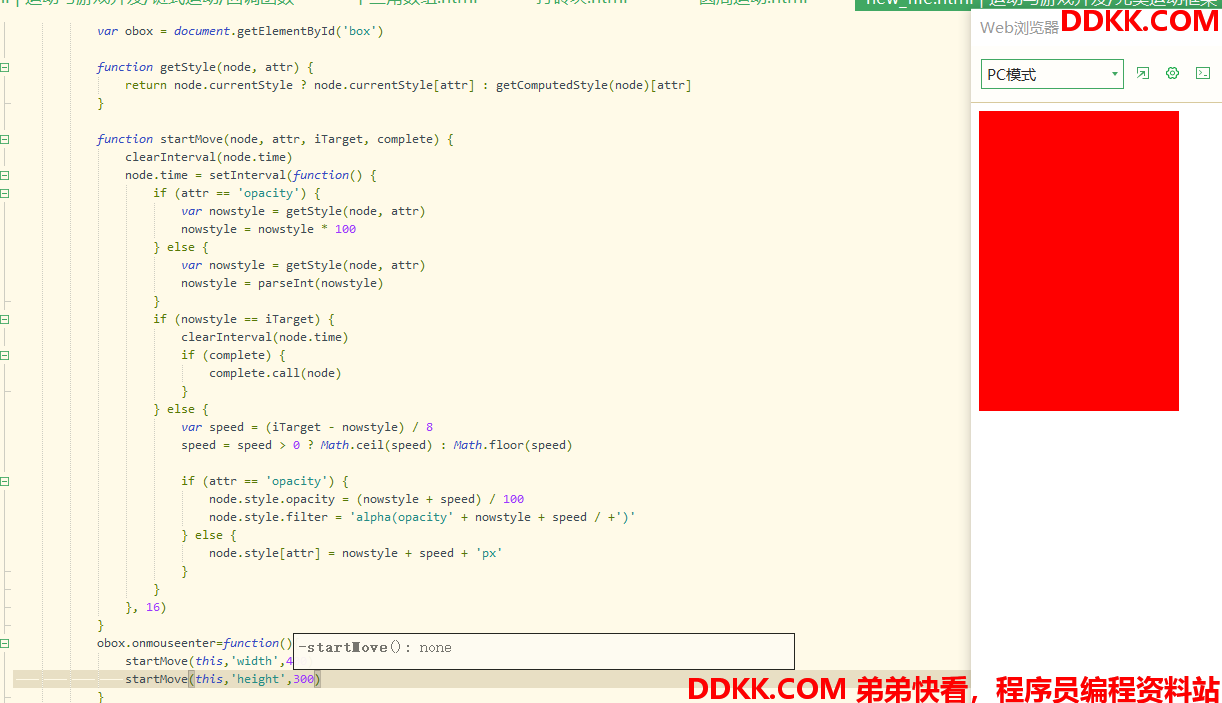
因为是同一个节点进行多个运动,所以它们使用的是同一个定时器,因此会出现同元素不同属性的定时器会被关闭。
先用用一个案例解析以下如何同设置多个样式:
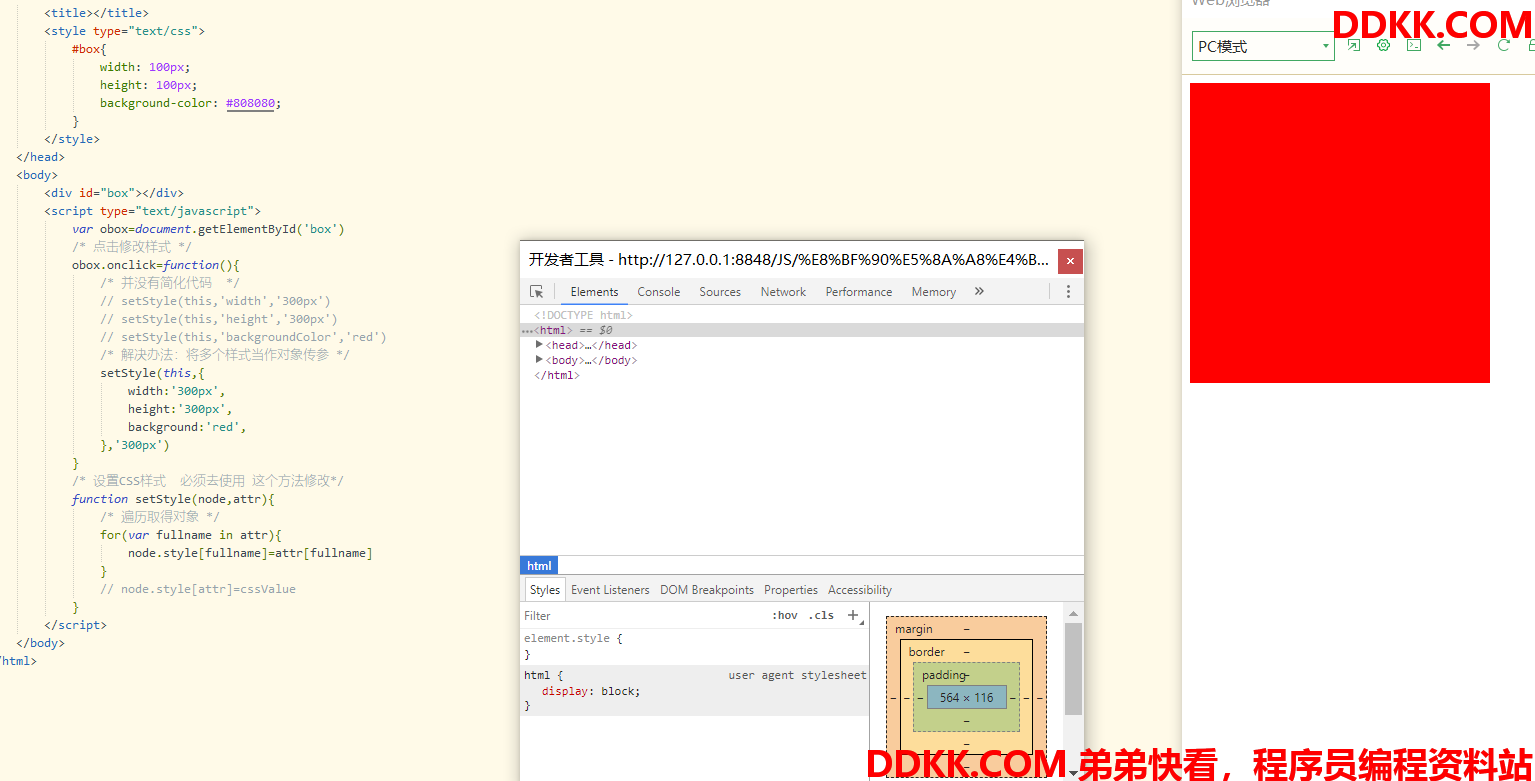
上图中,如果我们需要改变css样式,在普通的方式下,可能就是多次调用同一个函数,但是这不仅没有达到我们使用函数的意义,而且也造成代码过多。因此我们可以利用对象去实现多个样式合并,在利用循环进行设置。
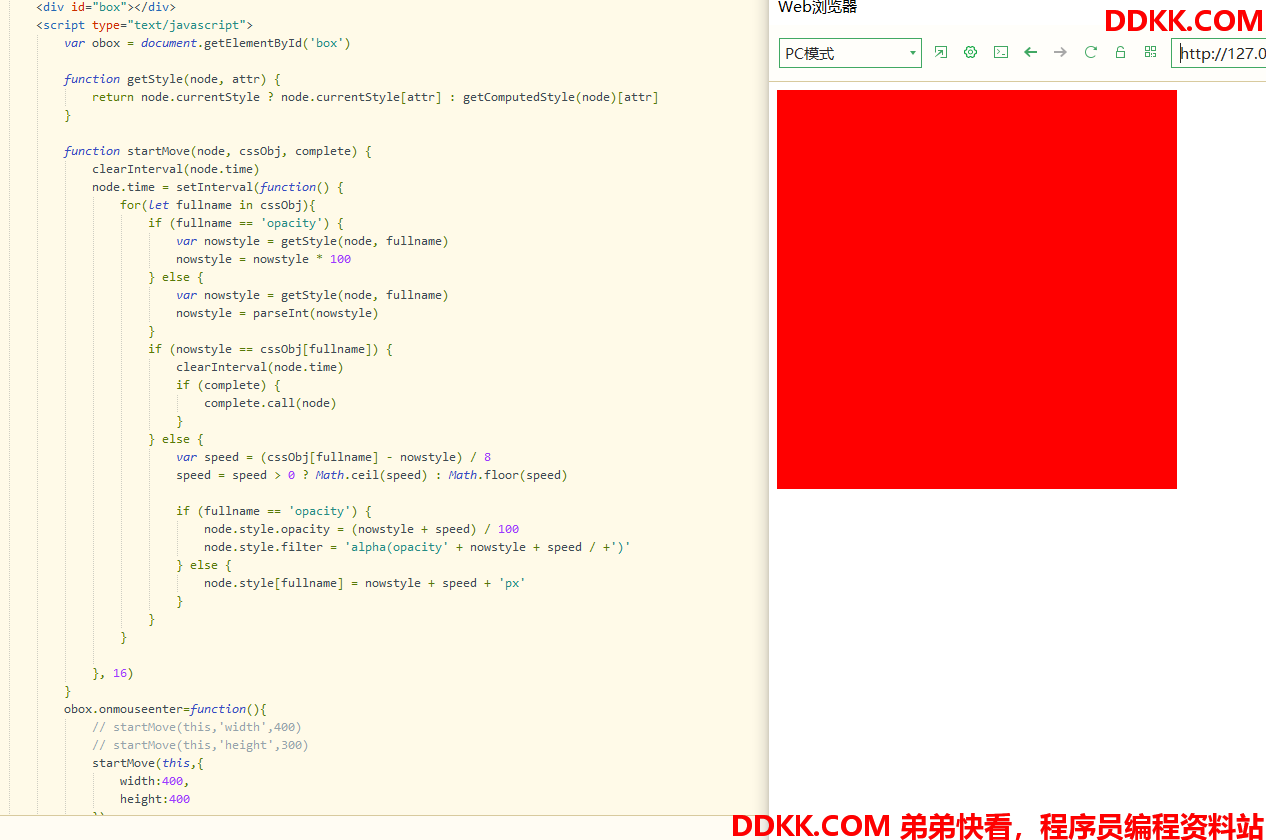
同理,我们的想要在同一个定时器中,实现多个样式设置也是一样的道理,选择对象合并样式,并用循环逐个输出改变样式。结果如下图:
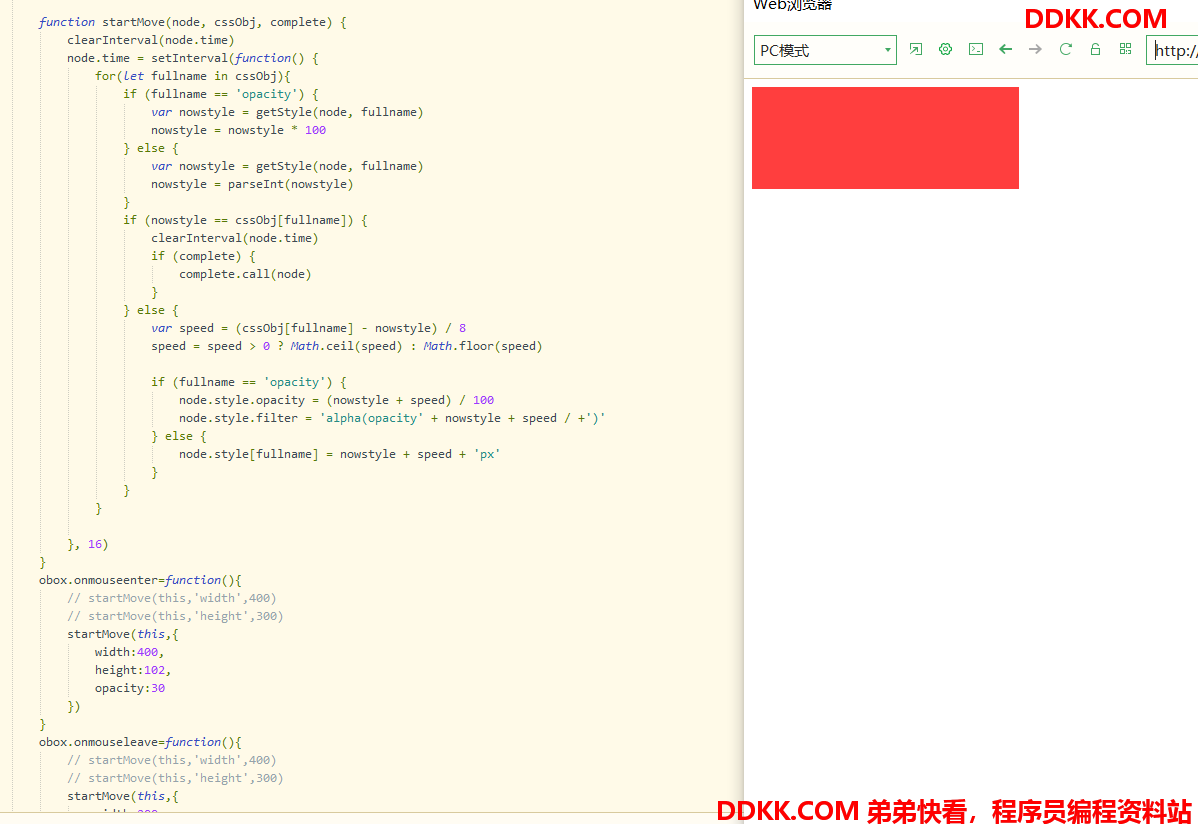
但是存在一个bug,如果我其中某个样式已经达到目的值,那么定时器就会提前关闭,例如下图:
解决:当最后一个动画达到目的值才能关闭定时器。
首先:我们也可以选择不关闭定时器。但是回调函数无法执行
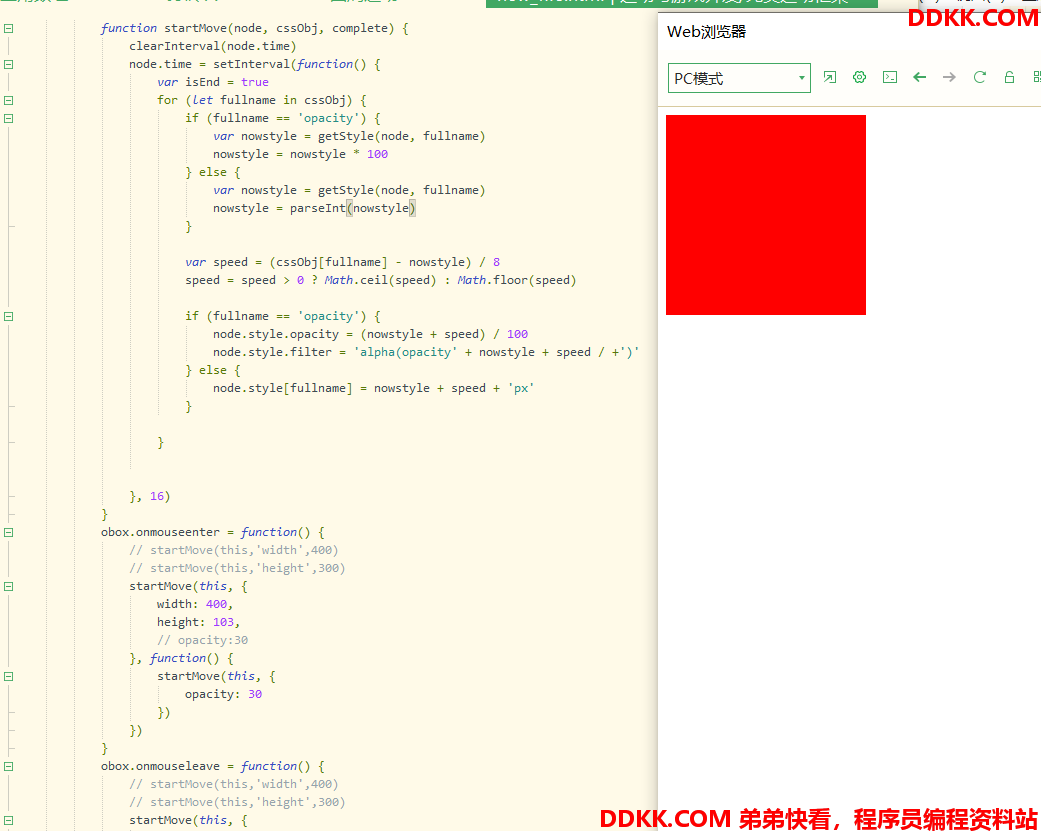
因此实际解决的办法是:每隔16ms都重新设置一个变量,去判断是否所有的样式都到达了目的,如果最后的变量没有改变,证明所有的样式已经达到目的值可以关闭执行回调函数了。
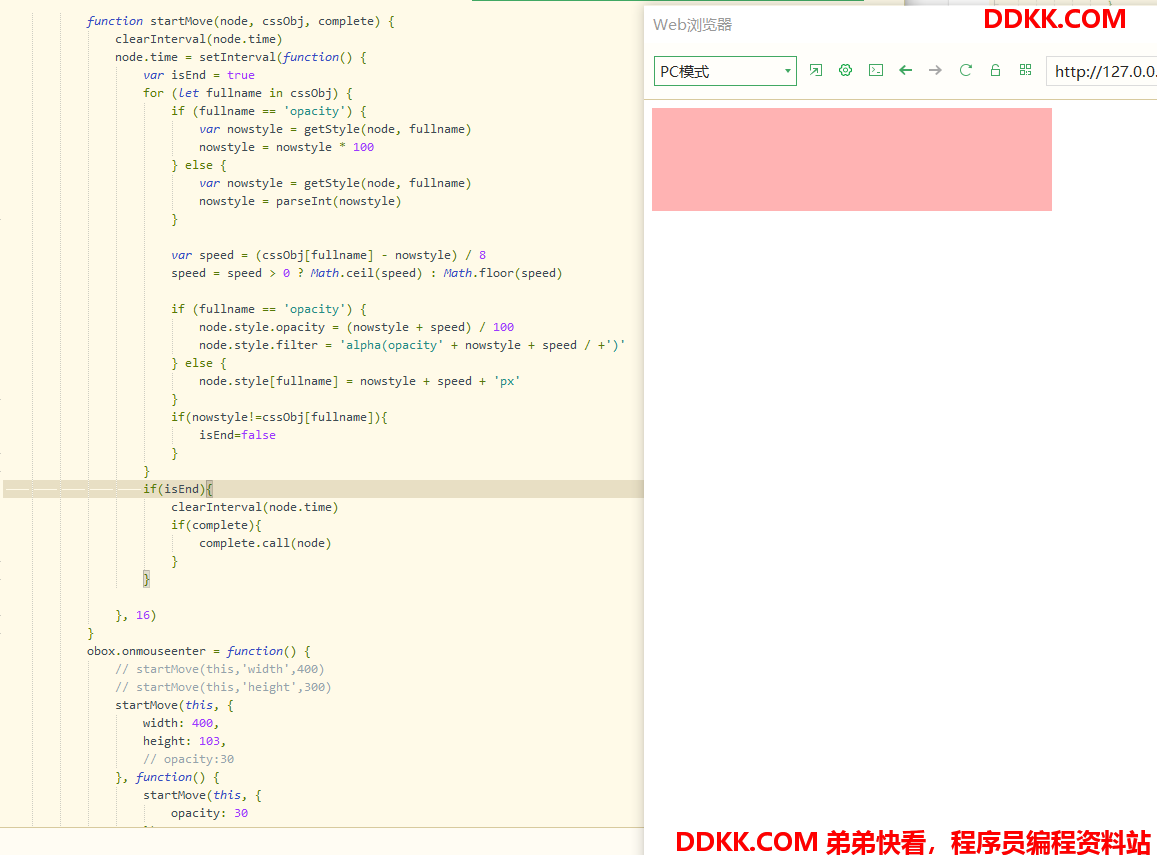
完美运动框架最终版:
function getStyle(node, attr) {
				return node.currentStyle ? node.currentStyle[attr] : getComputedStyle(node)[attr]
			}
					function startMove(node, cssObj, complete) {
						clearInterval(node.time)
						node.time = setInterval(function() {
							var isEnd = true
							for (let fullname in cssObj) {
								if (fullname == 'opacity') {
									var nowstyle = getStyle(node, fullname)
									nowstyle = nowstyle * 100
								} else {
									var nowstyle = getStyle(node, fullname)
									nowstyle = parseInt(nowstyle)
								}
								if(nowstyle!=cssObj[fullname]){
									isEnd=false
									var speed=-5
									if (fullname == 'opacity') {
										node.style.opacity = (nowstyle + speed) / 100
										node.style.filter = 'alpha(opacity' + nowstyle + speed / +')'
									} else {
										node.style[fullname] = nowstyle + speed + 'px'
									}
								}
							}
							if(isEnd){
								clearInterval(node.time)
								if(complete){
									complete.call(node)
								}
							}
						}, 16)
					}
案例:多图片放大缩小
注:如果实现中心放大,不要去改变定位的left和top值,可以使用margin。好处:不用获取当前的left和top值。
补充:文档流转换:相对定位转绝对定位
将所有相对定位时的left、top值赋值给left和top(node.style.left=node.offsetLeft),因为绝对定位在使用currentStyle(getComputedStyle)获取的top和left值都是auto。
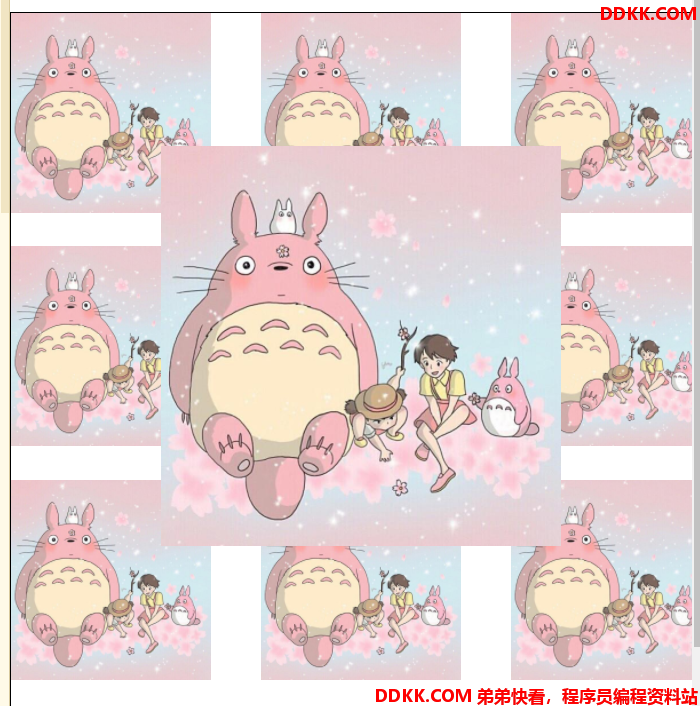
<!DOCTYPE html>
<html>
	<head>
		<meta charset="utf-8">
		<title></title>
		<script type="text/javascript" src="../new_file.js"></script>
		<style type="text/css">
			* {
				margin: 0;
				padding: 0;
			}
			#main {
				margin: 100px auto;
				width: 700px;
				height: 700px;
				border: 1px solid black;
				display: flex;
				flex-wrap: wrap;
				justify-content: space-between;
			}
			.box {
				width: 200px;
				height: 200px;
				position: relative
			}
			img {
				position: absolute;
				width: 200px;
				height: 200px;
			}
		</style>
	</head>
	<body>
		<div id="main">
			<div class="box">
				<img src="龙猫.jpeg" alt="">
			</div>
			<div class="box">
				<img src="龙猫.jpeg" alt="">
			</div>
			<div class="box">
				<img src="龙猫.jpeg" alt="">
			</div>
			<div class="box">
				<img src="龙猫.jpeg" alt="">
			</div>
			<div class="box">
				<img src="龙猫.jpeg" alt="">
			</div>
			<div class="box">
				<img src="龙猫.jpeg" alt="">
			</div>
			<div class="box">
				<img src="龙猫.jpeg" alt="">
			</div>
			<div class="box">
				<img src="龙猫.jpeg" alt="">
			</div>
			<div class="box">
				<img src="龙猫.jpeg" alt="">
			</div>
		</div>
		<script type="text/javascript">
			var aimg = document.getElementsByTagName('img')
			for (let i = 0; i < aimg.length; i++) {
				aimg[i].onmouseenter = function() {
					this.style.zIndex = 2
					startMove(this, {
						width: 400,
						height: 400,
						/* 中心放大 */
						marginLeft: -100,
						marginTop: -100
					})
				}
				aimg[i].onmouseleave = function() {
					this.style.zIndex = 1
					startMove(this, {
						width: 200,
						height: 200,
						marginLeft: 0,
						marginTop: 0
					})
				}
			}
		</script>
	</body>
</html>
案例:
轮播图:
1、 注意最后一个转到第一个转变(准备两张图片,两个图片容器);
2、 指示点与当前展现图片关系(left与全局变量point);
3、 指示点与左右箭头的关系(point);

<!DOCTYPE html>
<html>
	<head>
		<meta charset="utf-8">
		<title></title>
		<style type="text/css">
			* {
				margin: 0;
				padding: 0;
			}
			li {
				list-style: none;
			}
			#box {
				width: 500px;
				margin: 100px auto;
				position: relative;
				overflow: hidden;
				display: flex;
			}
			#main {
				font-size: 0;
				position: absolute;
				width: 500px;
				height: 300px;
				border: 1px solid black;
				z-index: 2;
			}
			#image {
				width: 3000px;
				height: 300px;
				display: flex;
			}
			img {
				display: inline-block;
				width: 500px;
				height: 300px;
			}
			#point {
				position: absolute;
				bottom: 5px;
				z-index: 3;
				left: 50%;
				transform: translate(-50%);
			}
			#point ul {
				display: flex;
				width: 100px;
				justify-content: space-between;
			}
			#point li {
				width: 16px;
				height: 16px;
				border-radius: 8px;
				background-color:DAA520;
			}
			#arrowsL,
			#arrowsR {
				width: 50px;
				height: 50px;
				background-color:DAA520;
				line-height: 50px;
				border-radius: 25px;
				font-size: 25px;
				color: gold;
				text-align: center;
				position: absolute;
				z-index: 3;
				top: 50%;
				transform: translateY(-50%);
			}
			#arrowsL {
				left: 0;
			}
			#arrowsR {
				right: 0;
			}
		</style>
	</head>
	<body>
		<div id="box">
			<div id="main"></div>
			<div id="image">
				<img src="./龙猫.jpeg">
				<img src="./可爱二.jpg">
				<img src="./龙猫.jpeg">
				<img src="./可爱二.jpg">
				<img src="./可爱1.jfif">
			</div>
			<!-- 循环效果 保证最后一张图转到第一张完美接替-->
			<img src="龙猫.jpeg">
			<!-- 指示点 -->
			<div id="point">
				<ul>
					<li></li>
					<li></li>
					<li></li>
					<li></li>
					<li></li>
				</ul>
			</div>
			<!-- 左右箭头 -->
			<!-- 左箭头 -->
			<div id="arrowsL"><</div>
			<!-- 右箭头 -->
			<div id="arrowsR">></div>
		</div>
		<script type="text/javascript">
			var oImage = document.getElementById('image')
			var obox = document.getElementById('box')
			var oPoint = document.getElementById('point')
			var ali = oPoint.getElementsByTagName('li')
			var oL = document.getElementById('arrowsL')
			var oR = document.getElementById('arrowsR')
			console.log(oImage.offsetWidth)
			function getStyle(node, attr) {
				return node.currentStyle ? node.currentStyle[attr] : getComputedStyle(node)[attr]
			}
			/* 运动框架 */
			function startMove(node, cssObj, complete) {
				clearInterval(node.time)
				node.time = setInterval(function() {
					var isEnd = true
					for (let fullname in cssObj) {
						var nowstyle = getStyle(node, fullname)
						nowstyle = parseInt(nowstyle)
						if (nowstyle != cssObj[fullname]) {
							isEnd = false
							var speed = -1
							node.style[fullname] = nowstyle + speed + 'px'
							/* 每次运动都判断哪个指示点变量 */
							changePoint(node)
						}
					}
					if (isEnd) {
						clearInterval(node.time)
						if (complete) {
							complete.call(node)
							/* 循环进行 */
							return move()
						}
					}
				}, 16)
			}
			/* 图片基本运动 */
			function move() {
				// 获取图片容器的宽度
				var left = oImage.offsetWidth
				/* 图片容器向左移动 */
				startMove(oImage, {
					marginLeft: -left
				}, function() {
					oImage.style.marginLeft = 0 + 'px'
				})
			}
			move()
			/* 指示点 */
			/* 指示点动态变化 */
			let point = 0
			function changePoint(node) {
				point = Math.abs(parseInt(node.offsetLeft / 500)) % 5 + 1
				for (let j = 0; j < ali.length; j++) {
					ali[j].style.backgroundColor = 'DAA520'
				}
				if (point == 5) {
					point = 0
				}
				console.log(point)
				ali[point].style.backgroundColor = 'antiquewhite'
			}
			for (let i = 0; i < ali.length; i++) {
				/* 鼠标移入指示点 */
				ali[i].onmouseover = function() {
					for (let j = 0; j < ali.length; j++) {
						ali[j].style.backgroundColor = 'DAA520'
					}
					ali[i].style.backgroundColor = 'antiquewhite'
					oImage.style.marginLeft = -i * obox.offsetWidth + 'px'
					clearInterval(oImage.time)
				}
				/* 鼠标移出指示点 */
				ali[i].onmouseleave = function() {
					move()
				}
			}
			/* 左右箭头 */
			var change = function(node) {
				clearInterval(oImage.time)
				oImage.style.marginLeft = -point * obox.offsetWidth + 'px'
				node.style.backgroundColor = 'antiquewhite'
			}
			var resetcolor = function(node) {
				node.style.backgroundColor = '#DAA520'
				move()
			}
			oL.onmouseenter = function() {
				change(oL)
				oL.onclick = function() {
					point--;
					if (point == -1) {
						point = ali.length - 1
					}
					for (let j = 0; j < ali.length; j++) {
						ali[j].style.backgroundColor = 'DAA520'
					}
					console.log(point)
					oImage.style.marginLeft = -point * obox.offsetWidth + 'px'
					ali[point].style.backgroundColor = 'antiquewhite'
				}
			}
			oR.onmouseenter = function() {
				change(oR)
				oR.onclick = function() {
					point++;
					if (point == 5) {
						point = 0
					}
					for (let j = 0; j < ali.length; j++) {
						ali[j].style.backgroundColor = 'DAA520'
					}
					oImage.style.marginLeft = -point * obox.offsetWidth + 'px'
					ali[point].style.backgroundColor = 'antiquewhite'
				}
			}
			oL.onmouseleave = function() {
				resetcolor(oL)
			}
			oR.onmouseleave = function() {
				resetcolor(oR)
			}
		</script>
	</body>
</html>