1. 什么是Shuffle机制
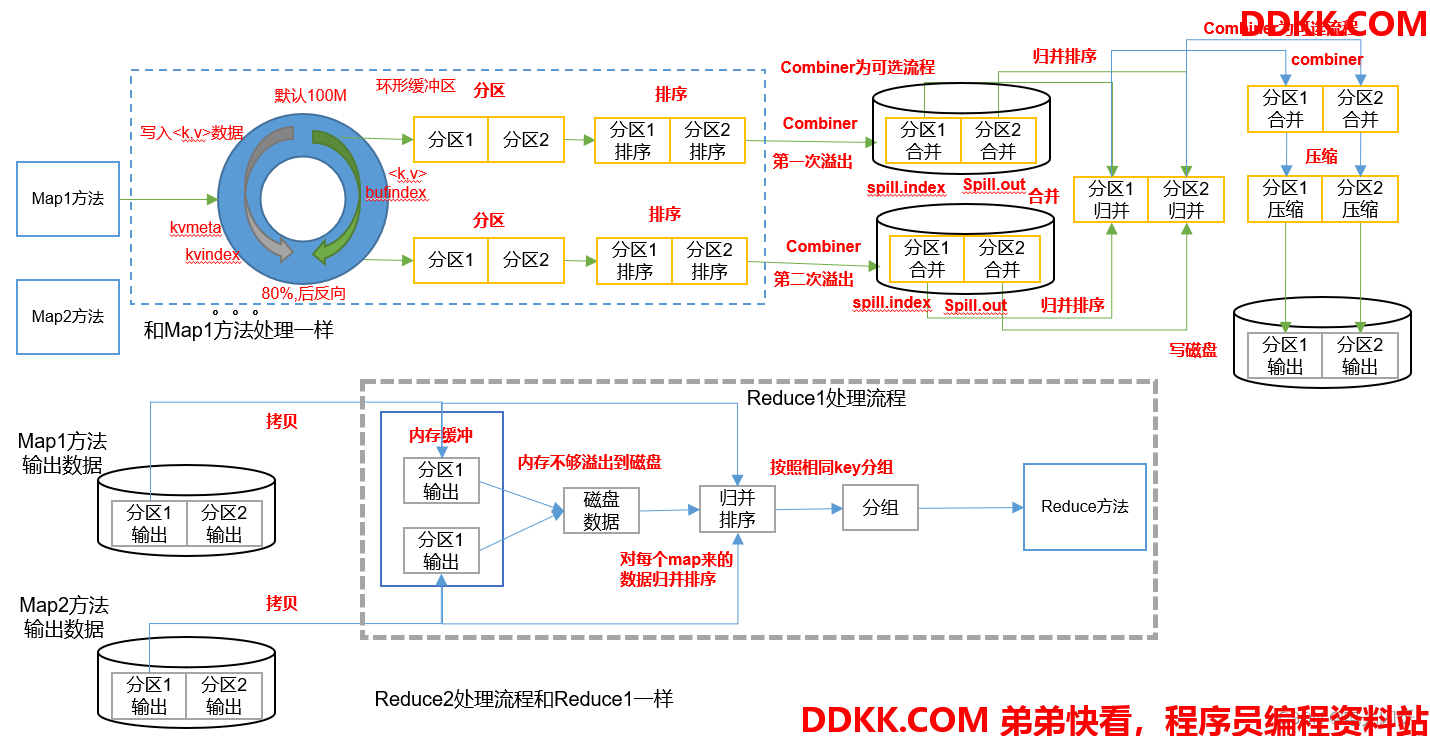
Map方法之后,Reduce方法之前的数据处理过程称之为Shuffle。
2. Partition分区
2.1. 什么是Partition分区
要求将统计结果按照条件输出到不同文件中(分区)。比如:将统计结果按照手机归属地不同省份输出到不同文件中(分区)
2.2. 默认Partitioner分区
public class HashPartitioner<K, V> extends Partitioner<K, V> {
  public int getPartition(K key, V value, int numReduceTasks) {
    return (key.hashCode() & Integer.MAX_VALUE) % numReduceTasks;
  }
}
默认分区是根据key的hashCode对ReduceTasks个数取模得到的。用户没法控制哪个key存储到哪个分区。
2.3. 自定义Partitioner步骤
1)自定义类继承Partitioner,重写getPartition()方法
public class CustomPartitioner extends Partitioner<Text, FlowBean> {
	@Override
	public int getPartition(Text key, FlowBean value, int numPartitions) {
         // 控制分区代码逻辑
    … …
		return partition;
	}
}
2)在Job驱动中,设置自定义Partitioner
job.setPartitionerClass(CustomPartitioner.class);
3)自定义Partition后,要根据自定义Partitioner的逻辑设置相应数量的ReduceTask
job.setNumReduceTasks(5);
2.4. 分区总结
- 如果ReduceTask的数量> getPartition的结果数,则会多产生几个空的输出文件part-r-000xx;
- 如果1<ReduceTask的数量<getPartition的结果数,则有一部分分区数据无处安放,会Exception;
- 如果ReduceTask的数量=1,则不管MapTask端输出多少个分区文件,最终结果都交给这一个ReduceTask,最终也就只会产生一个结果文件 part-r-00000;
- 分区号必须从零开始,逐一累加。
2.5. 案例分析
例如:假设自定义分区数为5,则
(1)job.setNumReduceTasks(1); 会正常运行,只不过会产生一个输出文件
(2)job.setNumReduceTasks(2); 会报错
(3)job.setNumReduceTasks(6); 大于5,程序会正常运行,会产生空文件
3. Partition分区案例实操
3.1. 需求
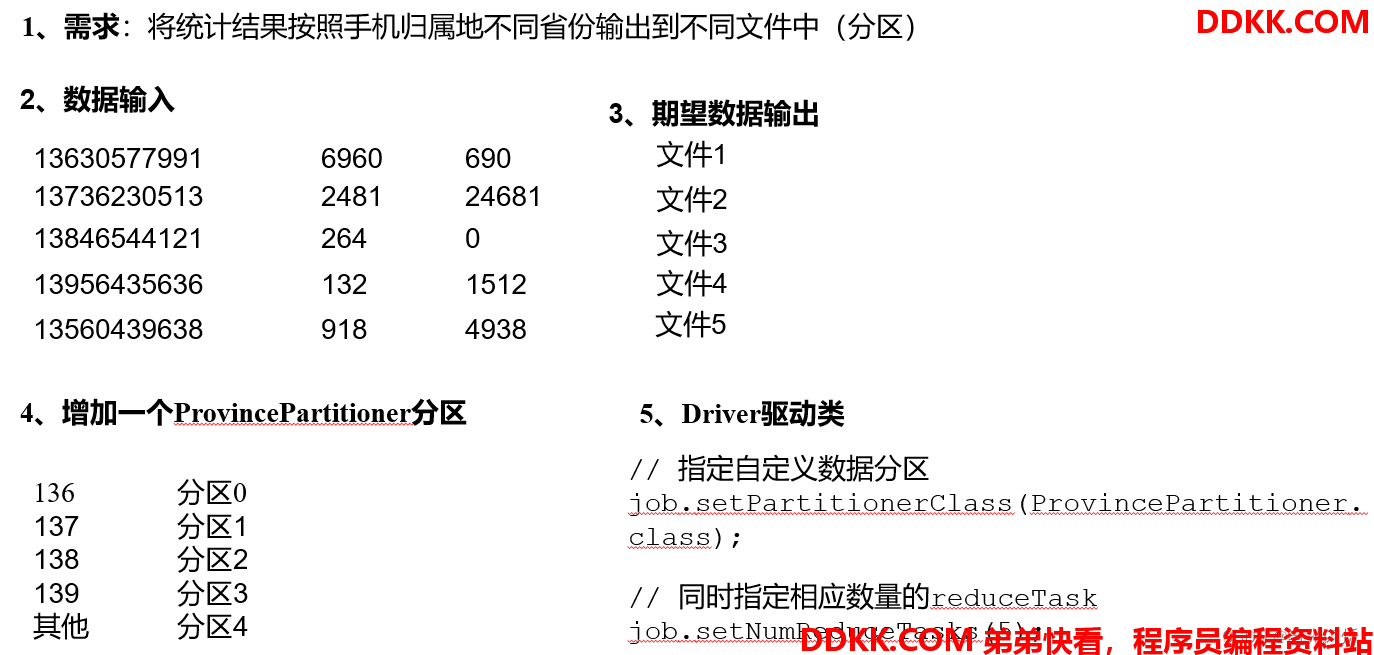
将统计结果按照手机归属地不同省份输出到不同文件中(分区)
1)输入数据
1	13736230513	192.196.100.1	www.atguigu.com	2481	24681	200
2	13846544121	192.196.100.2			264	0	200
3 	13956435636	192.196.100.3			132	1512	200
4 	13966251146	192.168.100.1			240	0	404
5 	18271575951	192.168.100.2	www.atguigu.com	1527	2106	200
6 	84188413	192.168.100.3	www.atguigu.com	4116	1432	200
7 	13590439668	192.168.100.4			1116	954	200
8 	15910133277	192.168.100.5	www.hao123.com	3156	2936	200
9 	13729199489	192.168.100.6			240	0	200
10 	13630577991	192.168.100.7	www.shouhu.com	6960	690	200
11 	15043685818	192.168.100.8	www.baidu.com	3659	3538	200
12 	15959002129	192.168.100.9	www.atguigu.com	1938	180	500
13 	13560439638	192.168.100.10			918	4938	200
14 	13470253144	192.168.100.11			180	180	200
15 	13682846555	192.168.100.12	www.qq.com	1938	2910	200
16 	13992314666	192.168.100.13	www.gaga.com	3008	3720	200
17 	13509468723	192.168.100.14	www.qinghua.com	7335	110349	404
18 	18390173782	192.168.100.15	www.sogou.com	9531	2412	200
19 	13975057813	192.168.100.16	www.baidu.com	11058	48243	200
20 	13768778790	192.168.100.17			120	120	200
21 	13568436656	192.168.100.18	www.alibaba.com	2481	24681	200
22 	13568436656	192.168.100.19			1116	954	200
2)期望输出数据
手机号136、137、138、139开头都分别放到一个独立的4个文件中,其他开头的放到一个文件中。
3.2. 需求分析
3.3. 具体代码
上述案例具体代码在博主的另一篇博文中(Hadoop(11):Hadoop序列化 中的第3节)已有,当进行自定义分区时,需要添加如下分区类:
import org.apache.hadoop.io.Text;
import org.apache.hadoop.mapreduce.Partitioner;
public class ProvincePartitioner extends Partitioner<Text, FlowBean> {
    @Override
    public int getPartition(Text text, FlowBean flowBean, int numPartitions) {
        //获取手机号前三位prePhone
        String phone = text.toString();
        String prePhone = phone.substring(0, 3);
        //定义一个分区号变量partition,根据prePhone设置分区号
        int partition;
        if("136".equals(prePhone)){
            partition = 0;
        }else if("137".equals(prePhone)){
            partition = 1;
        }else if("138".equals(prePhone)){
            partition = 2;
        }else if("139".equals(prePhone)){
            partition = 3;
        }else {
            partition = 4;
        }
        //最后返回分区号partition
        return partition;
    }
}
3.4. 在驱动函数中增加自定义数据分区设置和ReduceTask设置
import org.apache.hadoop.conf.Configuration;
import org.apache.hadoop.fs.Path;
import org.apache.hadoop.io.Text;
import org.apache.hadoop.mapreduce.Job;
import org.apache.hadoop.mapreduce.lib.input.FileInputFormat;
import org.apache.hadoop.mapreduce.lib.output.FileOutputFormat;
import java.io.IOException;
public class FlowDriver {
    public static void main(String[] args) throws IOException, ClassNotFoundException, InterruptedException {
        //1 获取job对象
        Configuration conf = new Configuration();
        Job job = Job.getInstance(conf);
        //2 关联本Driver类
        job.setJarByClass(FlowDriver.class);
        //3 关联Mapper和Reducer
        job.setMapperClass(FlowMapper.class);
        job.setReducerClass(FlowReducer.class);
        //4 设置Map端输出数据的KV类型
        job.setMapOutputKeyClass(Text.class);
        job.setMapOutputValueClass(FlowBean.class);
        //5 设置程序最终输出的KV类型
        job.setOutputKeyClass(Text.class);
        job.setOutputValueClass(FlowBean.class);
        //8 指定自定义分区器
        job.setPartitionerClass(ProvincePartitioner.class);
        //9 同时指定相应数量的ReduceTask
        job.setNumReduceTasks(5);
        //6 设置输入输出路径
        FileInputFormat.setInputPaths(job, new Path("D:\\inputflow"));
        FileOutputFormat.setOutputPath(job, new Path("D\\partitionout"));
        //7 提交Job
        boolean b = job.waitForCompletion(true);
        System.exit(b ? 0 : 1);
    }
}
4. WritableComparable排序
4.1. 排序概述
排序是MapReduce框架中最重要的操作之一。MapTask和ReduceTask均会对数据按照key进行排序。该操作属于Hadoop的默认行为。任何应用程序中的数据均会被排序,而不管逻辑上是否需要。默认排序是按照字典顺序排序,且实现该排序的方法是快速排序。
对于MapTask,它会将处理的结果暂时放到环形缓冲区中,当环形缓冲区使用率达到一定阈值后,再对缓冲区中的数据进行一次快速排序,并将这些有序数据溢写到磁盘上,而当数据处理完毕后,它会对磁盘上所有文件进行归并排序。
对于ReduceTask,它从每个MapTask上远程拷贝相应的数据文件,如果文件大小超过一定阈值,则溢写磁盘上,否则存储在内存中。如果磁盘上文件数目达到一定阈值,则进行一次归并排序以生成一个更大文件;如果内存中文件大小或者数目超过一定阈值,则进行一次合并后将数据溢写到磁盘上。当所有数据拷贝完毕后,ReduceTask统一对内存和磁盘上的所有数据进行一次归并排序。
4.2. 排序分类
(1)部分排序:MapReduce根据输入记录的键对数据集排序。保证输出的每个文件内部有序。
(2)全排序:最终输出结果只有一个文件,且文件内部有序。实现方式是只设置一个ReduceTask。但该方法在处理大型文件时效率极低,因为一台机器处理所有文件,完全丧失了MapReduce所提供的并行架构。
(3)辅助排序:(GroupingComparator分组),在Reduce端对key进行分组。应用于:在接收的key为bean对象时,想让一个或几个字段相同(全部字段比较不相同)的key进入到同一个reduce方法时,可以采用分组排序。
(4)二次排序:在自定义排序过程中,如果compareTo中的判断条件为两个即为二次排序。
4.3. 自定义排序WritableComparable原理分析
bean对象做为key传输,需要实现WritableComparable接口重写compareTo方法,就可以实现排
@Override
public int compareTo(FlowBean bean) {
	int result;
	// 按照总流量大小,倒序排列
	if (this.sumFlow > bean.getSumFlow()) {
		result = -1;
	}else if (this.sumFlow < bean.getSumFlow()) {
		result = 1;
	}else {
		result = 0;
	}
	return result;
}
5. WritableComparable排序案例实操(全排序)
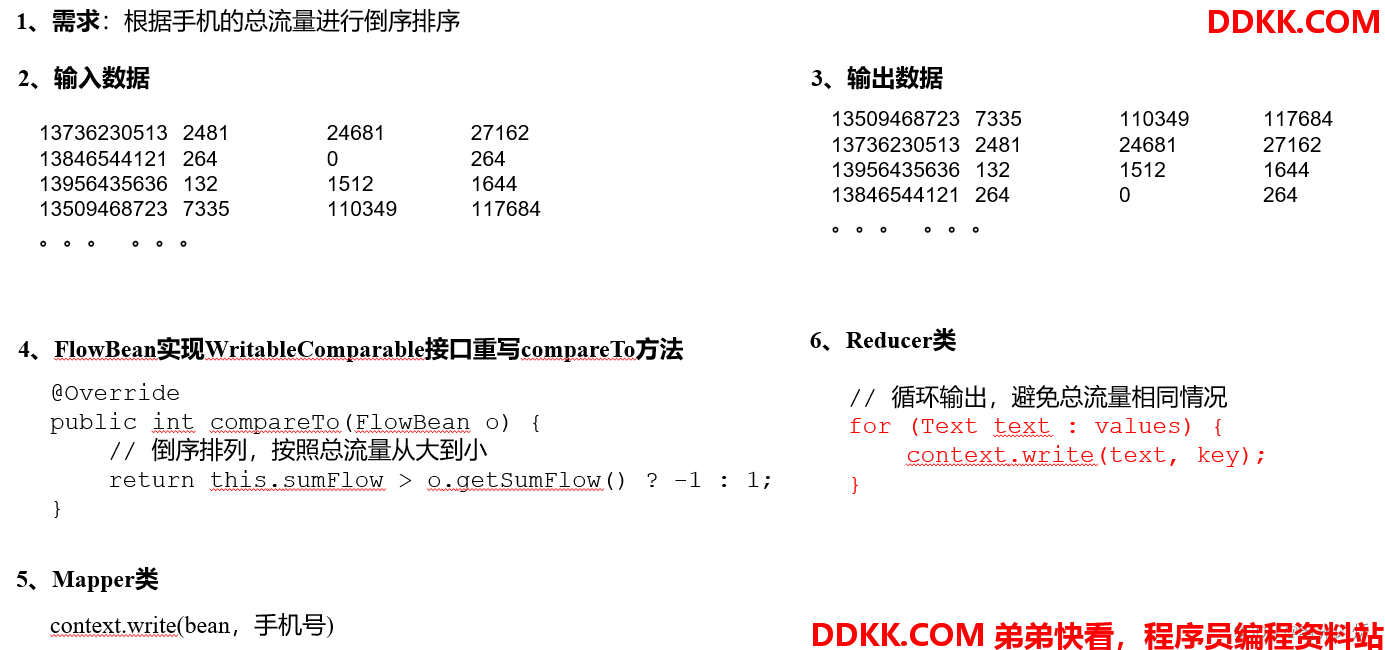
5.1. 需求
根据Hadoop(11):Hadoop序列化 中的第三节案例产生的结果再次对总流量进行倒序排序。
1)输入数据
原始数据:
1	13736230513	192.196.100.1	www.atguigu.com	2481	24681	200
2	13846544121	192.196.100.2			264	0	200
3 	13956435636	192.196.100.3			132	1512	200
4 	13966251146	192.168.100.1			240	0	404
5 	18271575951	192.168.100.2	www.atguigu.com	1527	2106	200
6 	84188413	192.168.100.3	www.atguigu.com	4116	1432	200
7 	13590439668	192.168.100.4			1116	954	200
8 	15910133277	192.168.100.5	www.hao123.com	3156	2936	200
9 	13729199489	192.168.100.6			240	0	200
10 	13630577991	192.168.100.7	www.shouhu.com	6960	690	200
11 	15043685818	192.168.100.8	www.baidu.com	3659	3538	200
12 	15959002129	192.168.100.9	www.atguigu.com	1938	180	500
13 	13560439638	192.168.100.10			918	4938	200
14 	13470253144	192.168.100.11			180	180	200
15 	13682846555	192.168.100.12	www.qq.com	1938	2910	200
16 	13992314666	192.168.100.13	www.gaga.com	3008	3720	200
17 	13509468723	192.168.100.14	www.qinghua.com	7335	110349	404
18 	18390173782	192.168.100.15	www.sogou.com	9531	2412	200
19 	13975057813	192.168.100.16	www.baidu.com	11058	48243	200
20 	13768778790	192.168.100.17			120	120	200
21 	13568436656	192.168.100.18	www.alibaba.com	2481	24681	200
22 	13568436656	192.168.100.19			1116	954	200
第一次处理后的数据:
13470253144	180	180	360
13509468723	7335	110349	117684
13560439638	918	4938	5856
13568436656	3597	25635	29232
13590439668	1116	954	2070
13630577991	6960	690	7650
13682846555	1938	2910	4848
13729199489	240	0	240
13736230513	2481	24681	27162
13768778790	120	120	240
13846544121	264	0	264
13956435636	132	1512	1644
13966251146	240	0	240
13975057813	11058	48243	59301
13992314666	3008	3720	6728
15043685818	3659	3538	7197
15910133277	3156	2936	6092
15959002129	1938	180	2118
18271575951	1527	2106	3633
18390173782	9531	2412	11943
84188413	4116	1432	5548
2)期望输出的数据:
13509468723	7335	110349	117684
13736230513	2481	24681	27162
13956435636	132		1512	1644
13846544121	264		0		264
。。。 。。。
5.2. 需求分析
5.3. 代码实现
1)FlowBean对象在在需求1基础上增加了比较功能
import org.apache.hadoop.io.WritableComparable;
import java.io.DataInput;
import java.io.DataOutput;
import java.io.IOException;
public class FlowBean implements WritableComparable<FlowBean> {
    private long upFlow; //上行流量
    private long downFlow; //下行流量
    private long sumFlow; //总流量
    //提供无参构造
    public FlowBean() {
    }
    //生成三个属性的getter和setter方法
    public long getUpFlow() {
        return upFlow;
    }
    public void setUpFlow(long upFlow) {
        this.upFlow = upFlow;
    }
    public long getDownFlow() {
        return downFlow;
    }
    public void setDownFlow(long downFlow) {
        this.downFlow = downFlow;
    }
    public long getSumFlow() {
        return sumFlow;
    }
    public void setSumFlow(long sumFlow) {
        this.sumFlow = sumFlow;
    }
    public void setSumFlow() {
        this.sumFlow = this.upFlow + this.downFlow;
    }
    //实现序列化和反序列化方法,注意顺序一定要一致
    @Override
    public void write(DataOutput out) throws IOException {
        out.writeLong(this.upFlow);
        out.writeLong(this.downFlow);
        out.writeLong(this.sumFlow);
    }
    @Override
    public void readFields(DataInput in) throws IOException {
        this.upFlow = in.readLong();
        this.downFlow = in.readLong();
        this.sumFlow = in.readLong();
    }
    //重写ToString,最后要输出FlowBean
    @Override
    public String toString() {
        return upFlow + "\t" + downFlow + "\t" + sumFlow;
    }
    @Override
    public int compareTo(FlowBean o) {
        //按照总流量比较,倒序排列
        if(this.sumFlow > o.sumFlow){
            return -1;
        }else if(this.sumFlow < o.sumFlow){
            return 1;
        }else {
            return 0;
        }
    }
}
2)编写Mapper类
import org.apache.hadoop.io.LongWritable;
import org.apache.hadoop.io.Text;
import org.apache.hadoop.mapreduce.Mapper;
import java.io.IOException;
public class FlowMapper extends Mapper<LongWritable, Text, FlowBean, Text> {
    private FlowBean outK = new FlowBean();
    private Text outV = new Text();
    @Override
    protected void map(LongWritable key, Text value, Context context) throws IOException, InterruptedException {
        //1 获取一行数据
        String line = value.toString();
        //2 按照"\t",切割数据
        String[] split = line.split("\t");
        //3 封装outK outV
        outK.setUpFlow(Long.parseLong(split[1]));
        outK.setDownFlow(Long.parseLong(split[2]));
        outK.setSumFlow();
        outV.set(split[0]);
        //4 写出outK outV
        context.write(outK,outV);
    }
}
3)编写Reducer类
import org.apache.hadoop.io.Text;
import org.apache.hadoop.mapreduce.Reducer;
import java.io.IOException;
public class FlowReducer extends Reducer<FlowBean, Text, Text, FlowBean> {
    @Override
    protected void reduce(FlowBean key, Iterable<Text> values, Context context) throws IOException, InterruptedException {
        //遍历values集合,循环写出,避免总流量相同的情况
        for (Text value : values) {
            //调换KV位置,反向写出
            context.write(value,key);
        }
    }
}
4)编写Driver类
import org.apache.hadoop.conf.Configuration;
import org.apache.hadoop.fs.Path;
import org.apache.hadoop.io.Text;
import org.apache.hadoop.mapreduce.Job;
import org.apache.hadoop.mapreduce.lib.input.FileInputFormat;
import org.apache.hadoop.mapreduce.lib.output.FileOutputFormat;
import java.io.IOException;
public class FlowDriver {
    public static void main(String[] args) throws IOException, ClassNotFoundException, InterruptedException {
        //1 获取job对象
        Configuration conf = new Configuration();
        Job job = Job.getInstance(conf);
        //2 关联本Driver类
        job.setJarByClass(FlowDriver.class);
        //3 关联Mapper和Reducer
        job.setMapperClass(FlowMapper.class);
        job.setReducerClass(FlowReducer.class);
        //4 设置Map端输出数据的KV类型
        job.setMapOutputKeyClass(FlowBean.class);
        job.setMapOutputValueClass(Text.class);
        //5 设置程序最终输出的KV类型
        job.setOutputKeyClass(Text.class);
        job.setOutputValueClass(FlowBean.class);
        //6 设置输入输出路径
        FileInputFormat.setInputPaths(job, new Path("D:\\inputflow2"));
        FileOutputFormat.setOutputPath(job, new Path("D:\\comparout"));
        //7 提交Job
        boolean b = job.waitForCompletion(true);
        System.exit(b ? 0 : 1);
    }
}
6. WritableComparable排序案例实操(区内排序)
6.1. 需求
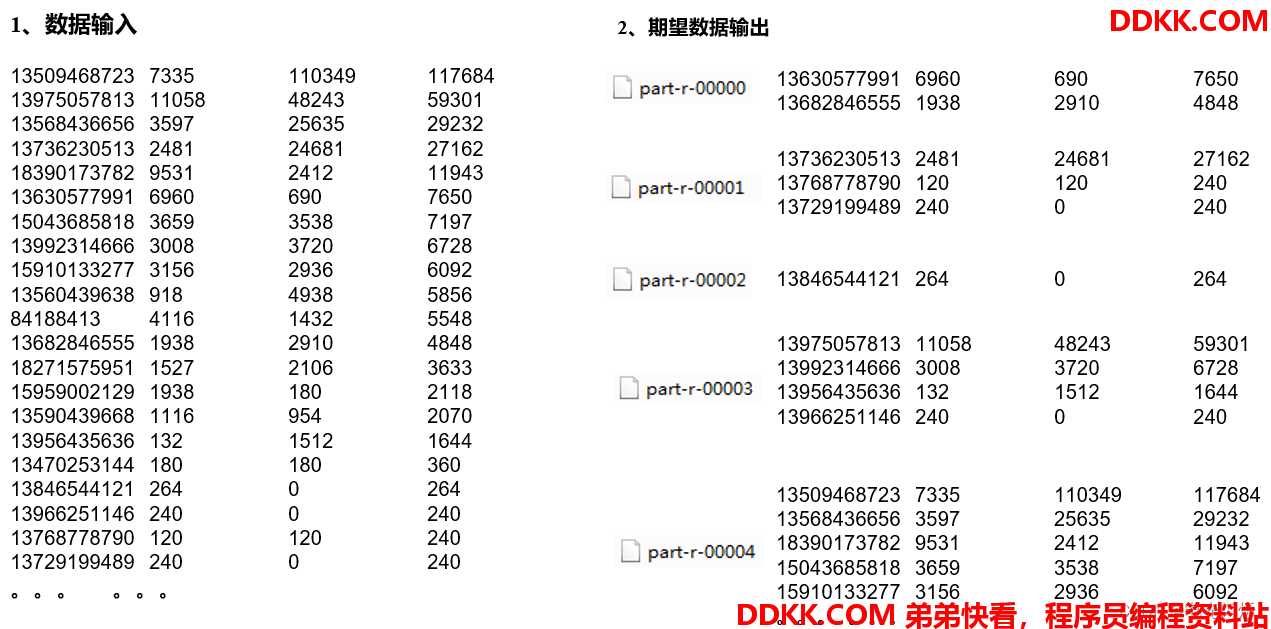
要求每个省份手机号输出的文件中按照总流量内部排序。
6.2. 需求分析
基于前一个需求,增加自定义分区类,分区按照省份手机号设置。
6.3. 案例实操
1)增加自定义分区类
import org.apache.hadoop.io.Text;
import org.apache.hadoop.mapreduce.Partitioner;
public class ProvincePartitioner2 extends Partitioner<FlowBean, Text> {
    @Override
    public int getPartition(FlowBean flowBean, Text text, int numPartitions) {
        //获取手机号前三位
        String phone = text.toString();
        String prePhone = phone.substring(0, 3);
        //定义一个分区号变量partition,根据prePhone设置分区号
        int partition;
        if("136".equals(prePhone)){
            partition = 0;
        }else if("137".equals(prePhone)){
            partition = 1;
        }else if("138".equals(prePhone)){
            partition = 2;
        }else if("139".equals(prePhone)){
            partition = 3;
        }else {
            partition = 4;
        }
        //最后返回分区号partition
        return partition;
    }
}
2)在驱动类中添加分区类
// 设置自定义分区器
job.setPartitionerClass(ProvincePartitioner2.class);
// 设置对应的ReduceTask的个数
job.setNumReduceTasks(5);
7. Combiner合并
7.1. 概述
(1)Combiner是MR程序中Mapper和Reducer之外的一种组件。
(2)Combiner组件的父类就是Reducer。
(3)Combiner和Reducer的区别在于运行的位置
Combiner是在每一个MapTask所在的节点运行;
Reducer是接收全局所有Mapper的输出结果;
(4)Combiner的意义就是对每一个MapTask的输出进行局部汇总,以减小网络传输量。
(5)Combiner能够应用的前提是不能影响最终的业务逻辑,而且,Combiner的输出kv应该跟Reducer的输入kv类型要对应起来。
Mapper Reducer 3 5 7 ->(3+5+7)/3=5 (3+5+7+2+6)/5=23/5 不等于 (5+4)/2=9/2 2 6 ->(2+6)/2=4
7.2. 自定义Combiner实现步骤
a)自定义一个Combiner继承Reducer,重写Reduce方法
public class WordCountCombiner extends Reducer<Text, IntWritable, Text, IntWritable> {
    private IntWritable outV = new IntWritable();
    @Override
    protected void reduce(Text key, Iterable<IntWritable> values, Context context) throws IOException, InterruptedException {
        int sum = 0;
        for (IntWritable value : values) {
            sum += value.get();
        }
        outV.set(sum);
        context.write(key,outV);
    }
}
b)在Job驱动类中设置:
job.setCombinerClass(WordCountCombiner.class);
8. Combiner合并案例实操
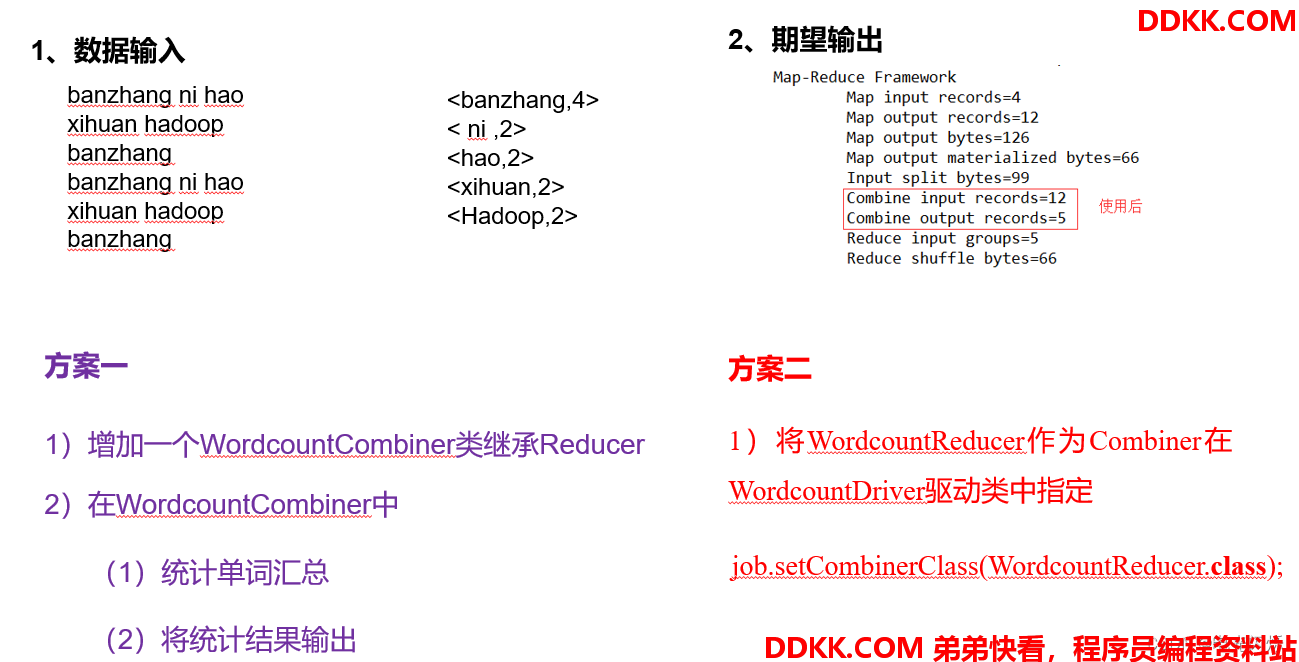
8.1. 需求
统计过程中对每一个MapTask的输出进行局部汇总,以减小网络传输量即采用Combiner功能。
1)数据输入:
banzhang ni hao
xihuan hadoop banzhang
banzhang ni hao
xihuan hadoop banzhang
2)期望输出数据:
Combine输入数据多,输出时经过合并,输出数据降低
8.2. 需求分析
8.3. 案例实操-方案一
1)增加一个WordCountCombiner类继承Reducer
import org.apache.hadoop.io.IntWritable;
import org.apache.hadoop.io.Text;
import org.apache.hadoop.mapreduce.Reducer;
import java.io.IOException;
public class WordCountCombiner extends Reducer<Text, IntWritable, Text, IntWritable> {
private IntWritable outV = new IntWritable();
    @Override
    protected void reduce(Text key, Iterable<IntWritable> values, Context context) throws IOException, InterruptedException {
        int sum = 0;
        for (IntWritable value : values) {
            sum += value.get();
        }
        //封装outKV
        outV.set(sum);
        //写出outKV
        context.write(key,outV);
    }
}
2)在WordcountDriver驱动类中指定Combiner
// 指定需要使用combiner,以及用哪个类作为combiner的逻辑
job.setCombinerClass(WordCountCombiner.class);
8.4. 案例实操-方案二
1)将WordcountReducer作为Combiner在WordcountDriver驱动类中指定
// 指定需要使用Combiner,以及用哪个类作为Combiner的逻辑
job.setCombinerClass(WordCountReducer.class);
2)运行程序,如下图所示
